
Livraison gratuite
Pergola est une structure de cour unique conçue pour créer une esthétique privée, ombragée et polyvalente pour votre espace extérieur. Que ce soit pour vous détendre ou vous divertir, la conception ouverte en fait un choix parfait pour toutes les tailles de cour ou de jardin, les piscines, les foyers, les espaces compacts et les coins. La composition majestueuse de la pergola est complétée par du bois de cèdre brun clair et des plaques décoratives en acier thermolaqué noir. Faites de la pergola votre choix en matière de structures extérieures et donnez une nouvelle vie à votre espace extérieur avec la solution parfaite à tous vos besoins de mobilier en plein air.
Super j’ai bien aimé. Nathalie. Sat Mar 18 2023

Sonne L 9 pi. Pergola en bois massif
Par Home Loft Concepts
Noté 4.3 sur 5 étoiles.37 votes au total
Livraison gratuite
Transformez votre espace extérieur avec un attrait merveilleusement esthétique tout en utilisant son plein potentiel. Magnifiquement fabriquée à partir de bois d'acacia riche, notre pergola exceptionnelle présente une structure solide et robuste qui non seulement rehausse votre espace avec une touche de charme rustique, mais offre également une multitude de fonctions. La conception triangulaire et le dessus à lattes ouvertes vous permettent de ranger cet accessoire dans un coin de votre cour ou de votre patio pour fournir à la fois de l'ombre rafraîchissante et de l'intimité pour que vous et votre famille puissiez en profiter.
This is a beautiful pergola in everyway. It is remarkably strong and exudes a rich feel. Because it is triangular, you have to measure very carefully.. Vicki. Thu May 21 2026

Pavillon de jardin permanent en métal L 9,5 pi. Pergola en bois massif
Par Backyard Discovery
Noté 5 sur 5 étoiles.1 vote au total
Livraison gratuite
La pergola Tuscany Cabana de Backyard Discovery avec mobilier de jardin extérieur intégré est une structure de cour unique conçue pour créer une esthétique privée, ombragée et polyvalente pour votre espace extérieur. Que ce soit pour vous détendre ou vous divertir, la conception à aire ouverte en fait un choix parfait pour toutes les tailles de cour ou de jardin, les piscines, les foyers, les espaces compacts et les coins. La composition majestueuse de la pergola Tuscany Cabana est complétée par du bois de cèdre brun clair et des plaques décoratives en acier thermolaqué noir. La structure du meuble en acier est entièrement intégrée pour plus de solidité et de stabilité, tandis que les coussins en tissu Sunbrella® ajoutent une touche idéale de qualité moderne et de confort durable. La table de patio fixe et les accoudoirs sont fabriqués en bois de meranti exotique. Généralement choisi pour sa résistance et sa durabilité dans la construction navale, Meranti offre une beauté et une allure peu communes qui impressionneront. Faites de la pergola Tuscany Cabana de Backyard Discovery votre choix en matière de structures extérieures et donnez une nouvelle vie à votre espace extérieur avec la solution parfaite à tous vos besoins en matière de mobilier en plein air.
I definitely shopped this particular pergola for pricing comparison which I suggest everyone does because there are many vendors who sell this product that differs in sales price. But, everything from the shipping condition of the boxes, the packing of the material (including the vacuum packed seat back cushions), the quality of the material, the instructions and hardware for each individual box, and the look after completing the installation was as expected. I have been in construction my entire life and am very handy, so I can anticipate what the overall installation would consist of, but there are a couple of areas in the installation instructions you have to watch out for especially when you get into your rhythm of the install. Step 6 - step 10, be sure that all respective joists pre-drilled hole side are turned up. For Step 12, I chose not to install the middle lag bolts on the left side and right side, two outer most joist because they aligned with the area of the beams that were overlapped which could create a split - the front and rear lags on those joist were still plenty of strength for the application. My last tip references the seating assembly - I permanently installed the Step 17, assembled the entirety of the seating area, leveled up the table (Step 18) and the sub frames (Step 20), I then fastened the table to the structure, and then permanently installed the seat supports (Step 22). The reason for installing the seating as I did is because there is a little bit of variance with squaring up the structure along with the spacing of the seat support, table, and sub frames that can affect how well the cushions fit in their areas. Overall, it was a great purchase, great price, and it looks even better in person than it does in pictures!. Anonyme. Las Vegas, NV. Tue Jul 23 2024
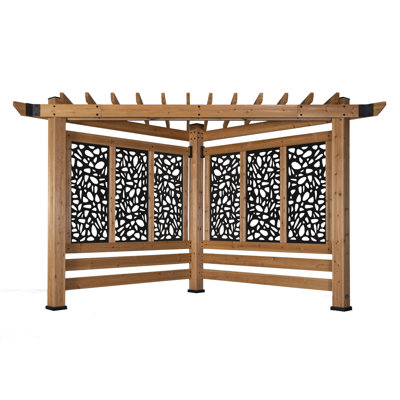
Pergola en bois massif Backyard Discovery Verona
Par Backyard Discovery
Noté 4.8 sur 5 étoiles.57 votes au total
Livraison gratuite
Pergola est une structure de cour unique conçue pour créer une esthétique privée, ombragée et polyvalente pour votre espace extérieur. Que ce soit pour vous détendre ou vous divertir, la conception à aire ouverte en fait un choix parfait pour toutes les tailles de cour ou de jardin, les piscines, les foyers, les espaces compacts et les coins. La composition majestueuse de la pergola est complétée par du bois de cèdre brun clair et des plaques décoratives en acier thermolaqué noir. Faites de la pergola votre choix en matière de structures extérieures et donnez une nouvelle vie à votre espace extérieur avec la solution parfaite à tous vos besoins de mobilier en plein air.
This has added such visual appeal to our backyard ❤️ And it is beautiful wood and hardware A Great purchase. Julia. Murrieta, CA. Wed May 08 2024