Livraison gratuite
Recevez-le entre le 27 sept.-30 sept.
à
M4C 1B5

Nombre de place: 2

Espèces de bois de pin

Outils d'assemblage inclus

Capacité de poids: 500 lb

Accumulez {RICH_TEXT_POTENTIAL_REWARDS} en récompenses, avec une remise de 5 %¹, en plus d’autres avantages exclusifs.
Couleur / motif:
Graphite

À propos de ce produit
Caractéristiques
Dimensions du produit
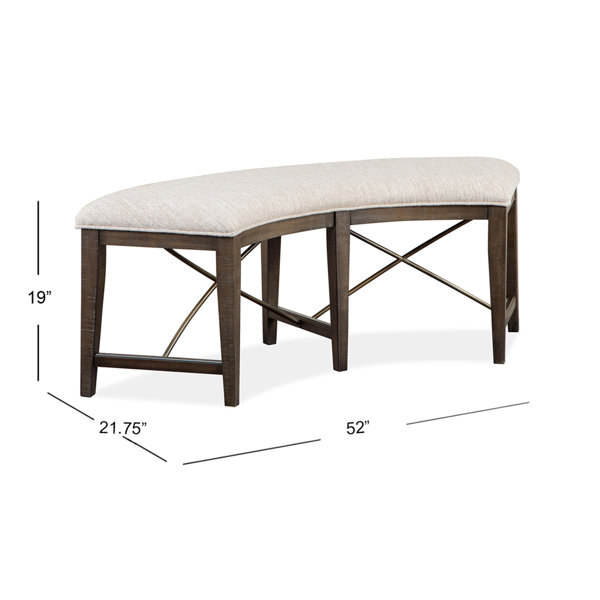
Autres dimensions
Détails
Assemblage
Garantie
Pas convaincu? Les retours sont offerts pour la plupart des articles dans les 30 jours suivant la livraison pour un remboursement ou un bon d'achat.
Apprenez-en plusNoté 4.5 sur 5 étoiles.
Avis 1-5 de 72
Noté 5 sur 5 étoiles.
Perfect for my dining area, prompt delivery, assembly not too tricky, managed with no additional support.
Noté 5 sur 5 étoiles.
Color/Pattern:Light Gray
Wonderful addition to our guest house renovation …. Fit perfectly under our old and custom built round table
Noté 4 sur 5 étoiles.
Color/Pattern:Graphite
The bench is beautiful, solid, and looks expensive. The packaging was amazing. I would give five stars except for a few issues. The first issue was I was short 2 of the split washers. I am not sure how you cannot send extra washers and screws. The second issue was the final leg and the holes did not line up. It was a challenge to get the last two screws in. But the worst part was the directions. They were horrible drawings squished onto one page. There could easily have been a second page with some written directions to help. Also there were no pre-drilled holes for the final step of adding the metal crossbars. Learn from my mistakes due to the awful directions. See photos too. 1. Do not fully tighten any screws until all legs have been added. 2. Make sure you have the correct legs in the correct position. The holes should be facing one another to add the wooden crossbars. 3. Add the wooden crossbar after one leg is put on then add the opposite leg. 4. Check that you have the correct wooden crossbar in the correct position. The carved out section should be facing the ground. This is where you add the metal crossbar. 5. Have a tool to start the holes for the screws for the metal crossbars. I used a rubber mallet and a pointy tool.
Noté 4 sur 5 étoiles.
Color/Pattern:Light Gray
After reading reviews from other people who purchased this bench, I agree that the bench is good, but the directions are terrible! There are no instructions, just pictures so you’re left trying to figure out many things on your own.
Noté 5 sur 5 étoiles.
This is the perfect bench for our dining table to add extra seating. Excellent quality and looks great.