Expédition à

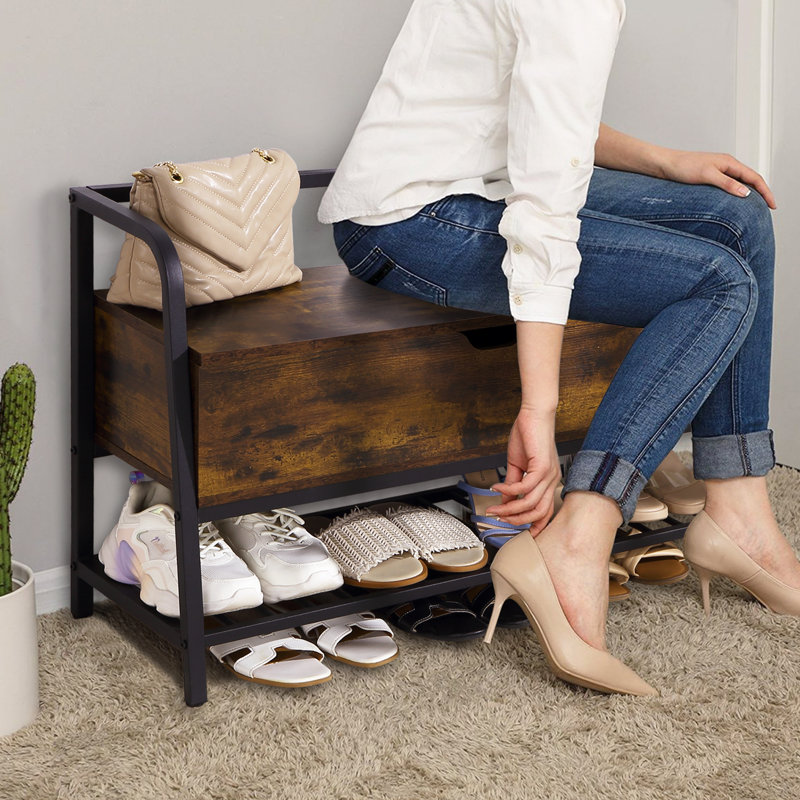
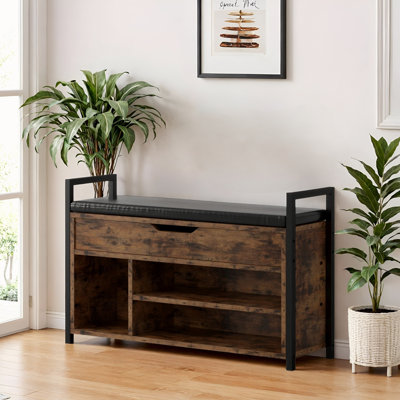
Rangements inclus

Matériau

Assemblage requis
Caractéristiques
Dimensions du produit
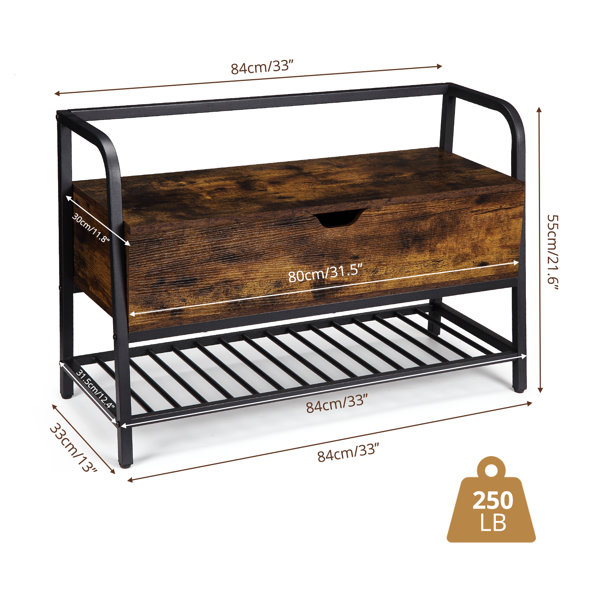
Autres dimensions
Détails
Assemblage
Pas convaincu? Les retours sont offerts pour la plupart des articles dans les 30 jours suivant la livraison pour un remboursement ou un bon d'achat.
Apprenez-en plus ou
ou

Accumulez {RICH_TEXT_POTENTIAL_REWARDS} en récompenses, avec une remise de 5 %¹, en plus d’autres avantages exclusifs.
Noté 4 sur 5 étoiles.
Avis 1-1 de 1
Noté 4 sur 5 étoiles.
Love the bench! Hate the instructions included. Didn’t follow them except to identify parts during assembly. Save your sanity by NOT assembling the base as they tell you. Use a box, a table or (as I did) a large storage bin to bring it up from floor level. Then, take your 2 end-pieces and lay them on the bin with spines facing eachother but apart. Take the bottom shelf and screw one side of the shelf (one corner at a time) to either of the side pieces FIRST. Continue connecting the shelf to the side pieces while supporting the side pieces enough to not be too wobbly, but don’t tighten the screws too much, you need some wiggle room to add the 2 #8 cross braces. MAKE SURE the holes in those pieces go ‘top-to-bottom’ NOT side-to-side)— watch this because they might spin over while you finish assembling the rest. Connect the #7 cross brace next. Assemble each component completely befor putting them together. BUT, ASSEMBLE THE LID AND BACK BOARD OF THE BOX — INCLUDING HINGES — BEFORE you work on the rest of the box. I found that laying the lid and backboard flat and touching eachother along their common ‘hinge edge’ with the drilled holes facing upward and adding the hinges at this point (instead of following their suggested assembly method) takes MUCH of the strain off you. (Use some cabinet glue to reinforce the hinges and rather weak and UNDERSIZED SCREWS supplied by the manufacturer. GLUEING THEM NOW MIGHT keep that heavy lid from disconnecting from those hinges in the long run.). Once you get the hinges on, GENTLY ‘close’ the hinges by lifting the backboard so it is standing upright and @ 90degrees to the lid but don’t move the lid or turn it over. Finish assembling the box around the backboard, using the lid which is laying flat on your table -or whatever you are building this on - as your base for the rest of the build. PLEASE DO USE GLUE when you assemble this so it’s sturdier. When you’re finished the box, you will need to ‘slip it’ into you almost-finished frame. But this might prove tricky because you need to keep the box “upside down” in order to be able to screw it into your slightly “under-tightened” metal base. TURN THE BASE UPSIDE DOWN ans OVER THE BOX, being sure to slide the upper metal part of the frame around the back and sides until the box is supporting the frame. (You will need to rest the box on a corner or narrower support so the frame hangs low enough to accept the screws. Loosen the base screws a bit if you need to, to get that “wiggle-room” I mentioned earlier, and align the holes in the metal base with the screw-holes in the box bottom. It will help a lot if you have nails or some kind of spacer to put into the screwholes as you locate them and use those to hold the openings in place so you can match all the holes up BEFORE you try screwing the base to the box… PLEASE BE SURE TO PUT THE BOX ON WITH THE HAND-HOLE UNDER THE LID FACING FRONT!!! When you have finished screwing the base to the frame, work your way back over all the screws, especially the base, and tighten everything down properly. If you have a few hiccups as you go, just stop, have a cup of coffee (or whatever you prefer), take a breather and know… it WILL WORK OUT —it’s a great little bench! Very STURDY! I did it all by myself and I’m almost 74 years old! (…well, with the help of the Holy Spirit.). MERRY CHRISTMAS!
Noté 4.7 sur 5 étoiles.884 votes au total
Noté 4.7 sur 5 étoiles.708 votes au total
Noté 4.3 sur 5 étoiles.19 votes au total
Noté 4 sur 5 étoiles.1 vote au total