Livraison gratuite
Recevez-le entre le 5 juill.-9 juill.
à
M4C 1B5

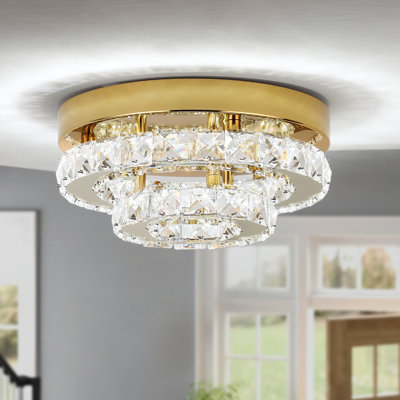
Abat-jour en cristal

Assemblage requis

Abat-jour en verre

Accumulez {RICH_TEXT_POTENTIAL_REWARDS} en récompenses, avec une remise de 5 %¹, en plus d’autres avantages exclusifs.

À propos de ce produit
Caractéristiques
Dimensions du produit
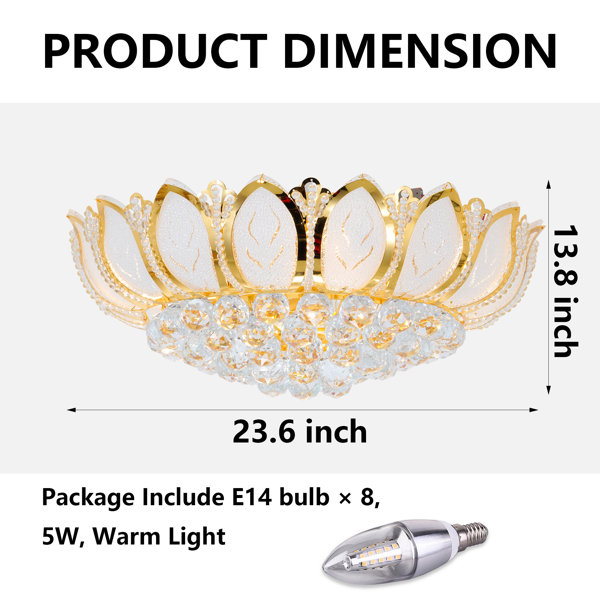
Autres dimensions
Détails
Assemblage
Garantie
Documents
Pas convaincu? Les retours sont offerts pour la plupart des articles dans les 30 jours suivant la livraison pour un remboursement ou un bon d'achat.
Apprenez-en plusNoté 3 sur 5 étoiles.
Avis 1-1 de 1
Noté 3 sur 5 étoiles.
The lamp is exactly as displayed in the images. It looks great on my living room ceiling. Here are the reasons why I give it 3 starts instead of 5. 1. The assembly guide is a one page diagram that shows how to assemble the lotus leafs and crystal balls on the main body. It mentions using an "installation sketch map to install parts in the right order". There is no such map available with the product itself or online. 2. We figured out that it is much cleaner and faster to install the lotus leaf bottom pin first and then the top pin (see attached pic). 3. The main body comes pre-assembled to the canopy that hangs from the ceiling. After a couple of unsuccessful attempts trying to hang the light from the ceiling, we figured out that we must dis-assemble the main body (the circular rings & the lotus leaves) from the canopy. This is done by removing 4 screws that attach the main body onto 4 vertical tubes (tubes are part of the canopy). 4. Once we figured that out, we then had the challenge of aligning the 4 holes in the canopy with the plate screws on the hanging board. The plate screws were hanging loose from the hanging board and just would not align with the holes in the canopy. So we actually measured the distance between the holes (181 mm) and completely tightened the plate screws on the hanging board exactly 181 mm apart. Then re-attached the hanging board to the ceiling - be mindful and use the inside slots on the hanging board to attach it to the ceiling (see attached pic). 5. After re-installing the hanging board on the ceiling, making the wiring connections, it was a lot easier to align the holes on the canopy with the plate screws and after about 3 hours of struggling with this part, we were finally able to install the canopy to the ceiling. Now we were ready to attach the main body to the canopy using the previously dis-assembled 4 screws. This part was also easy. 6. Last but not least came the step of attaching the crystal balls to the rings on the body. This was also an easy task. 7. After everything was complete, we were left over with 1 lotus leaf, 4 crystal balls and a few of the tack pins. 8. Time to test the light with the wall switch and remote -- everything works fine. Except the bulbs are not dimmable as mentioned in the specs. Overall it took 2 of us about 6 hours to finish the assembly and installation. With a better installation guide, I feel it should have taken no more than 2 hours.
Noté 4.8 sur 5 étoiles.10 votes au total
Noté 4.9 sur 5 étoiles.10 votes au total