DIY Shower Door Installation
Learn everything you need to know in a matter of minutes.

Facing the daunting task of shower door installation? You’re not alone. We’ve compiled a step-by-step guide to help you confront this DIY project with fervor. Trust us, it’s easy!
Tip!
While shower door installation is very possible to DIY, we recommend working with a professional if at any point you find the project overwhelming.
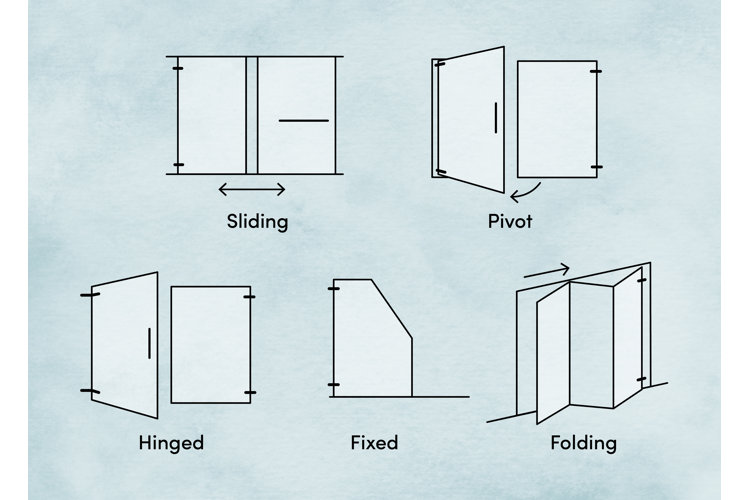
Know Your Door
Make installation easier by becoming familiar with the type of shower door you have. Here are five popular types of shower door.
How to Measure for a Shower Door
Before any shower door installation occurs, make sure you properly measure the doors and the space. We’ve covered every step in our guide on How to Measure a Shower Door.
How to Install a Shower Door
Every shower door is different, but these steps will prove useful for most shower door installation projects. Refer to your shower’s specific installation instructions before you begin.
What You Will Need
A friend for assistance
Low tack masking tape/plumber’s tape
Electric drill & various-sized drill bits
Hacksaw
Pencil
Level
Screwdriver
Clear silicone caulk
Caulk gun
Step 1: Remove the shower curtain and rod. Clean the area of any miscellaneous items.
Step 2: Hold the door up in the shower’s opening. If it has a frame, have your friend tape the frame to the shower walls with masking tape. Make sure the door fits properly in your space. If not, many framed shower doors can be trimmed to fit the shower area. Use a hacksaw to trim excess material.
Step 3: Use a level to inspect if the door is plumb to the shower walls.
Step 4: With the shower door or frame (if you have a framed door) still taped in the doorway, use a pencil to mark any screw holes. If you have dark tile, place masking tape in those spots so the pencil holes are visible when it’s time to drill.
Step 5: Remove the door and door frame from the doorway. Using the appropriate drill bit, drill through the hole markings. Leave the masking tape on to prevent the tile or wall from splitting. Remove the tape when drilling is complete.
Step 6: Using a caulk gun, apply a bead of caulk to the sides of the door or frame that will rest against the walls. Make sure not to apply caulk where the screw holes will be. Install your shower door by pressing the sides firmly to the wall, making sure to line up to the holes in the tile with the ones on the door. Run your fingers along the edge of the door, pressing firmly to waterproof it. Wipe away any excess caulk around the edges.Then, using a drill or screwdriver, screw the frame to the walls via the holes you marked.
Step 7: If your shower door requires more specific installation, like a handle or sliding, follow the manufacturer’s instructions.
Now that you know how to install a shower door, it’s time to pick the perfect one!
