Passer au contenu principal
JUSQU'À 70 % DE RABAIS | SOLDE DU DÉMÉNAGEMENT
JUSQU'À 70 % DE RABAIS | SOLDE DU DÉMÉNAGEMENT
JUSQU'À 70 % DE RABAIS | SOLDE DU DÉMÉNAGEMENT
JUSQU'À 70 % DE RABAIS | SOLDE DU DÉMÉNAGEMENT
JUSQU'À 70 % DE RABAIS | SOLDE DU DÉMÉNAGEMENT
JUSQU'À 70 % DE RABAIS | SOLDE DU DÉMÉNAGEMENT
Récompenses
Notre appli
Financement
Professionnel
Livraison GRATUITE à partir de 50 $*
Menu
Inspiration
Wayfair.ca
Connexion
Ouvrir le menu déroulant Compte
Panier
Wayfair.ca
Rechercher
Rechercher
English
Inspiration
Connexion
Ouvrir le menu déroulant Compte
Panier
Rechercher
Rechercher
Certifié
Ouvrir le menu déroulant Certifié
Nouveautés
Meilleurs Vendeurs
Partenariats
Ouvrir le menu déroulant Partenariats
Magasiner par pièce
Ouvrir le menu déroulant Magasiner par pièce
La Boutique de Plein Air
Meubles
Ouvrir le menu déroulant Meubles
Extérieur
Ouvrir le menu déroulant Extérieur
Literie et bain
Ouvrir le menu déroulant Literie et bain
Tapis
Ouvrir le menu déroulant Tapis
Deco et coussins
Ouvrir le menu déroulant Deco et coussins
Éclairage
Ouvrir le menu déroulant Éclairage
Organisation
Ouvrir le menu déroulant Organisation
Cuisine
Ouvrir le menu déroulant Cuisine
Enfants
Ouvrir le menu déroulant Enfants
Rénovation
Ouvrir le menu déroulant Rénovation
Électroménagers
Ouvrir le menu déroulant Électroménagers
Animaux
Ouvrir le menu déroulant Animaux
Fêtes
Ouvrir le menu déroulant Fêtes
Soldes
Ouvrir le menu déroulant Soldes
Certifié
Nouveautés
Meilleurs Vendeurs
Magasiner par pièce
La Boutique de Plein Air
Meubles
Meubles en solde
Meubles de salon
Canapés
Sectionnels
Meubles TV et centres de divertissement
Tables basses
Toutes les tables de bout et d'appoint
Fauteuils d'appoint
Ensembles de salon
Meubles de salon en soldes
Meubles de bureau
Bureaux
Bibliothèques
Chaises de bureau
Meubles de rangements pour bureau
Ensembles de meubles de bureau
Meubles de bureau en soldes
Meubles de chambre à coucher
Lits
Commodes
Tables de chevet
Armoires
Matelas et sommiers
Ensembles de lit
Meubles de chambre en soldes
Meubles d'entrée
Tables de console et de canapé
Armoires et commodes
Tout le stockage de chaussures
Étagères et casiers à chaussures
Arbres d'entrée
Meubles d'entrée en soldes
Meubles de salle à manger
Tables et sièges
Buffets
Îlots de cuisine et chariots
Vitrines et vaisseliers
Tabourets de bar et de comptoir
Meubles de bar
Ensembles de salle à manger
Meubles de salle à manger en soldes
Meubles de salle de jeux
Fauteuils de jeux
Bureaux de gaming
Jeux et tables de jeux
Fauteuils à billes
Meubles de salle de jeux en soldes
Animaux
Magasinez les meubles certifiés Wayfair
Mercury Row
Mises á jour pour le salon
Tables à manger modernes
Extérieur
Soldes d'extérieur
Meubles d'extérieur et de terrasse
Ensembles de meubles de patio
Sièges extérieurs et chaises de patio
Tables d'extérieur
Meubles de bar d'extérieur
Mobilier de terrasse et d'extérieur en solde
Jeux de cour
Articles d'ombrage pour l'extérieur
Pavillons de jardin
Pergolas
Abris de jardin
Auvents
Parasols d'extérieur
Articles d'ombrage pour l'extérieur en soldes
Chauffage et refroidissement d'extérieur
Décoration extérieure
Tapis d'extérieur
Statues et sculptures
Coussins et coussins décoratifs d'extérieur
Fontaines
Couronnes
Paillassons d'extérieur
Décoration extérieure en solde
Éclairage d'extérieur
Jardin
Toutes les jardinières
Serres
Treillis
Tonnelles
Articles de jardin en solde
Accessoires de façade
Organisation du garage et de l'extérieur
Remises
Porte-vélos et porte-vélos
Armoires de rangement pour garage
Rangement à outils
Coffres de terrasse et rangements pour patio
Rayonnages et étagères
Rangement pour garage et extérieur en soldes
Clôtures et revêtements de sol d'extérieur
Spas et saunas
Articles de cuisine et de table extérieure
Cuisiner à l'extérieur
Cuisines d'extérieur
Articles de service de table d'extérieur
Articles de cuisine extérieure en soldes
D'extérieur certifié Wayfair
Sunbrella
POLYWOOD®
Blackstone
Suncast
Backyard Discovery
Préparez le jardin
Pergolas
Chaises Adirondack
Literie et bain
Litterie et articles de bain en soldes
Literie
Ensembles de literie
Draps et taies d'oreiller
Coussins décoratifs
Couvertures et jetés
Literie en solde
Essentiels de literie
Oreillers
Protège-matelas et surmatelas
Couettes et duvets
Housses et protecteurs de matelas
Jupes de lit
Essentiels de literie en soldes
Matelas et sommiers
Tous les matelas
Matelas très grands
Matelas grands
Matelas doubles
Matelas simple
Sommiers
Lits réglables
Bases de lit
Matelas et sommiers en soldes
Réno et robinetterie de salle de bain
Meubles-lavabos
Robinets de salle de bain
Miroirs de salle de bain
Soldes de réno de salle de bain
Serviettes et tapis de bain
Tous les serviettes de bain
Tapis de bain
Serviettes et tapis de bain en solde
Accessoires et organisation de salle de bain
Accessoires pour comptoir de bain
Rangement pour douche et baignoire
Rangement pour serviettes
Accessoires et organisation de salle de bain en solde
Rideaux et accessoires douche
Rideaux et doublures de rideaux de douche
Tringles à rideaux de douche
Accessoires et rideaux de douche en soldes
Literie ultra confortable
Indispensables pour salle de bain invité
RE/FINE™
Laura Ashley
Sealy
Wayfair Sleep
Wayfair Basics
Chambre certifié Wayfair
Literie: Juste Pour Vous
Tapis
Tapis en solde
Tapis
Tapis décoratifs
Tapis d'extérieur
Tapis de couloir
Tapis de bain
Tapis lavables en machine
Tapis de cuisine
Tapis de porte
Tapis uniques
Tapis pour enfants
Sous-tapis
Tapis d'escalier
Dalles de tapis
Tailles de tapis populaires
Tapis 3 pi x 5 pi
Tapis 5 pi x 8 pi
Tapis 7 pi x 9 pi
Tapis 8 pi x 10 pi
Tapis 9 pi x 12 pi
Tapis 10 pi x 14 pi
Magasinez les tapis certifiés Wayfair
Livraison rapide : Tapis
Magnolia Home by Joanna Gaines x Loloi
Rifle Paper Co. x Loloi
Lauren Ralph Lauren
Galey Alix x Livabliss
Tapis lavables en machine
Tapis en jute et sisal
Tapis à carreaux et à rayures
Tapis à poils longs
Deco et coussins
Deco et coussins en soldes
Décorations murales
Tablettes murales et présentoirs
Objets décoratifs muraux
Tapisserie
Tapisserie adhésive
Draperies murales
Autocollants muraux
Décorations murales en soldes
Art
Tous les arts muraux
Art mural par sujet
Art mural par type
Art mural par pièce
Tous les arts muraux en soldes
Miroirs
Tous les miroirs
Miroirs muraux
Miroirs de salle de bain
Miroirs pleine longueur
Miroirs en soldes
Accessoires pour la maison
Vases, urnes, pots et bouteilles
Objets décoratifs
Plateaux décoratifs
Assiettes et bols décoratifs
Globes terrestres
Boîtes décoratives
Accessoires pour la maison en soldes
Chandelles
Tous les cadres photos
Fleurs et plantes
Plantes artificielles
Arbres artificiels
Fleurs artificielles
Jardinières d'intérieur
Fleurs et plantes en soldes
Habillages de fenêtres
Rideaux et draperies
Stores et rideaux
Habillage de fenêtres en soldes
Coussins décoratifs et couvertures
Coussins décoratifs
Couvertures et jetés
Coussins décoratifs et couvertures en soldes
Décor certifié Wayfair
Miroirs et décoration
Accessoires aux meilleurs avis
Trouvailles fraîches
RE/FINE™
Wayfair Basics
Petite déco, grand style
Jetés et coussins printaniers
Stylez-le pour moins de 100 $
Éclairage
Éclairage en solde
Lustres
Tous les lustres
Chandeliers
Luminaires suspendus
Plafonniers
Spots encastrables
Plafonniers en solde
Lampes de table et lampes sur pied
Lampes de table
Lampes sur pieds
Ensembles de lampes
Abat-jours
Lampes de bureau
Solde de lampes de table et lampes sur pied
Éclairage d'extérieur
Tous les éclairages d'extérieur
Éclairage mural extérieur
Tous les plafonniers d'extérieur
Lanternes et lampes pour l'extérieur
Guirlandes lumineuses
Éclairage d'extérieur à DEL
Éclairage d'extérieur en solde
Appliques murales
Appliques murales salle de bain
Appliques murales
Appliques murales à bras pivotant
Éclairage sous l'armoire
Appliques murales pour tableaux
Éclairage mural en solde
Ventilateurs de plafond
Tous les ventilateurs de plafond
Ventilateurs de plafond avec lumières
Ventilateurs de plafond intérieurs
Ventilateurs de plafond extérieurs
Ventilateurs de plafond en soldes
Ampoules et quincaillerie
Light Bulbs
Plaques d'interrupteurs
Light Shades
Interrupteurs, gradateurs et prises
Composants d'éclairage
Ampoules et abat-jour en soldes
L'éclairage certifié Wayfair
Éclairage par Mercury Row
Lampes de table aux meilleurs avis
Livraison rapide : lampes de table
Breegan Jane x Savoy House
Kuzco Lighting
Éclairage pour meubles-lavabos
Éclairage moderne & industriel
Organisation
Rangements et organisation en soldes
Contenants et tiroirs de rangement
Tous les contenants de rangement
Panier tressé
Rangement décoratif
Rangement à cubes
Bacs et contenants de rangement
Tiroirs de rangement
Chariots utilitaires
Contenants et tiroirs de rangement en soldes
Meubles de rangement
Bibliothèques
Armoires et commodes
Bancs de rangement
Repose-pieds avec rangements
Meubles de rangement en solde
Étagères et organisation murales
Tablettes murales et présentoirs
Crochets muraux
Étagères murales en soldes
Organisation de garde-robe
Tous les systèmes de garde-robe
Supports à vêtements
Tout le stockage de chaussures
Tous les accessoires de garde-robe
Coffres de rangement
Rangement et organisation de garde-robe en soldes
Organisation du garage et de l'extérieur
Remises
Porte-vélos et porte-vélos
Armoires de rangement pour garage
Rangement à outils
Coffres de terrasse et rangements pour patio
Rayonnages et étagères
Rangement pour garage et extérieur en soldes
Rangement pour bureau
Organisation du bureau
Boîtes d'archivage
Meubles de rangements pour bureau
Organisation de la salle de bain
Armoires et étagères de salle de bain
Accessoires pour comptoir de bain
Rangement pour douche et baignoire
Poubelles de salle de bain
Rangement pour salle de bain en soldes
Organisation de la cuisine
Garde-manger
Récipients de stockage d'aliments
Étagères de cuisine
Toute l'organisation d'armoires
Porte-pots
Pots et étagères à épices
Rangement pour cuisine en soldes
Organisation de la salle de lavage
Aspirateurs et nettoyeurs en profondeur
Paniers à linge
Poubelles et recyclage
Organisation de la salle de lavage en soldes
Wayfair Basics
Dotted Line
ClosetMaid
Brabantia
Organiser l'espace
Rangement dans le placard
Rangement sous le lit
Cuisine
Articles de cuisine et salle à manger en soldes
Articles de table et de bar
Vaisselle
Décorations de table
Verrerie
Linges de table et de cuisine
Couverts et argenterie
Articles de bar
Articles de table et de bar en soldes
Meubles de salle à manger
Articles de cuisine et de table extérieure
Cuisiner à l'extérieur
Articles de service de table d'extérieur
Articles de cuisine extérieure en soldes
Ustensiles de cuisine et ustensiles de cuisson
Tous les outils de cuisine
Tous les plats de cuisson
Marmites, casseroles et poêles
Coutellerie et accessoires
Ustensiles de cuisine
Ustensiles et outils de cuisine
Articles de cuisine et de pâtisserie en soldes
Réno de cuisine et accessoires de cuisine
Organisation de la cuisine
Garde-manger
Étagères de cuisine
Organisation d'armoire et garde-manger
Comptoir de cuisine
Rangement pour cuisine en soldes
Petit électroménager de cuisine
Friteuses à air
Batteurs
Café, espresso et thé
Machines à glace
Mixeurs
Fours grille-pain
Petits appareils de cuisine en soldes
Électroménagers de cuisine
Cuisinart
Calphalon
HENCKELS
Des cocktails stylés
La tasse parfaite
Enfants
Articles pour enfants et adolescents en solde
Ensemble de meubles pour chambres de bébé
Lits pour bébé
Matelas pour lit de bébé
Fauteuils oscillants
Tables à langer
Berceaux et landaus
Meubles pour chambres de bébé
Meubles pour chambres de bébé en soldes
Literie de chambre pour bébé
Ensembles de literie pour lits de bébé
Draps de lit
Couvertures de bébé
Literie de chambre pour bébés en solde
Salle de jeux et jouets pour tout-petits et enfants
Tables et chaises pour tout-petits et enfants
Ensembles de jeux de cuisine
Jeu d'intérieur
Salle de jeux et jouets pour tout-petits et enfants en soldes
Mobilier de chambre pour tout-petits et enfants
Lits enfants
Lits superposés et mezzanines
Lits pour tout-petits
Commodes pour bébés et enfants
Bureaux d'enfants
Ensembles de chambre à coucher pour enfants
Mobilier de chambre pour tout-petits et enfants en soldes
Rangement pour bébés et enfants
Literie et textiles de bain pour tout-petits et enfants
Tapis, déco et éclairage pour bébés et enfants
Jeux de cour
Portiques de jardin
Jeux et glissades gonflables
Modules d'escalade et glissades
Maisonnettes extérieures
Jeux de cour en soldes
Literie pour adolescents
Déco et éclairage pour adolescents
Meubles de chambres pour adolescents
Lits superposés et mezzanines pour adolescents
Mobilier de détente pour adolescents
Lits pour adolescents
Mobilier de chambre pour adolescents en soldes
Meubles pour enfants certifié Wayfair
Les essentiels des nouvelles parents
Pour les enfants
Graco
Storkcraft
Delta Children
Tapis adaptés aux familles
Les tables de jeux
Espace jeu révolutionnaire
Rénovation
Articles de rénovation en soldes
Réno et robinetterie de salle de bain
Meubles-lavabos
Robinets de salle de bain
Miroirs de salle de bain
Lavabos de salle de bain
Douches et baignoires
Toilettes et bidets
Soldes de réno de salle de bain
Réno de cuisine et accessoires de cuisine
Robinets de cuisine
Éviers de cuisine
Ébénisterie
Soldes de réno de cuisine
Habillages de fenêtres
Rideaux et draperies
Stores et rideaux
Habillage de fenêtres en soldes
Plancher, mur et plafond
Carrelage plancher et mur
Panneaux muraux
Revêtements de sol en vinyle
Plancher, mur et plafond en solde
Portes et quincaillerie de porte
Portes d'intérieur
Portes extérieures
Quincaillerie de porte et accessoires
Portes et quincaillerie de porte en soldes
Quincaillerie
Quincaillerie pour armoire
Quincaillerie de porte et accessoires
Quincaillerie pour salle de bain
Quincaillerie en soldes
Réno d'extérieur
Chauffage et climatisation
Foyers et poêles
Climatiseurs
Chauffage, ventilation et climatisation en soldes
Moen
Shaw
Ackland
Carrelage plancher et mur: À motifs
Style évier
Électroménagers
Électroménager en soldes
Électroménagers de cuisine
Frigos et congélateurs
Toutes les hottes
Micro-ondes
Cuisinières
Lave-vaisselles
Frigos à boissons
Fours encastrés
Plaques de cuisson
Ensembles d'électroménagers de cuisine
Électroménagers pour la cuisine en soldes
Petit électroménager de cuisine
Friteuses à air
Batteurs
Café, espresso et thé
Machines à glace
Mixeurs
Fours grille-pain
Petits appareils de cuisine en soldes
Aspirateurs et appareils de nettoyage
Tous les aspirateurs
Aspirateurs-balais
Aspirateurs verticaux
Aspirateurs chariots
Aspirateurs en solde
Laveuses et sécheuses
Laveuses
Sécheuses
Ensembles laveuse et sécheuse
Laveuses et sécheuses en soldes
Chauffage et climatisation
Climatiseurs
Purificateurs d'air
Déshumidificateurs
Radiateurs à gaz
Chauffage, ventilation et climatisation en soldes
GE Appliances
Frigidaire
LG
Nos marques préférées: électroménagers
Les essentiels du comptoir du matin
Électros au style rétro
Animaux
Meubles pour animaux en soldes
Chiens
Cages pour chiens
Paniers et coussins pour chiens
Niches pour chiens
Cages de transport pour chiens
Rampes et escaliers pour chiens
Poussettes pour chiens
Rangement et pots à friandises pour chien
Meubles pour chiens en soldes
Cages de style meuble
Bacs à litière
Chats
Litières
Paniers pour chats
Cages et parcs pour chats
Arbres, perchoirs et griffoirs à chats
Mobilier pour chats en soldes
Gamelles pour animaux
Barrières, clôtures et portes pour animaux
Housses adaptées aux animaux de compagnie
Poules
Poulaillers
Enclos à poulets
Accessoires de poulailler
Oiseaux
Poissons
Reptiles
Petits animaux
Beautyrest & Serta
FurHaven
Zylina
The Refined Feline
Aivituvin
Cages style mobilier
Paniers cozy
Fêtes
Soldes
Conseils et idées
Organisation
Styles
Pièces
DIY
Extérieur
Divertissement
Guides
Rénovation
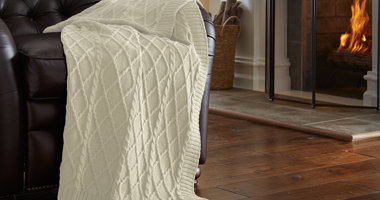
Comment choisir une couverture en fonction des saisons
Restez à la température parfaite toute l'année.
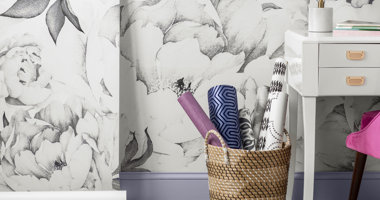
Tout sur les papiers peints : Installation de papier peint
Votre guide pas-à-pas pour installer du papier peint sur vos murs.
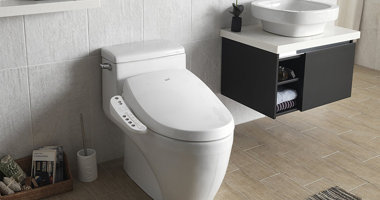
Types de bidets : trouvez le meilleur bidet pour vous
Une façon simple de mettre à jour la salle de bain.
Glossaire des finitions et des types de meubles en bois
Voici un survol des caractéristiques, des couleurs et des finitions des meubles en bois.
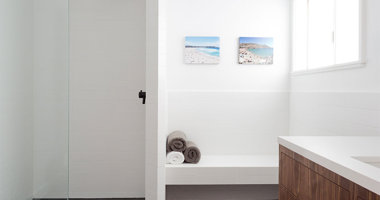
10 vraies salles de bain modernes (et vraiment stupéfiantes)
Vous trouverez ci-dessous 10 idées de salles de bain modernes pour vous inspirer.
4 façons de créer un garde-manger
Utilisez nos combinaisons de rangement favorites pour en créer un dans n'importe quel espace.
Previous Page
1
Next
Recherche d'articles
Rechercher
ServerT:2.109433889389
8.221
![[object Object]](https://assets.wfcdn.com/im/46038891/compr-r85/2732/27324540/ideas_and_advice_banner_background.jpg)