How to Install Hardwood Flooring
A step-by-step guide to selecting and installing new hardwoods.
Hardwood flooring is one of the most beautiful, classic, and durable flooring options. It adds a timelessness and warmth, and increases the value of any home. Unlike engineered or laminate flooring, solid hardwood can be sanded and refinished multiple times. If cared for properly, hardwood flooring can look great for more than 50 years, making it well worth the initial investment. It's also preferable over carpet for those who suffer from allergies.
Project Level of Difficulty
4 out of 5—it's such a large-scale and intrusive project that requires a lot of prep work, but it's a project that the average DIYer can handle
Estimated Time Frame
Flooring acclimation: two weeksOld flooring removal: one daySubfloor and room prep: one day or more, depending on subfloor conditionActual installation: 40 hours or more
Materials
- Hardwood flooring
- Underlayment (#30 roofing felt)
- Nails, for face nailing
- 2-inch nails or staples, for flooring nailer
- Staples, for staple gun
- Matching wood filler
- New, sharp saw blades
Tools
- Shop vacuum
- Moisture metre
- Safety glasses
- Ear plugs
- Knee pads
- Tape measure
- Hand saw, jamb saw, or oscillating multi-tool
- Chalk line and chalk
- Mitre saw
- Table saw
- Air compressor
- Hammer
- Pneumatic nail gun
- Pneumatic flooring nailer
- Pry bar
- Staple gun
- Utility knife
- Nail set
- Nail finisher
- Rubber mallet
Choose Wood Flooring
Hardwood flooring comes in a multitude of styles. The choices can be nearly overwhelming! Here are a few main points to consider to help you narrow down which type of wood you want.
Variation: Woods like oak, pine and hickory have heavy grain, lots of knots, and dramatic colour variation from board to board, while woods like maple or walnut have a clear grain and less variation. Heavy grained woods tend to disguise wear. Clear grain gives a more uniform appearance.
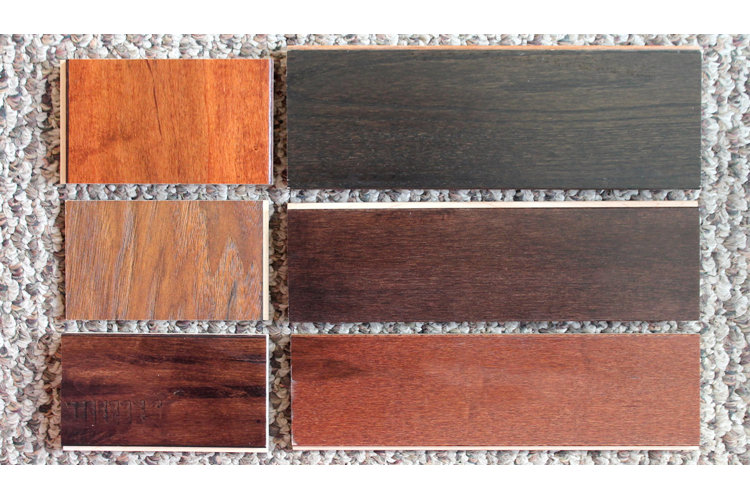
Photo: The Craft Patch
Durability: Different woods vary in hardness. You can check the hardness of any wood by consulting the Janka Hardness scale. Find the Janka Hardness rating for flooring you are considering on Wayfair’s product pages. The higher the number, the harder the wood. For example, southern yellow pine is rated at 870, red oak is 1290, maple is 1450, and hickory is 1820. This means that a pine floor will be more susceptible to dents than a hickory floor. If your wood floor will be installed in a high traffic area or if you have children or pets, it's probably a good idea to choose a harder wood such as oak (1,360); maple (1,450); or hickory (1,820).
Finish: The most common finishes for hardwood flooring are handscraped or smooth. Handscraped wood has a rutted surface that looks like it was cut by hand, while smooth floors are completely smooth to the touch.
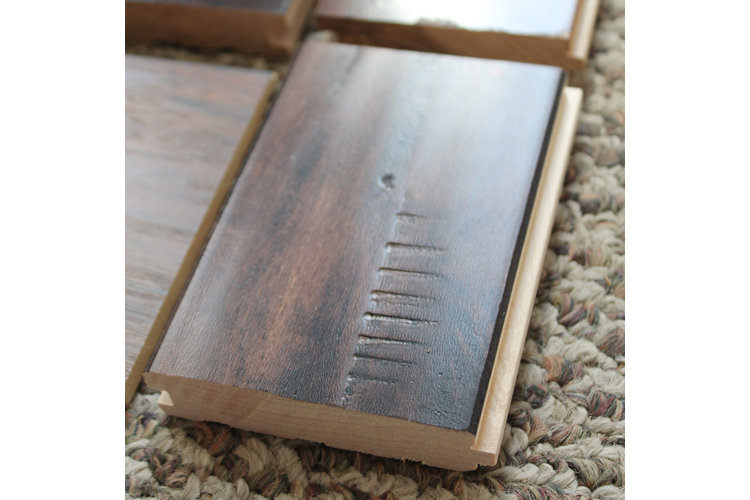
Photo: The Craft Patch
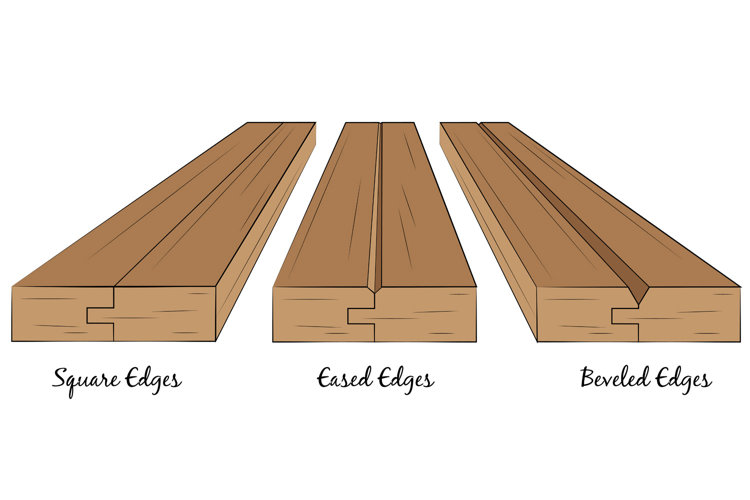
Edges: Since pre-finished hardwood flooring is not finished on site, the board edges change the look of the overall floor. There are three main choices: square, eased (also referred to as microbeveled or kissed), and beveled. Square edges are a perfect 90 degrees, eased edges have a very slight angled edge, and beveled edges will show a noticeable groove between boards.
Colour: Once you've considered all of the above factors, the last choice is colour. This is completely a personal preference. Take into consideration how the wood flooring colour will look with cabinetry, wall colour and other wood pieces in the room.
Order Samples
Once you've narrowed down the type, species, and finish of the wood you like, it's important to order samples. Look at the samples in sunlight, in artificial light, next to the walls and trim, in the centre of the room, from close up, from far away, at all different angles, and next to other wood furniture pieces that will be in the room.
Tip! When selecting hardwood floor on Wayfair, you can easily order samples without leaving the product page!
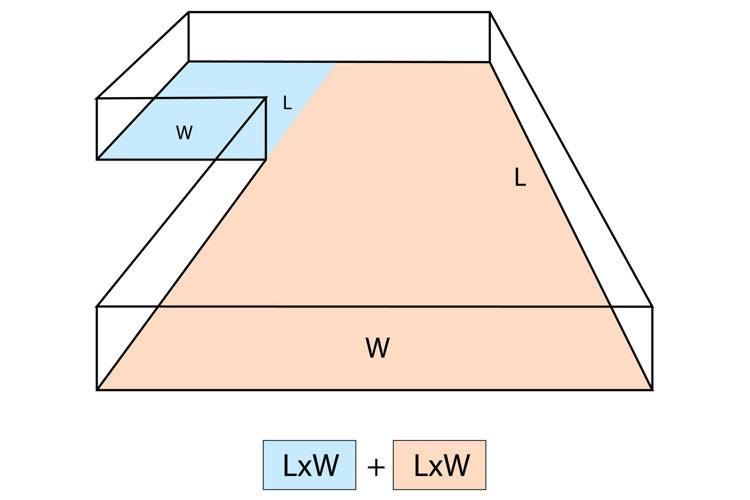
Measure Square Footage
Square footage is calculated by multiplying the length of the room by the width. Most rooms, however are not a perfect rectangle. In this case, divide the space into areas that are rectangular. For example, the living room and hallway would be counted as two separate rectangles. Measure these two spaces, multiply length times width, then add the two numbers together. When ordering wood flooring, add 10 percent to the actual square footage of the space to account for waste.
Prepare Hardwood for Installation
Wood flooring must acclimate to the home in which it will be installed or it can shrink, gap, or buckle after installation. Flooring must sit in the room for at least 72 hours, but the most accurate way to ensure that your wood is ready to be installed is to assess its moisture content with a moisture metre. Wood with a moisture content of less than 12 percent is considered ready to install. The difference between the wood and the subfloor's moisture content should be no greater than 2 percent.
Photo: The Craft Patch
Prepare Room for Installation
Step 1: Begin by removing baseboards from the entire installation space. Using a utility knife, score the caulk line where the baseboard and wall meet. Then gently use a pry bar to loosen the nails. You can pad your walls with a small cloth to prevent damaging the sheetrock. Work slowly and carefully and you should be able to reinstall the baseboards after the floors are in.
Photos: The Craft Patch
Step 2: Next, remove old flooring, including laminate flooring, carpet pad, tack strips, staples, chunks of glue, or any other obstruction. This process is labour intensive, and may take 4-6 hours depending on the size of your room.
Tip! Rather than throw your carpet away, recycle it with Carpet America Recovery Effort.
Photo: The Craft Patch
Step 3: The bottoms of most door casings will need to be cut off in order for the wood to fit flush underneath. This can be done using a Hand Saw, Jamb Saw or Oscillating Multi-Tool. Place a scrap piece of flooring next to the casing and use it as a guide for the saw. If cut correctly, the flooring should be able to fit under the casing. Remember it's better to cut too small and have to cut again than to cut too far up and have a gap between the moulding and the flooring.
Photos: The Craft Patch
Step 4: The most important step for successfully installing hardwood flooring is to ensure that the subfloor is properly prepped. If wood is installed over an uneven subfloor, it will squeak and warp over time. It will also be difficult to achieve straight lines during installation on an uneven subfloor. Solid wood flooring must be installed over a dry, flat, damage-free wood subfloor that is on or above grade. It cannot be installed in a basement or over a cement slab. If you have a cement subfloor, you'll need to use engineered hardwood flooring instead.
Damaged subfloor should be replaced. Use a 4- or 8-foot level to determine that your subfloor is flat. Lay it on the floor and sweep it in large circles. Mark any spaces that are high or low. High spots can be sanded down. Low spots can be filled in with layers of roofing felt or wood shims. To meet installation requirements, the subfloor must be within 3/16-inch in any 10-foot area or 1/8-inch in any 6-foot area. If your subfloor is excessively warped or damaged, consider replacing it or hiring professional help for this step.
Photo: The Craft Patch
When your room is properly prepped, it's time to start with the fun job ... laying the flooring!
Important Installation Principles
1. Flooring should be installed perpendicular to the floor joists. This helps support the weight of the boards and prevent sagging over time.
2. An expansion gap of 3/4 inch should be left around the perimeter and at all vertical obstructions, such as cabinets or walls. The gap allows the wood to expand and contract with the seasons, and is essential to preventing buckling. When the baseboards are reinstalled, the gap will not be visible.
Photo: The Craft Patch
3. Flooring should be laid out prior to installation to plan board placement. This is called racking. The goal of racking is to create a random pattern of board end seams and colour variation to give the floor a pleasing appearance. Avoid stair step and H seams. All board ends should be at least 6 inches away from the ends of adjacent boards. Work from several open boxes at a time to blend any variation between boxes.
4. Nails should be placed 1-3 inches from each end, and every 6-8 inches along the length of the board with at least two nails per board.
5. For efficiency, cut waste pieces can be reused at the beginning of a row. Just make sure the flat, cut end is against the wall.
Photo: The Craft Patch
6. Boards may need to be cut to fit around obstructions, such as walls and cabinets. Lay the board in place and mark where the notch will be. Don't forget to measure for an expansion gap: 1/2 inch at the end of the board and 3/4 inch along the edges. Cut notch and install.
Photo: The Craft Patch
7. Underlayment should be installed between the subfloor and the hardwood flooring. Roll it out, cut it to size, then staple in place with a basic staple gun.
Photo: The Craft Patch
8. Cut board ends to length with a mitre saw. Cut boards to width using a table saw.
Photo: The Craft Patch
Wall-to-Wall Installation
This is the most common method for installing hardwood floors.
Step 1: Begin against the longest outer wall that is perpendicular to the floor joists. Use spacers to mark the 3/4-inch expansion gap (don't forget to leave room on the ends of the boards too!). Make a chalk line to use as a guide. Choose the straightest long boards you have.
Step 2: Face nail the first row into place using a pneumatic nailer.
Photo: The Craft Patch
Step 3: Using a rubber mallet, tap the tongue side of the second row until its groove is tightly seated with the first row. Using a pneumatic nail gun, blind nail diagonally through this tongue into the subfloor.
Photo: The Craft Patch
Step 4: It's important that each new row fits tightly against the previous row. Use a soft rubber mallet to gently tap the boards together. If you find this is damaging your flooring, you can use a sacrificial piece of flooring as a buffer. Slide it against the row that needs to be pounded into place, and pound on the sacrificial piece. This prevents any damage to the flooring that will be installed.
Photo: The Craft Patch
Step 5: Continue blind nailing with a nail gun until there is enough clearance for the flooring nailer to fit. Then use the flooring nailer for the remainder of the project.
Photo: The Craft Patch
Centre to Wall Installation
Perfectly straight flooring is more noticeable in certain areas in a home, especially hallways and doorways. If your room is not a perfect square (measure to confirm), you may want to begin laying the first board in the centre of the room to run down a hallway or line up with an important doorway.
Step 1: Mark a straight chalk line as a guide.
Photo: The Craft Patch
Step 2: Top nail a row of boards with the groove side lined up to the chalk line. These boards will later be removed, so don't use your favourite boards.
Photo: The Craft Patch
Step 3: install three or four rows of hardwood flooring against this top-nailed row using the flooring nailer before removing this first row of top-nailed boards.
Photo: The Craft Patch
Step 4: Before installing the rows going the other direction, insert a spline into the groove of the middle row, creating a double-tongue centre board.
Photo: The Craft Patch
Step 5: Glue and top nail the spline in place; use a scrap piece of flooring to ensure proper alignment.
Photo: The Craft Patch
Step 6: Continue installing wood flooring in the opposite direction.
Installing the Last Rows
At some point, the flooring nailer will no longer fit between the working board and the far wall.
Photo: The Craft Patch
Step 1: Switch to blind nailing with the nail gun until it no longer fits, then face nail the remaining boards.
Photo: The Craft Patch
Step 2: The last board will probably need to be cut down to size using a table saw.
Photo: The Craft Patch
Step 3: Fit the last two boards together, then drop them into place at the same time.
Photo: The Craft Patch
Step 4: Use a pry bar to push the last rows tightly together before top nailing into place.
Photo: The Craft Patch
Finishing Up
Step 1: Reattach baseboards, fill nail holes in baseboards, caulk, and touch up paint.
Step 2: install any needed transition pieces, such as reducers, threshold pieces, or T-mouldings.
Photo: The Craft Patch
Step 3: Fill all visible nail holes in the flooring with matching wood filler.
Photo: The Craft Patch
Step 4: Attach felt protective pads to all furniture before it's brought back into the room.
Photo: The Craft Patch
Step 5: Protect flooring when moving heavy furniture or appliances back into place by laying down a sheet of hardboard or plywood.
Step 6: Save any extra flooring in a dry place to use for future repairs.
Photo: The Craft Patch
