How to Make a Canopy Bed
No canopy bed frame required!

Nothing says luxury like a flowy curtain canopy above your bed. A bed canopy can instantly elevate your bedroom style and boost your mood, but not everyone has the space for a traditional canopy bed. Fortunately it’s easy to create your own DIY canopy bed. We’ll show you how to make that dream come true with these step-by-step instructions on how to make a canopy bed – no frame required!
How to Make a Canopy Bed
These instructions will teach you how to construct a ceiling-suspended canopy from curtain rods, brackets, and curtains of your choice. This will be a U-shaped construction of three connected rods, with the open ended side facing the wall at the head of the bed. These instructions can be adjusted for any size bed frame and mattress.
Difficulty Level: Beginner
What You Will Need:
- 3 Curtain rods
- 2 Corner curtain rod connectors
- 6 Curtain mounting brackets (closed)
- 6 Curtain panels
- Electric drill
- Screws
- Screw anchors
- Ladder
- Laser level (optional)
1. Measure
You’ll want your canopy to line up with the outside of your bed frame, so you’ll need to take measurements to know what size curtain rods to purchase and where to place them. Using a laser level is optional, but will make placement a breeze.
- Measure your bed frame: First, you will need to take measurements of your bed frame’s width and length. Measure the dimensions of your bed frame and then use a ladder to mark these measurements on the ceiling where you will install your brackets and rod. Once installed on the ceiling, the three curtain rods should match the measurements of your bed frame.
- Choose Your Rods & Curtains: Once you have the measurements, choose the appropriate-length curtain rods. You will need long curtain rods for most beds, since most standard mattresses are 75" – 85" long. Match the length of your curtain rods to the length of your bed frame – two will be the same length (for the bed’s sides), and one will be the length of the foot of your bed.
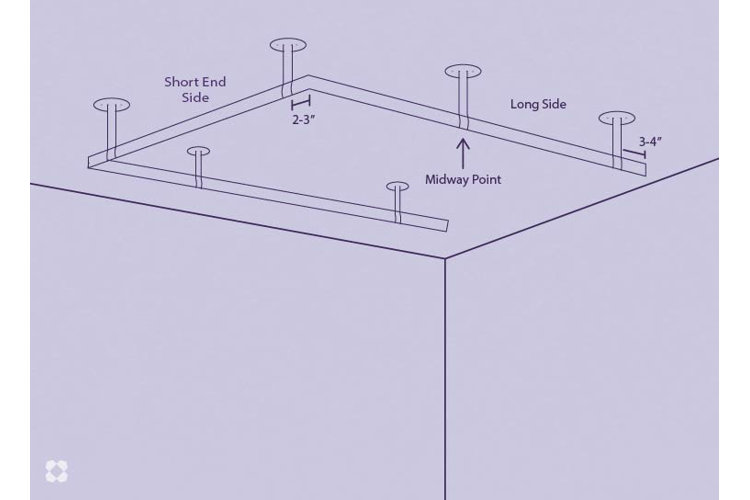
- Measure & Mark Bracket Placement: The brackets are the pieces of hardware that will attach to your ceiling and hold your curtain rods. The brackets need to be properly spaced out in order to support the curtain rods. There will be two brackets on each long side of the canopy and two on the short side that will hang above the end of the bed. On the long sides, a bracket should sit at the midway point of the curtain rod and one will sit 3" – 4" before the end of the curtain rod. The two brackets at the end (short side) of the canopy should be installed 2" – 3" from the corner connection of the curtain rods. Mark these measurements off on your ceiling ahead of time to make installation easier.
- Choose Curtain Length: You will also need to consider length when choosing curtains for your canopy bed. Measure from the ceiling to how far you want your canopy to hang down and then subtract the length of your brackets to choose the curtain length you will need. Placing two standard-width curtains on each rod will give you enough fabric to work with so that you can open them up to cover the whole length of your bed, or push them to the side when you want to open things up.
Tip!
Sheer material is typically used for canopy bed curtains, but you can get creative with your curtain choice. Choose different colors, patterns, and levels of opaqueness to fit your vision. Check out our guides to learn more about How to Pick the Right Custom Curtains or even How to Make Curtains on your own.
2. Install Ceiling Brackets
Once you have marked your placement on the ceiling, it’s time to install your brackets. Purchase brackets with a deep hook, and preferably ones that are able to close to prevent the curtain rods from falling.
- Double-Check Your Measurements: Double-check your measurements and bracket placements before installing them. Depending on the brackets you choose, consider where the bracket will attach to the ceiling and where the curtain rod will actually sit in the bracket hook. Make sure the rod will stay lined up with the outside of the bed frame below it.
- Install Brackets Onto the Ceiling: Using an electric drill, drill holes in the ceiling where the bracket holes will go. Place screw anchors in the holes, then using screws, attach the brackets to the ceiling.
3. Assemble Your Canopy
You’re finally about to see your gorgeous canopy come together! It’s time to thread your canopy bed curtains onto the rod and assemble the canopy.
- Thread Your Curtains: You will thread two curtains onto each rod – one curtain will sit towards each end of the rods. If you choose curtains without grommets, tabs, or sewn-in rod pockets, you can attach them to the rod using curtain rings.
- Assemble Your Canopy: If you have someone to help you place the canopy in the brackets, you can assemble the three-sided canopy on the ground before hanging it all at once. You will twist and screw on the rod connectors at the foot-end of the canopy to connect the shorter end rod, on each end, with the two longer side rods. If assembling the canopy alone, you can hang one rod at a time and then connect the corners with the corner rod connectors once the rods are already in the brackets.
- Adjust Your Curtains: Once the canopy is suspended in the brackets, make sure the brackets are tightened if you have closable brackets. Adjust your curtains however looks best to you. Spread them out on the rods for added privacy, or bunch them into the corners and use some spare fabric or ribbons to tie bows around them.
Tip!
Elevate your dreamy bedroom canopy by adding twinkling string lights to the curtain rods or curtains. This will create the ultimate fairy tale canopy for any bedroom.
