How to Assemble a Cheese Board in 8 Easy Steps
Learn how to put together a cheese board.
There is something extremely sophisticated and elegant about a well-curated cheese board. They can instantly elevate any get together, and show off your creative culinary skills, while providing a little bit of everything to satisfy each guest. However elaborate as they may seem, when you break it down, learning how to assemble a cheese board is not nearly as difficult as you might think.
Tip!
Before you get to assembling your cheese board, read our guide on how to make a cheese board including the specific ingredients to use, from there you can use these step-by-step instructions to design your masterpiece.
How to Assemble a Cheese Board
Once you have your in-depth knowledge on creating a cheese board, you can move on to piecing it together yourself.
Step 1: Start With the Foundation
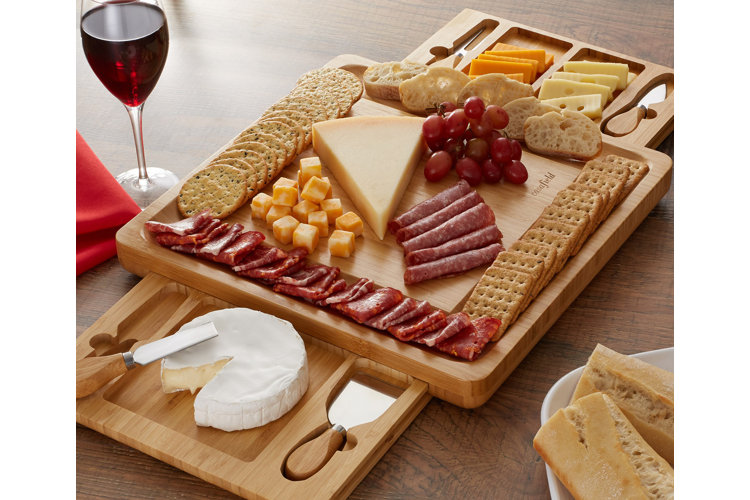
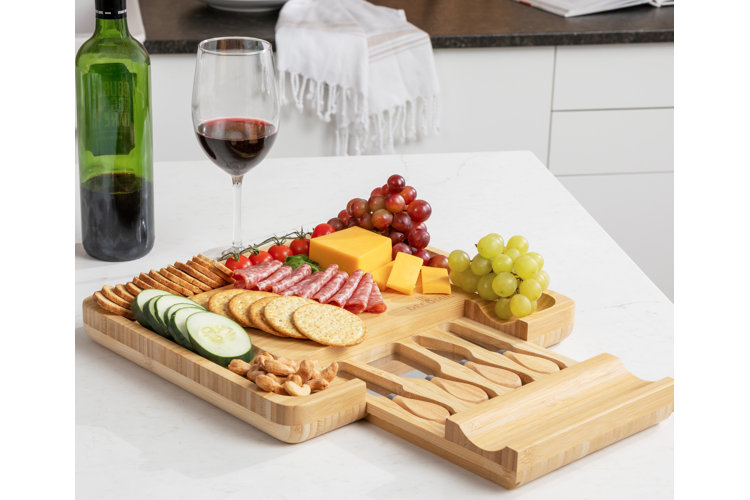
There are so many different cheese boards to choose from. Ranging from style to materials, your personal preference is where you begin. There are slate, wood, glass, and marble opinions, in round, square, and rectangular shapes. What you choose is up to you.
Step 2: Select Your Cheese
This is probably the most difficult part because of all the choices you have available to you. No matter if you prefer brie, cheddar, blue, or asiago, there is one main point to consider – variety. This doesn't only mean different flavors but also includes a range of textures. Oftentimes people serve the entire block of cheese for guests to cut individual slices, or break them up into smaller pieces.
Step 3: Choose Your Cured Meats
Also known as charcuterie, you want to pick a few different cold meats. These can include favorites such as salami, prosciutto, and chorizo. You can begin to explore new flavors here.
Step 4: Add the Savory
After the cheese and meat, you are now ready to add the smaller touches, beginning with savory items. These can include anything from nuts, to olives, artichokes, roasted peppers, as well as tapenades and spicy condiments.
Step 5: Now for the Sweet
Sweetness is vital to breaking up and balancing out all that savory saltiness. These come by way of dried fruits, preserves, candied nuts, and even chocolate if you are feeling a little adventurous.
Step 6: Remember the Bread
You will now need a vehicle to get all of these delicious ingredients into your mouth, aka. bread. This is not limited to only baked breads such as baguette and bread sticks, but also includes crackers and the like.
Step 7: Pick Garnishes to Finish
The final touch to completing your cheese board is the garnish. This is where you can have some fun by creating a theme or fun design. For example edible flowers work well for a fresh look, aromatic herbs for a warm feel, you can even add fresh fruit like apples and pears to complement all your other flavors.
Step 8: Design Your Cheese Board
Now you have all your ingredients, it's time to artfully lay them out. There are a number of ways to do this, so these are only guidelines to help get you started.
- Place your cheeses in different spots around the board.
- Do the same with the meats. These are best served in slices (which can be rolled or displayed as you prefer).
- The number of cheese and meats you choose will depend on the size of your board, but the most common range is between 2 and 3 of each.
- Now take a handful of each savory and sweet item and begin to place them in piles in any open spaces available.
- If you have any condiments or dips, place them in small serving dishes and arrange the other items around them. You can use your judgment for items like olives and pickles.
- Finally the bread/crackers are best placed in a row or next to one another. Some cheese boards feature a designated spot to store them.
- To finish it off, squeeze in those final flourishes of herbs, flowers, and fruits into any bare spots you may see.
- Remember the cheese knives, teaspoons, and plates.
- Cheese markers are a fun addition to identify each one, and you can find cocktail picks amongst our bar and wine tools.
- Wine is always a good accompaniment to a cheese board, so now is the perfect time to pop your favorite bottle.
Now you know how to make a cheese board, all that is left is to enjoy the fruits of your labor.
You Might Also Like:
