How to Attach a Bed Frame to a Headboard
Fasten your headboard for a solid sleep setup.
Headboards can add functionality, comfort, and style to your bedroom. Adding a headboard to your bed is a simple upgrade that can make a big difference and it’s easier to do than you might expect. Keep reading to learn how to attach a bed frame to a headboard with confidence.
Key Terms to Know
Before you begin, familiarize yourself with these common terms:
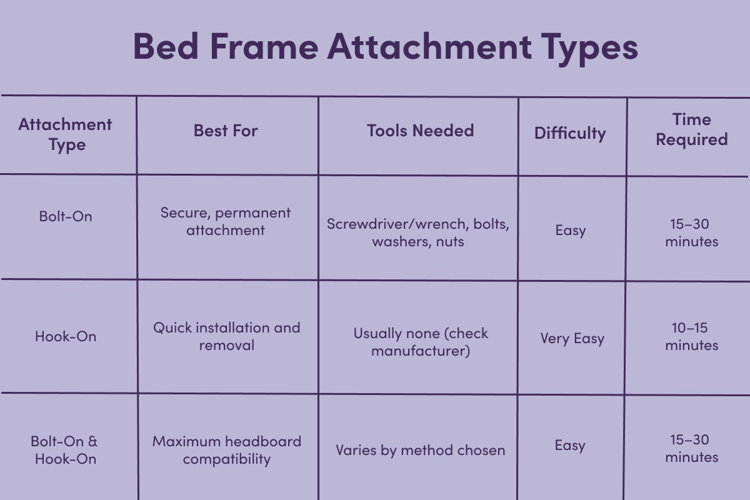
- Bolt-on brackets: Metal plates with round drill holes that secure headboards using bolts, washers, and nuts.
- Hook-on attachments: Hooks at the end of bed rails that slide into pre-cut slits on compatible headboards.
- Bed rails: The side pieces of a bed frame that connect the headboard to the footboard.
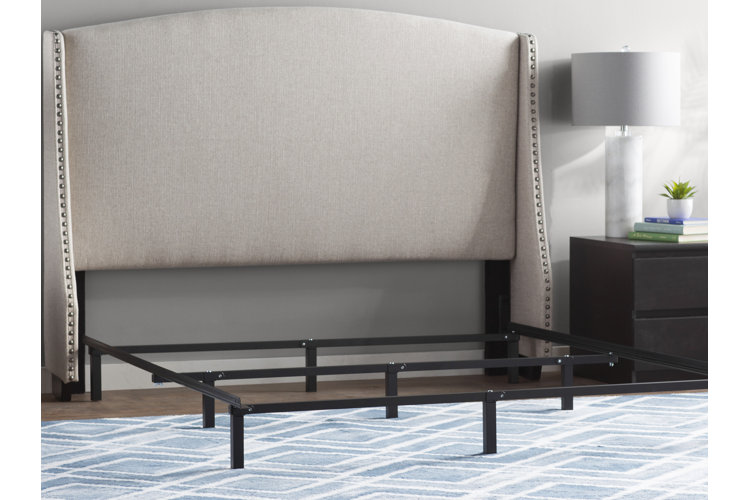
1. Check Your Bed Frame for Brackets
Before attaching a headboard, check your bed frame for compatible attachment types. This allows you to narrow your headboard search and determine the tools and materials you need to attach your headboard to your bedframe.
- Bolt-On: Bolt-on bed frames have brackets with round drill holes either on the headboard side or on both sides of the bed (should you want to attach a footboard). These types of bed frames are usually compatible with bed frame–mounted headboards and require bolt screws to secure the headboard to the bed frame.
- Hook-On: Hook-on bed frame attachment types have hooks on the end of both bed rails. These hooks hook into pre-created slits on the bed frame–mounted headboards for a quick but secure attachment.
- Bolt-On & Hook-On: Bolt-on and hook-on bed frame attachments typically include basic bolt-on brackets and hook attachments or bolt-on brackets and a separate hook-on bracket that you can secure and take off the bed frame. This gives you ample flexibility when it comes to compatible headboards.
Tip!
Learn more about your bed frame in Types of Bed Frames: Everything You Need to Know.
2. Choose a Headboard
When it comes to headboard installation types, there are three common designs: mounted to the bed frame, mounted to the wall, and freestanding.
- Bed Frame–Mounted Headboards: Bed frame–mounted headboards usually match up with bed frames that have bolt-on, hook-on, or bolt-on and hook-on attachments. They typically have bracket holes that correspond with pre-drilled holes or slits on bed frames. Some frame–mounted headboards have adjustable height features so you can raise or lower the headboard's length according to your bed height.
- Wall-Mounted Headboards: Wall-mounted headboards are ideal if your bed frame doesn't come with mounting brackets or if you prefer the look of a wall-mounted headboard.
- Freestanding Headboards: These are the easiest headboards to attach. This is because freestanding headboards rest between the bed and the wall and do not require any installation. If your bed frame doesn't have any brackets, or you don't want the hassle of installation, freestanding is the way to go.
Tip!
Get more in-depth information to help you choose the right headboard in Buying a Headboard 101: Headboard Designs.
3. How to Attach Different Types of Headboards
Now that you've determined the best headboard for your bed frame, it's time to learn how to attach a headboard to a bed frame. If you currently have a mattress on top of your bed frame, we recommend removing it for this part.
Tools & Materials Checklist
Gather these items before starting your installation:
For frame-mounted: Four-inch bolts (or manufacturer-specified, typically 1/4"-20 thread), washers, nuts, screwdriver/wrench/Allen key, bracket modifier (if needed)
For wall-mounted: Pencil, tape measure, level, stud finder, toggle bolts (if no studs), four-inch bolts, power drill with drywall bit, headboard mounts, wall mounts, bolts, washers, screwdriver, wrench
For freestanding: Furniture brackets (optional, for added stability)
For a Frame–Mounted Bed:
People Required: 1–2 people
Time Required: 15–30 minutes
We recommend having one other person to help hold the headboard and bed rails in place as you install them. Bed frames with pre-installed hook-on mounts may not require bolts so be sure to check the manufacturer's instructions before proceeding.
1. Line Up Headboard Supports
Have someone hold the headboard up as you align the headboard bracket holes with those on the bed frame. Complete this step away from the wall as you may need to install bolts from the backside of the headboard into the bed frame.
2. Screw the Bolts Through the Headboard
Bed-frame mounted headboards typically have two to four sets of pre-drilled holes in the headboard legs for bolts to go through and attach to the frame brackets. When determining how to attach a headboard, opt for a screwdriver or Allen key to screw the bolts through the holes. The bolts should pass through the holes and the corresponding bracket holes of the bed frame.
3. Attach Washers to the Bolts
With the bolts loosely through the headboard and bed frame brackets, it's time to start securing them. Use your finger to twist a washer onto the end of each bolt until it rests snug against the bed frame bracket. Make sure to hold each bolt in place while you do this to ensure they stay in place.
4. Attach Nuts
Tighten up each washer/bolt combo with a nut. Start by twisting the nut onto the end of the screw. Use your wrench to tighten the nut once it's resting against the washer on the bolt. Repeat this process for each bolt on both sides of the bed.
For Wall-Mounted:
People Required: 2 people
Time Required: 30 minutes – 1 hour
1. Locate the Wall Studs
Wall studs are the wood interior beams that support drywall. They are the ideal structure to drill into as they can support the weight of wall-mounted items like headboards. Use a stud finder (a small device that detects wall studs when placed against the wall) and mark the location of each wall stud for the best headboard installation spot.
No wall studs? No problem. Use a standard drywall drill bit and drill into the spots where you want to install wall mounts. Then, insert toggle bolts instead of standard screws or bolts to provide maximum support to your headboard.
2. Measure & Mark Bed Height (With Your Mattress)
Use your tape measure to determine the full height of your bed frame with the mattress on top. This ensures that you don't hang your headboard too high or too low in comparison to your bed. Using your measurement, line your tape measure against the wall where you want the edge of your bed to go and mark the height of the bed on the wall. Repeat this on the bed’s other side.
3. Measure & Mark Headboard Height
Use the height marker for your bed and mattress as the starter point. Measure upwards using your tape measure. Mark the height measurement for the headboard. Repeat for the other side and connect the two markers with duct tape or pencil marking.
4. Determine Levelness With a 4-Foot Level
Use the line you created with duct tape or a pencil to rest your level horizontally against the wall. If the air bubble moves to the center of the level, then you know your markings and measurements produced an even line to hang your headboard from. If not, redo your measurements and try again.
5. Identify & Measure Headboard Mounts
Now, turn your attention to the back of your headboard. Lay it flat on a floor or table surface. The back of your headboard will likely have pre-made markings that identify the spots to drill the mounts into the headboard. Take your tape measure and measure starting from one of the mount spots to the outside edge of the headboard, and then from the outside edge to the bottom of the headboard. Record these measurements.
Use these measurements and the markings already on the wall to help you measure and mark where each wall mount should go to line up with the headboard mounts.
6. Attach Headboard Mounts to Back of Headboard
Use the hardware and tools provided or deemed appropriate by the manufacturer to attach the headboard mounts to the back of the headboard. Start by positioning the mounting brackets on top of each mount spot. Using the screws provided and a power drill, drill each screw into the headboard mount's bracket holes. Repeat for the other headboard mount.
7. Attach Wall Mounts to the Wall
Now, turn your attention to the wall mounts. Center the wall mount on the headboard mount marker you made earlier. Take your pencil and trace a line along the top of the wall mount. Repeat this step for the other wall mount. Then, take your 4-foot level and check the lines for levelness. This is important as it will determine if the headboard hangs straight on the wall. Once you determine levelness, you can start your installation.
Place your wall mount on the wall. Fit a bolt (specified by the manufacturer) with a washer and place it in one of the wall mount bracket holes. Take your power drill and drill the bolt into place, holding the wall mount level with your other hand (or grab a helper). Place a nut over the remaining part of the screw and use a wrench to help tighten the screw, locking it in place. Repeat this process for each wall mount.
8. Grab a Helper & Hang the Headboard
Pick up your headboard and lower it over the installed wall mounts to lock it into place. Push your bed frame back against the wall and enjoy!
For Freestanding:
People Required: 1 person
Time Required: 10–20 minutes
Freestanding headboards are quick and easy to attach to the bed frame.
1. Pull the bed frame away from the wall.
2. Maneuver the headboard to rest against the desired spot on the wall.
3. Push the bed frame up against the headboard until the headboard fits snug between the wall and the bed. To prevent the headboard from falling if the bed frame is moved, consider securing it with furniture brackets.
4. Make your bed and enjoy!
Tip!
Check out the video below for a complete visual overview on attaching a bed frame to a headboard:
