How to Build a Swing Set
Get ready for some outdoor fun.
Interested in building a swing set? These luxurious backyard playgrounds provide the ultimate entertainment spot for kids of all ages. If you feel intimidated by all of the swing set parts, never fear. We’re here to give you all the tools (figuratively and literally) you will need. Whether you choose a wooden, metal, or plastic kit, this guide covers everything you need to know about how to build a swing set so your family can enjoy the season outdoors.
What You Will Need
From the actual swing set parts to the tools for assembly, here are all of the materials you will need for building a swing set.
- Swing set kit
- Screwdriver
- Shovel
- Adjustable wrench
- Socket wrench
- Power drill
- Hammer
- Ratchet
- Tape measure
- Stepladder
- Anchors/stakes
If you are building a wooden swing set, you may need more tools for assembly than you would for metal or plastic sets since these wooden options contain more parts. Your swing set kit may also require more tools than what is on our list. Always make sure to read each product specification so you can be prepared with the required tools needed to build your specific set.
How to Build a Swing Set Step-by-Step

What You Will Need
You will need to use the hand tools presented earlier in this guide to build your wooden swing set along with these components that typically come in each kit:
- Slide
- Swings
- Climber
- Frames & beams
- Bolts & screws
- Swing set hardware
- Other extras
Your chosen wooden swing set kits will also give you the hardware you need to secure every item in place.
Step 1: Select Your Kit
Before you begin installing a wooden swing set, you need to find the right kit for you. Not all wooden swing sets are made the same in terms of complexity, size, and number of parts.
To choose the right size, you will need to measure your yard to know what you can and cannot accommodate. Measure your yard by locating the flatest and clearest portion of your yard. This location needs to be free from obstructions like tree branches and allow for at least 6 ft. of clearance once the swing set is installed so it’s not cramped. The basic rule of thumb for space is having at least 6 ft. of clearance on all sides of the swing set.
The standard dimensions for a swing set is 12 ft. wide and 8 ft. deep. Measure this space out in your yard with a measuring tape to see if you can accommodate a standard swing set and even might have room to fit a larger set. If your flat area does not allow for the standard size, a smaller swing set would be the best fit.
If you have the yard space for a larger wooden swing set with slides, a tree house, multiple swings, and a bottom sandbox, go for a complete backyard jungle gym set. Smaller yards can still fit a smaller wooden swing set, but these typically just include swings rather than other extras like a slide or treehouse.
Step 2: Find the Right Location
After you’ve found your swing set kit, choosing the spot to install it in your yard is important. The right location to install your swing set is:
- In a flat, level part of the yard.
- Within the view of the home.
- In the shade (this is optional if your yard has no shade).
Once you’ve selected the right location, you will want to mark the spot. To do this, use a measuring tape to measure out a 12 ft. span, and mark both ends with spray paint. These markings will be where you dig two holes – both 3 ft. deep – with a post-hole digger to insert your A-frame. (More on what the A-frame is below!)
Step 3: Build the A-Frame
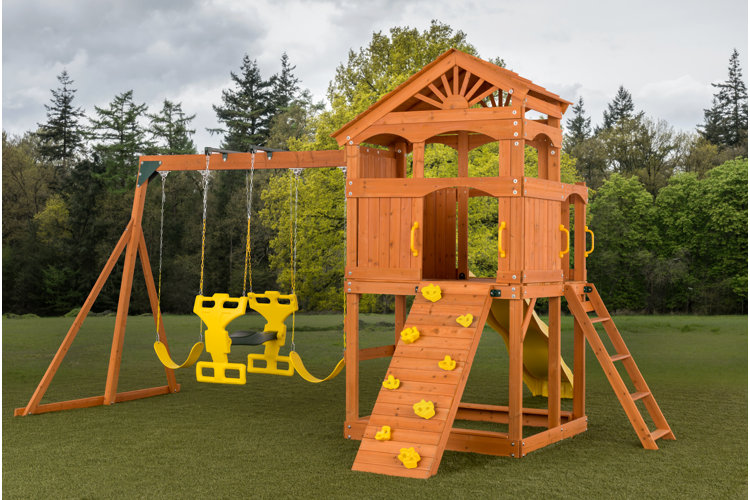
The A-frame is the side/sides of your swing set that hold the swings up and keep the set secure. Refer back to the image in this section to see the A-frame at the very end on the left side next to the swings – it literally looks like a capital letter “A”.
To build your A-frame, take two of the boards from your kit and put the ends together like an “A”. Install a bracket from the kit at the top point by drilling with a drill bit. Your kit’s instructions will tell you how many holes to drill for the brackets and how many bolts will need to be installed with your wrench or socket.
Some swing sets may have two A-frames. This is true if your wooden swing set does not include an extra tree house or sandbox area. For wooden swing sets with the treehouse, the kit’s A-frame will be attached to an overhead beam that later connects to the treehouse portion.
Step 4: Install Swing Hardware
Next, you will install your swing hardware. You’ll be attaching your swing hardware onto the top beam that will eventually be held off the ground by the A-frame sides.
The easiest way to install your swings and their hardware is to have the bottom of the beam (the beam your swings will hang from) lying face-up so you can mark the center of the beam with a pencil. You will need to mark the center of the beam so you can properly measure the space you need to install your swings since they require a certain amount of distance between each swing.
Take your tape measure and measure out the full length of the beam to find the center and then mark the center with a pencil. The standard rule of thumb for spacing out your swings is to allow at least 18 in. between each swing and 16 in. between each swing hardware.
In order to find the right spot to install each swing hardware, take your tape measure and measure out 8 in. from both sides of your center marking. This will space the swing hardware the appropriate 16 in. apart. Mark your measurement with your pencil about 2 in. from the edge, but don’t forget to double-check your instructions for precise measuring.
Use your drill bit to drill the holes for your swing hardware at the spots you marked and begin installing the hardware per your kit’s instructions.
Once you’ve installed the swing hardware onto the beam, attach the beam to the bracket that is holding your A-frame together to create one side of the initial swing set frame. Repeat this step with the other A-frame if your swing set has two. Make sure you read your assembly manual for specific instructions for drilling and attaching.
You can then finish by hanging your swings from the swing hardware at this step or waiting until the entire set is installed.
Step 5: Build Your Treehouse (If Your Kit Includes One)
Does your wooden swing set kit include a treehouse extra? If so, now is the time to begin installing this portion of your kit.
The treehouse extra will be attached to the center beam your swings are on (the opposite of the end of your A-frame). Every wooden swing set that includes a treehouse may involve varying construction methods and parts, so be sure to pay close attention to the specifics of this step in the manual if you’re building a treehouse.
Step 6: Stand Up the Frame
After your extras are installed, you can stand up your frame! To make it easier, we recommended installing your swing set in the location you will be placing it in so you do not have to worry about moving the set. Gently lift the swing set up and place it in the location you marked. This step typically requires at least two adults since your swing set will be heavy and expansive.
Step 7: Place Safety Stakes
Once your wooden swing set is in your preferred location, you will need to install the safety stakes that keep your set firmly in the ground. These stakes prevent the swing set from tipping over, which can be very dangerous.
You can secure your swing set one of two ways: with the included safety stakes provided by your kit or by digging holes in the ground and filling them with concrete. Here’s how to do both.
With Safety Stakes:
- Using your drill bit, drill a hole exactly 2 in. up from the bottom of the beam legs (this needs to be done on both A-frame legs and frame legs). This needs to be done on each leg.
- Insert the screw eyes provided by your kit into the hole by twisting it until it locks.
- Place an included J-bolt through the screw eye on each leg. Take a hammer and hammer down the J-bolt until the top reaches the screw eye.
With Concrete:
- Dig two 2 ft-. or 3 ft.-deep holes for each end of your frame with a post hole digger.
- Mix two 50 lb. bags of concrete with water. You will need a 5 gal. bucket for this.
- Place the beams into each hole.
- Pour in enough concrete around the hole to fill it all the way to the top.
- Let your concrete sit for 24 to 48 hours.
- Cover the concrete with soil.
Step 8: Install Any Extras
Once you’re finished building your A-frame, center beam, and swing hardware, and optional treehouse, it’s time to finish your installation with the extras. Extras can include slides, a climber, a sandbox area, and more.
Make sure you read your instructions to correctly install your kit’s extras since every wooden swing set differs in construction.
If you did not hang your swings earlier, now is the time to do so.
What You Will Need
You will need to use the hand tools presented earlier in this guide to build your metal swing set, along with these components that typically come in each kit:
- Slide
- Swing
- Beams & poles
- Swing hardware
- Bolts & screws
- Other extras
Since metal swing sets are not as complex as wooden swing sets, your kit may not come with as many extras in terms of treehouses or climbers, so this will cut back on installation time and complexity.
Step 1: Select Your Kit
Similar to wooden swing sets, swing sets made out of metal can range in size and features, so the complexity of your installation depends on the complexity of your kit. Most metal swing sets do not come with as many extras as wooden swing sets. Metal swing sets typically only contain swings, with slides being the only extra tag-on.
Step 2: Find the Right Location
Once again, your metal swing set should go in a proper location of your yard. Flat, level spaces work best so your set has a less of a chance of tipping over. Metal swing sets come in a variety of sizes, so if your yard doesn’t have the space for a larger swing set with multiple swings, opt for a smaller swing set with just one swing.
Before installing your metal swing set, you will need to measure out your yard similar to how you would measure a wooden swing set so you can know for sure which size your yard can accommodate.
Step 3: Attach the Frame & Swings
Metal kits are simpler since they do not have as many swing set parts as wooden swing sets. Building their frame works just like you would a wooden swing set’s frame, except the beams are made out of metal.
You will still build the A-frame legs with your metal beams and attach a bracket as normal. The swings will also be installed just like they are on a wooden swing set – hanging from an overhead beam with the same spacing in between each swing. Be sure to read your kit’s instructions to make sure you follow specific steps to install your set properly.
Step 4: Anchor Into the Ground
Once you’ve finished installing your A-frame and swings, it’s time to sit the frame up and secure it in the ground. Metal swing sets should be secured into the ground with the concrete method, since this will be the best way to keep this kind of swing set from tipping over.
Step 5: Install Swing Hardware & Extras
Once the cement has had the chance to dry, you can begin installing your slide or any extra parts once your swing set is up right.
What You Will Need
You will need to use the hand tools presented earlier in this guide to build your plastic swing set, which typically comes in a kit including the following:
- Slide
- Swing
- Beams & poles
- Swing hardware
- Bolts & screws
- Other extras
Step 1: Select Your Kit
Plastic swing sets are the easiest to install since they do not contain complex instructions or as many parts. Plastic swing sets can be used by a variety of ages, so the type of set you select depends on how old your children are. Choose the right kit with the right weight capacity to best accommodate your children for safe play.
Tip!
To find the weight capacity for plastic swing sets, check each product overview section. For a shortcut, browse through one of our filters below.
Step 2: Find the Right Location
Plastic swing sets are the most versatile in location. Some plastic swing sets are made for indoors, while others are made for outdoor use. If you do prefer to place your swing set outdoors, make sure it’s weather-resistant to prevent it from damage due to a storm.
Determine where you would like your plastic swing set to be and select a set accordingly. If you opt for an outdoor location, the same rules apply for finding a flat and level area to install your swing set.
Step 3: Attach Your Parts & Extras
As already mentioned, plastic swing sets are the simplest to install and should not require any tools other than a screwdriver and wrench, if that. Follow the instructions on your kit for installing each part for a quick and easy set up that can be completed in under 30 minutes!
Now that you know how to build a swing set, it’s time to get started on your backyard fun!
