How to Install a Mailbox: Our Easy Step-by-Step Guide
Don’t miss our open letter to installing this necessary home item.
If you’ve recently been thinking about purchasing a new mailbox for your home, then you also need to know how to install a mailbox correctly. Different types of mailboxes all have specific requirements for their installation, so we’ve broken down how to install each kind in this guide. Keep reading to learn how to install mailboxes of any kind anywhere on your property.
Tip!
Looking for the perfect mailbox for your home? Read our guide about the types of mailboxes here!
In This Guide:
How to Install a Post-Mount Mailbox
How to Install a Wall-Mount Mailbox
How to Install a Recessed Mailbox
How to Install a Mailslot
How to Install a Freestanding Mailbox
How to Install a Pedestal Mailbox
How to Install a Post-Mount Mailbox:
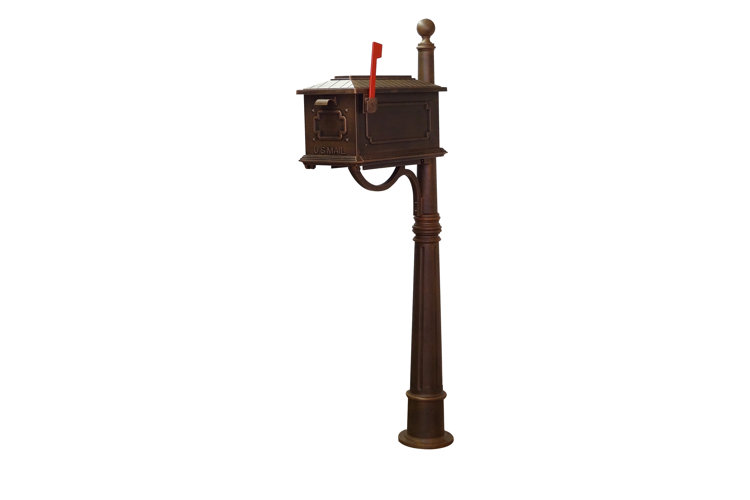
A post-mount mailbox is a mailbox attached to a post that is firmly planted in the ground. These types of mailboxes are typically placed at the edge of your yard near a driveway entrance. We love that this means you can easily check the mail on your way to work without having to leave your car. Make sure this type of mailbox is planted firmly enough to avoid being knocked over by inclement weather or driving accidents. If this sounds like the mailbox for you, here’s how to install a post-mount mailbox securely for easy access and to decrease the chance you’ll need to replace it.
Tools/Materials Required:
- Measuring tape
- Pencil/marker
- Post-hole drill
- Support beams (if working alone)
- Fast-acting concrete mix
Step 1: Determine Your Desired Location
The typical distance of a post-mount mailbox is 6" to 8" off the road or curb and a few inches off to the side of your driveway. Once you’ve narrowed down the location of your post-mount mailbox, the next step is to begin installing the post.
Step 2: Drill a Hole
The USPS recommends post-mount mailbox height be no taller than 45" above ground. Before you start drilling, use a tape measure to mark the 45" spot with a pencil or marker starting from the top of your post, so you know where the post should start to stick out of the ground once you insert it. Then measure the remaining bottom section of the post (the part that will be underground) – that measurement is approximately how deep a hole you’ll need to drill into the ground. Use a post hole digger to drill your hole at the desired location of your choice. Remember to drill deep enough that your mailbox height is between 42" to 45" tall, but do not dig more than 24" into the ground.
Step 3: Insert the Post
Now you can insert the post to the hole you just drilled! You will need to give the post support with support beams if you do not have anyone helping you with this step. Once you insert the post, measure once again to make sure it is sticking up at least 42" to 45" above the ground and that your post is straight, not crooked.
Step 4: Secure with Concrete
Fast-setting concrete mix will be your best friend when installing your post-mount mailbox. It can be very easy for mailboxes to be run over or knocked down if they are not held firmly in place after installation. To secure your post, fill the hole with concrete until there’s a few inches left at the top, which you’ll fill in with dirt afterwards. Filling the hole with concrete helps to lock the post, but remember not to fill the concrete mix all the way up to the top of the surface where the ground is so you can keep your yard aesthetic.
Step 5: Attach the Mailbox & House Numbers
The last step of installing a post-mount mailbox is to attach the mailbox to the post. There should be instructions in your kit that detail how to do this successfully. You will also need to install your house numbers on the mailbox once it’s secured, so the mail carrier can deliver your mail to the correct box.
Tip!
Want to spruce up your mailbox? Try accessorizing it with some decorations!
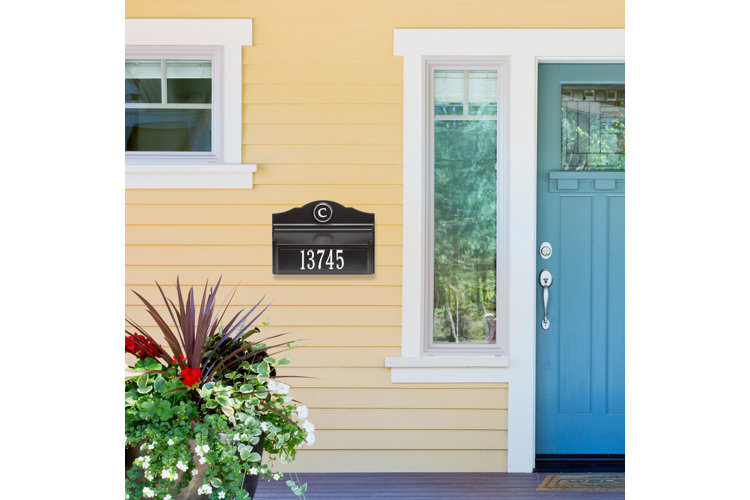
Another popular mailbox option is a wall-mount mailbox installed on the wall somewhere next to your door. If you do not want to risk your mailbox being hit or knocked down easily, then a wall-mount mailbox is perfect for you. Wall-mount mailboxes also give you convenient access to your mail, since they’re right outside your door. With this option, you won’t have to take a stroll to retrieve your mail from the end of your driveway. Wall-mount mailboxes enhance the entrance of your home thanks to their intricate design options and various colors, which can add a more welcoming, lively feel to your porch.
These mailboxes do not have a long post you have to drill into the ground, but they still require you to drill some holes for proper installation. Read below to learn how to install a wall-mount mailbox.
Tip!
Before you install a wall mount mailbox, don’t forget to call your post office to get their approval of your new mailbox. This ensures there are no errors in delivering your mail and that the mail deliverers will know where your mailbox is.
Tools/Materials Required:
- Pencil/marker
- Leveler
- Power drill
- Wall anchors
- Drill bits/screws
- Screwdriver
Step 1: Mark Your Desired Location
Wall-mount mailboxes need to be visible and easily accessible for your mail deliverer. Most wall-mount mailboxes are big enough to be seen from the road, but you should make sure its location on the wall is not obscured by bushes or any other visual-blockers. When you’ve found the perfect spot, first mark the place on the wall that you’ll be drilling holes with a pencil or marker. You can easily do this by holding up the mailbox against the wall and opening the flap to see the back holes you will be inserting your screws in. Use your pencil or marker to put a mark through the holes. After you’ve marked the holes, set your leveler on top of the mailbox to make sure everything is lined up and does not have to be adjusted.
Step 2: Drill Holes
You should use a standard drill to create the holes you need to install a wall-mount mailbox. You do not need to drill very far into the wall: ¼ drill bits will work for brick and masonry walls and ⅙ drill bits will work for wooden walls. After checking the leveler to make sure everything is lined up, you can remove the mailbox from the wall and drill through the holes you marked from earlier.
Step 3: Use Wall-Mounting Hardware
Some wall-mount mailboxes come with mounting hardware, while others do not. It’s important to check the kit to see if you have the hardware before you start the installation process, to make sure you can finish the job. Plastic wall anchors should be used for all wall types and inserted into the holes first to secure the nails or screws later.
Step 4: Hang Your Mailbox
After your wall anchors are in place, you can begin your mailbox installation. Place one nail or screw in one of the back holes of the mailbox and use your drill or screwdriver to firmly secure it, then repeat this step to the other hole. You should pause before all screws are firmly in place to make sure the mailbox is level and does not have to be readjusted – using your leveler for this. If everything is straight and proper, securely lock all screws in place. Since wall-mount mailboxes are typically smaller and farther away from the road, don’t forget to have your house numbers or home address placed prominently above the mailbox on the wall for the mail carrier to see.
Tip!
Test out the security of your wall-mounted mailbox after installation by wiggling the sides to make sure it cannot come out of the wall easily. If your mailbox doesn’t move, you’re good to go!
How to Install a Recessed Mailbox:
Recessed mailboxes are typically used for residential complexes that host multiple tenants. They can have several slots for each individual unit, and there are more complex parts to these items than standard mailboxes. Some recessed mailboxes can be installed into the wall of a building, while others are installed into concrete. Since their parts are more intricate, we highly recommend having them professionally installed.
Mail slot mailboxes are very similar to wall-mounted mailboxes, but are instead installed in your door. With this type of mailbox, your mail is directly delivered to the inside of your house, so you never have to walk outside to get the mail or worry about someone else going through what’s been delivered to your home. To install a mail slot, you will need to cut a slot through your door for your mail to slide through the slot. You can perform this mailbox installation yourself with the below-outlined materials and steps, or have a professional handle itt.
Tools/Materials Required:
- Pencil/marker
- Measuring tape
- Leveler
- Jigsaw
- Drill/drill bits
- Screwdriver
Step 1: Mark Your Location
Mail slots are typically installed 36" from the ground and in the center of your front door. Use your measuring tape to start at the base of the ground outside your front door and measure up 36". Once you’ve found that spot, place your mail slot in the center of your marked location, then take your pencil or marker to mark the four corners, drawing an outline of the mailslot. You will need this marking as a guidepost later, when you cut out the slot in your door.
Step 2: Drill Your Holes
Before you cut out the slot, you should use a ⅜ drill to drill holes in the corner where the the screws will go.
Step 3: Cut Out Your Outline
Next, take your jigsaw and cut out the mail slot opening in the wall. You should use your jigsaw to cut from right beside the right hole to the edge of the left hole, without actually cutting into the holes themselves. Do not cut through the holes, as they’re needed to hold the screws that secure the mail slot.
Step 4: Attach Your Screws
Now that your slot opening is cut out and you have your screw holes, you can finish installing the mail slot. Hold your mail slot up to line-up with your cut outs, and use a drill or screwdriver to secure your screws, securing the mail slot to the door.
How to Install a Freestanding Mailbox:
Freestanding mailboxes are the easiest to install, since they don’t actually require any installation! They sit directly on your porch, driveway or yard. These mailboxes are heavy enough to stand on their own, while still being light enough to move around on your porch or front yard. They are often used for bigger pieces of mail such as packages, boxes, or larger documents that cannot fit into a standard mailbox.
These mailboxes are typically used for small businesses or living complexes for multiple tenants. They are mounted into the ground, preferably through concrete. Installation for pedestal mailboxes operates similarly to post-mounted mailboxes, though they are more complex due to their detailed parts. You will need a hammer drill that is able to power through concrete for the anchors and a drill once you begin installation. Instructions for installing pedestal mailboxes come with these items, but we highly recommended having a professional handle it due to its complexity.
Now that you know how to install mailboxes, it’s time to find your next letter home!
