How to Make Homemade Ice Cream
Make ice cream at home with ease.
If you love experimenting with flavors and making desserts from scratch, an ice cream maker might just be the right gadget for you. You can easily change up your frozen treats game and learn how to make homemade ice cream to your taste with one of these easy-to-use appliances. Use this guide to master how to use an ice cream maker so that you too can make your own ultra smooth and creamy summer delicacies with ease.
In This Guide:
Before You Buy an Ice Cream Maker
Types of Ice Cream Makers
How to Use an Ice Cream Maker
Before You Buy an Ice Cream Maker
Warm weather and cold desserts go hand-in-hand, and an ice cream maker is the ideal way to ensure you have a steady supply of your favorite frozen treats throughout the season. Making homemade ice cream is not difficult, as long as you are properly prepared. Before you learn how to use an ice cream maker, you need to take a few things into consideration to help you purchase the best model for your needs.
Time: How much time do you have to make ice cream? Will you be making it on a whim or consistently throughout the week? Some ice cream makers need to be prepped the day before whilst others can be used immediately.
Amount: What is the volume of ice cream you intend to make? Some ice cream makers can only make one serving within an eight or more hour span and others can make ice cream batches back to back.
Space: How much space do you have available on your counters, in your cupboards, and in your freezer (if necessary)? Ice cream makers are not small appliances so you need to ensure you have the means to correctly use and store yours.
Cost: Ice cream makers do come at a premium so you will need to ensure you select a model that is in your budget and that will be used enough to give you the most bang for your buck.
For an additional ice cream maker guide, read: How to Choose the Best Ice Cream Maker for You.
Types of Ice Cream Makers
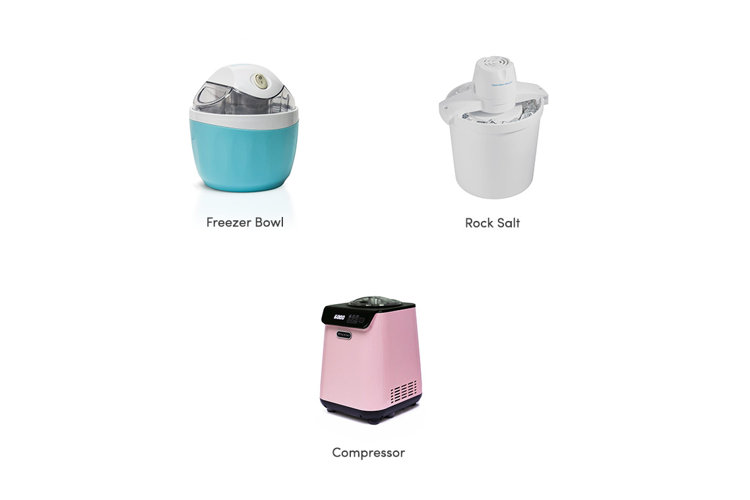
Before you learn how to use an ice cream maker, you need to learn which type of maker you’d prefer. There are several types to choose from, some are even able to produce a number of frozen treats. Although they all produce the same result, each ice cream maker functions in a different way. It is up to you to choose the one that works best for you and your family.
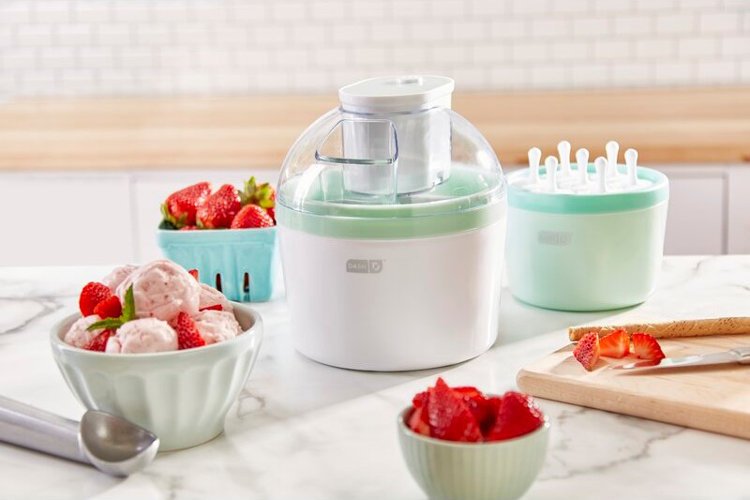
Freezer Bowl: Freezer bowl ice cream makers have a removable bowl that contains a freezable liquid within its structure that must be frozen – usually the day before you make ice cream. That frozen liquid then transfers the cold to the ice cream batter while churning. Due to the fact that they require at least six to eight hours of pre-chilling, freezer bowl ice cream makers can only make one batch at a time.
Rock Salt: Rock salt ice cream makers are double stacked, meaning they comprise two separate components – an inner and an outer container. Rock salt and ice are added to the outer container while the ice cream batter is placed in the inner bowl. As the salt melts the ice it draws out the heat from the inner bowl and batter, creating a slow freezing process. Bear in mind that making homemade ice cream with rock salt requires precise measurements.
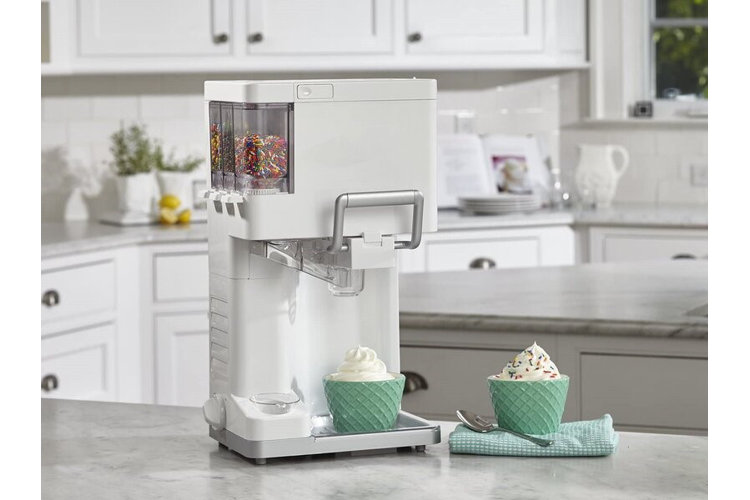
Compressor: A compressor ice cream maker is the fastest and easiest way to make ice cream. It automatically freezes itself whilst churning the ice cream mix, thanks to its built-in compressor. Compressor ice cream makers often have additional features and options that can produce various desserts such as frozen yogurt, gelato, or sorbet.
Although making homemade ice cream can be done in one of three ways, it begins with the same process using homemade ice cream recipes for the base. From there, each ice cream maker has its own step-by-step instructions.
Preparing the Base
Although there are a myriad of easy ice cream recipes to choose from, they usually have the same three basic ingredients of milk, cream, and sugar. From there the world is your oyster. It is important to know that the ice cream base is cooked over heat and requires a thorough chill before you begin to make ice cream. For the best results you should chill it overnight. Here are a few things to keep in mind with ice cream ingredients:
- Use the freshest and richest ingredients possible. Cutting calories will result in a less creamy ice cream and you will likely want your efforts to go to a decadent dessert.
- Be precise with your measurements as one mismeasure can throw off the entire ice cream recipe.
- Add your liquid essence flavors after the batter has come off the stove as heat evaporates alcohol.
- Keep your ingredients in the fridge right up until you use them. This includes any fresh ingredients you plan to add to the batter while it is churned, as well as the batter itself. Warm ingredients will prolong the process and make a heavier ice cream.
- Make sure to not fill the bowl more than halfway as the ice cream batter increases in size.
- Turn on the ice cream maker and have the paddle churning first before you add any of your ingredients to prevent them from sticking/freezing to the side of the bowl.
For some of our favorite homemade ice cream recipes, read our guides: Cranberry Almond Swirl Ice Cream and Birthday Cake Ice Cream Recipe.
Using a Freezer Bowl Ice Cream Maker
Freezer ice cream makers require preparation, usually the day before you make ice cream.
- Begin by placing the bowl in the freezer. The liquid within must be 100% frozen before you make ice cream. Shake the bowl to check it is solid – if you hear a sloshing sound, then it needs to go back into the freezer. If it's not frozen the ice cream mix won't thicken and will remain soupy.
- Make sure the bowl is completely dry before you place it in the freezer as any liquid will turn to ice which will end up in your ice cream.
- Remove your frozen bowl only when your batter is chilled and you are ready for making homemade ice cream. Don't let it sit out as it will immediately begin to defrost.
- Assemble your ice cream maker as required and turn on the paddle before you pour the batter in.
- Churn until the batter has thickened to your desired consistency. If you have any additional ingredients you want to add such as fruit, nuts, or chocolate, do so in the last several minutes of churning.
- If you prefer a soft serve consistency, serve immediately. For a firmer texture place the ice cream in an airtight container and store it in the freezer for at least two hours. The longer it is stored, the more the flavors intensify.
- Don't store the ice cream in the bowl as it will stick to the sides.
Tip!
Be sure to properly care for your ice cream maker and follow all cleaning instructions immediately after using it.
Using a Rock Salt Ice Cream Maker
Rock salt ice cream makers use one of the more traditional methods to make ice cream. It is important that you use rock salt and not table salt for the best results.
- Start by adding the ice to the outer canister, run the motor for two minutes so the inner canister can chill evenly.
- Add about two cups of rock salt on top of the ice. Allow it to melt down to 2 – 3 inches and add more ice and two more cups of rock salt.
- You want a ratio of five cups of ice to one cup of rock salt in order to bring that brine to between 8 – 12°F, which gives the rapid cooling needed for creamy ice cream.
- The ice melting draws out any heat from the ingredients inside of the inner bowl that results in a slow freezing process, which then produces rock salt ice cream.
- It is important to maintain the correct ratios as too much salt will create a rapid freeze, which will cause the ingredients to lose too much moisture and have a brittle texture, while too little salt can create a watery texture in the batter.
- The ice cream should begin to freeze about 40 minutes in.
Tip!
If you prefer dairy-free ice cream or a more straightforward method to creating frozen treats, ice pop makers are a great option for you.
Using a Compressor Ice Cream Maker
The easiest way to make ice cream is with a compressor ice cream maker, as the smart technology does all the hard work for you.
- Simply add the paddle to the bowl, turn on the machine and add your chilled base and ingredients.
- The built-in compressor automatically freezes the ice cream as it churns.
- Your ice cream will be ready in an hour or less.
- It is possible to start a new batch of ice cream immediately after the first one is complete.
Now you know how to make homemade ice cream you can scoop your way through summer.
