How to Set Up a Tent for Beginners
Be prepared come camping season.
The last thing you want to worry about when camping is not knowing how to set up a brand-new tent in the dark or an unfamiliar area. You might lose some pieces, have difficulty reading the instructions, and set it up incorrectly. Follow our guide ahead of time so that you'll have no issue knowing how to set up a tent when the time comes.
How to Set Up a Tent
Regardless of their shape, size, or type, most tents follow the same general steps of how to set up a tent.
Tip!
Get familiar with your tent before you actually go camping. Read all of the instructions and be sure you have all the necessary parts for installation. Practice setting it up in your home or yard to go through the motions. You will thank yourself later when it's time to set it up in the woods.
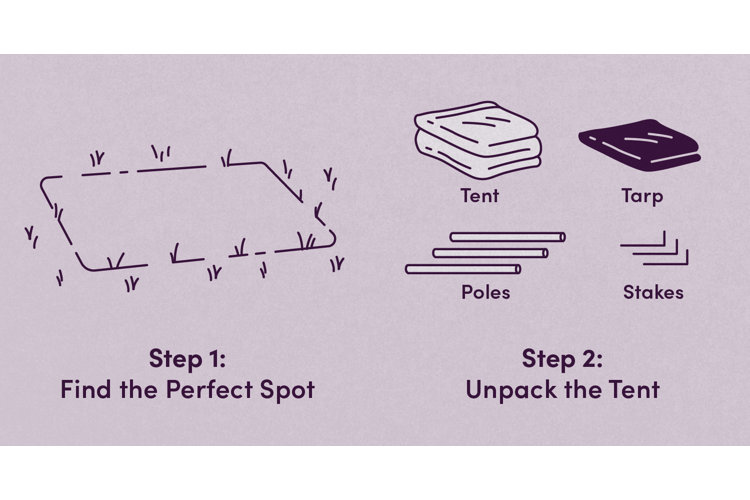
Step 1: Find the Perfect Spot
If you are not camping in an identified campground, you need to look for an area to pitch your tent. The optimal campsite will be on flat ground, clear of debris, a respectable distance from a water source (within walking distance but safe from potential flooding), and protected from direct sunlight and strong wind exposure. Be sure to consult park rangers for advice on where to set up camp.
Step 2: Unpack the Tent
Unpack your tent and organize all of the separate pieces, keeping small pieces somewhere safe during setup. Double-check that you have everything you need. If possible, do your best to bring extra parts (like stakes or poles) in case anything goes missing.
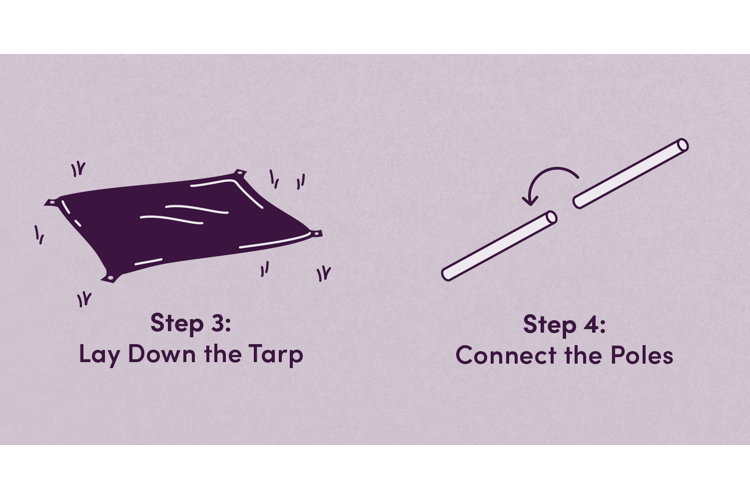
Step 3: Lay Down the Tarp
After clearing the area of any debris, lay down the tarp. If you do not have a tarp, your tent may include a groundsheet or footprint instead. Unroll your tent and place it on the tarp, flattening it and checking that the entrance to the tent is facing the desired direction. For example, set up your tent to face the east to see the sunrise in the morning!
Step 4: Connect the Poles
If your tent has poles, connect the adjoining pieces. Each pole will likely be broken down into smaller parts, held together by a string running through the center so they don't get lost. If your tent has ropes instead of poles, skip this step.
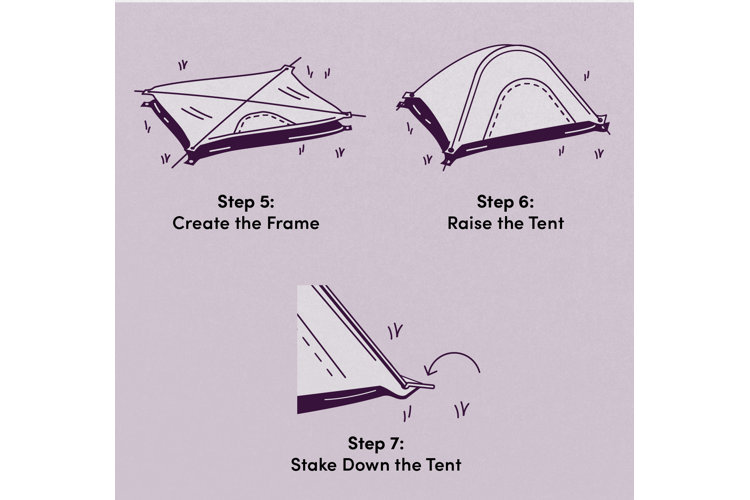
Step 5: Create the Frame
Once the poles are fully assembled, thread them through their corresponding pathways. These pathways will be fabric flaps on the exterior of the tent that create the larger frame of the tent. Most poles follow pathways diagonally across the tent that meet and cross at the center, but check your manufacturer's instructions to be sure.
Step 6: Raise the Tent
Place the ends of the poles through the fabric loops at each corner of your tent. Note: There are usually two fabric loops, a smaller one to fit the end of the pole and a larger one for the stakes. If you accidentally place the poles through the stake holes, your tent could disassemble in the night. Some tents also include hooks that attach to the frame to reinforce the structure; connect these now if yours has them. Then, with the help of a friend, raise your tent. This step will likely be halfway done when you threaded the poles through the frame, but your tent might need some extra encouragement. Try spreading out the fabric around the poles and stretching the corners of the tent if you face resistance.
Step 7: Stake Down the Tent
Your tent should be fully assembled now, but don't forget the most important step! Secure the corners of your tent to the ground by placing the stakes through the large, fabric loops. Nail these into the ground with a hammer. Do your best to get them as far into the ground as you can, but be careful not to stretch or stress the frame of the tent.
