Patio Privacy: How to Create a DIY Privacy Screen
Build your own intimate corner!
Having a backyard patio space makes enjoying warm summer days and nights enjoyable, but sometimes privacy can be an issue if you have nearby neighbors or streets. Having a privacy fence or privacy screen can help create more privacy in your backyard. Fortunately, it’s pretty easy to build your own inexpensive privacy screen with just a quick trip to the lumberyard to gather a few supplies! Read on to learn more about a budget-friendly DIY way to add more privacy to your backyard.
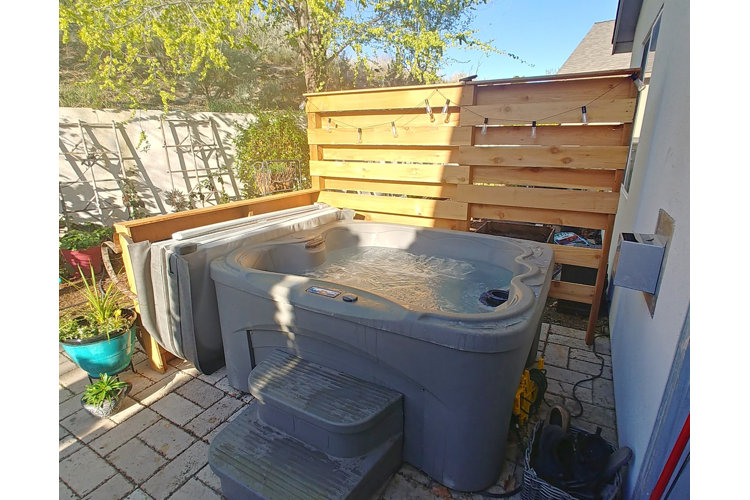
Our sample homeowner shares how she created this DIY project creating an outdoor privacy screen to lend some privacy to her backyard hot-tub area.
Supply List
- Cedar fence boards.
- Pressure-treated 4ʺ x 4ʺ or 2ʺ x 4ʺ boards (depending on the size of your screen).
- Decking screws.
- Concrete.
- Power drill/screwdriver.
- Level/quaring tool.
Total Estimate: $150.00 (This will vary depending on the size of your wall.)
Building the Screen
Step 1: Measure and determine the size of your screen.
Our homeowner built the screen to add a privacy screen to a hot tub, so she measured the length and width of the hot tub on her patio and added enough to the width to accommodate the hot-tub cover when opened. When you are making your privacy screen, you’ll also need to determine how tall you want it to be.
Depending on the length of your privacy screen, you will need to build it in sections. For each panel, lay the 4ʺ x 4ʺ posts on the ground and place your first fence board even with the top and flush on each side, checking that it is square. Attach it to the posts with decking screws.
Continue in the same manner, attaching more fence boards to the front of the privacy screen. You can use another fence board as a spacer between each board to ensure the spacing is consistent, or you can place your boards close to each other with no spacing between. Leave approximately 1ʹ of the posts at the bottom of the screen so it can sink into the ground.
Once you have one side of the privacy screen completed, flip it over and add fence boards to the other side in the same manner. If you left space between each board on the first side, then alternate the boards on the other side to provide the privacy needed for your outdoor hot tub area.
Step 3: Determine placement and dig holes for posts.
You should sink the posts into the ground to add stability and prevent your privacy screen from falling over during windy weather or when accidentally bumped. Alternatively, you can add a flower planter box to one side to serve this purpose while adding outdoor garden decor to your deck or porch.
Dig holes for the posts, stand the wall up with the posts in the holes, and pour concrete into the holes. (Tip: Our homeowner used half cinder blocks inside the holes, slid the posts into the cinder blocks, and then added the concrete. The cinder blocks gave some stability while the concrete cured.)
Continue in the same manner creating as many panels as you need to create your privacy screen. Add a board to the top as a cap for a finished, lattice look.
Give your outdoor space a decorative look by decorating your outdoor privacy screen. Add cup hooks to the bottom of the fence-board cap, hang string lights, and add planters filled with beautiful flowers to create a decorative garden feel to you DIY privacy screen. Pair with hanging outdoor decor and outdoor accent chairs to create a beautiful backyard hangout spot on your deck or patio.
Tania Pelletier has been the do-it-yourself blogger behind littlevintagecottage.com for over 10 years. She has a passion for sharing the journey she is on to fix up her small ranch house and also shares fun crafts and upcycling projects. Follow her on Instagram and Facebook to see more of her ideas.
