How to Install Unique Backsplash in Your Home
Brighten your dull wall space with a backsplash installation
A tile backsplash is one of the best focal points of a kitchen or bathroom. It can add a modern or vintage look depending on the style you choose, or can give your space a much-needed upgrade at a budget-friendly price. But what you might not know about backsplash is that it's not just a decorative feature. While the tiling you choose can be aesthetically pleasing, it also has a primary function for wet spaces: to protect the walls from any splashes and splatters of water and other liquids that might occur during the cleaning process. Keep reading for popular, timeless tile backsplash options.
Popular Backsplash Tiles
Ceramic Tile:Ceramic tiling is affordable, lightweight, durable, and easy to install in your kitchen. A great choice if you are a do-it-yourself home renovator. Ceramic is the most common type of tile backsplash found in homes not only because it is easy to install but because it is durable, cost-effective and comes in a wide variety of colors, sizes, and patterns. Whether you choose mosaic tile or tile sheets, ceramic is a favorite when it comes to backsplash installation.
Glass Tile:Despite being slightly more expensive and trickier to install, glass tiles can add a beautiful design element to your kitchen. Glass tile backsplash comes in a variety of colors and is lightly transparent, allowing you to go bolder with your color choices and add visual interest to your kitchen backsplash without overwhelming the eye. Glass, like ceramic, is very easy to wipe clean and maintain.
Stone/Marble Tile: Stone or marble tile is a luxurious add-on to any kitchen backsplash design but can be pricey when compared to other options. Marble tile is easy to clean and is a beautiful complement to any cabinet or countertop color. If you are looking to put marble in your kitchen, be aware that it may need frequent sealing to maintain its appearance and can chip, crack, and stain very easily.
Installing backsplash doesn't have to be difficult if you make sure to follow step-by-step instructions.
Step 1:Measure the space. To get the exact square footage, multiply the width and height of the wall you plan to install the backsplash upon. Be sure to take outlets and switches into account and add an additional 10% of tile to your final measurement to account for any breakages, gaps, or unexpected incidents.
Step 2: Prepare the area by clearing the work surface, taping off the sections you will be tiling, and placing down a protective layer on your counters. Make sure to shut off all power to any nearby electrical outlets and switches.
Step 3: Prepare the wall by patching and spackling any holes. Sand the spackle down and wipe the wall surface so you have a clean canvas to work on. An unsanded glossy wall may be difficult to tile, so be sure it is correctly prepped.
Step 4: Pre-lay the backsplash across the wall to make sure the tile fits perfectly. Use a tile cutter for porcelain or ceramic tiles.
Step 5: Prepare the mortar to adhere the tile to. Thin-set mortar offers a higher bond-strength, making it a common selection.
Step 6: Apply the mortar using the flat side of a trowel. Be sure to work in small sections to prevent the mortar from drying out.
Step 7: Lay the mosaic or tile sheets on the wall. Use spacers to ensure the installation is even and lined up.
Step 8: Once the mortar has dried, pre-seal the tile if necessary.
Step 9: Prepare the grout. Wipe the tiles clean and remove the spacers once the grout is ready for application.
Step 10: Apply the grout to the tile. Remember you have a small period to do so in before the grouting dries up. Once complete, use a damp sponge to remove any excess grout.
Step 11:Seal the tile after the grout has dried and been cleaned. Once the sealer is dried you can apply a small amount of latex caulk for added protection.
For more in-depth instructions, read our guide How to Install Kitchen Backsplash Tile.
The Process
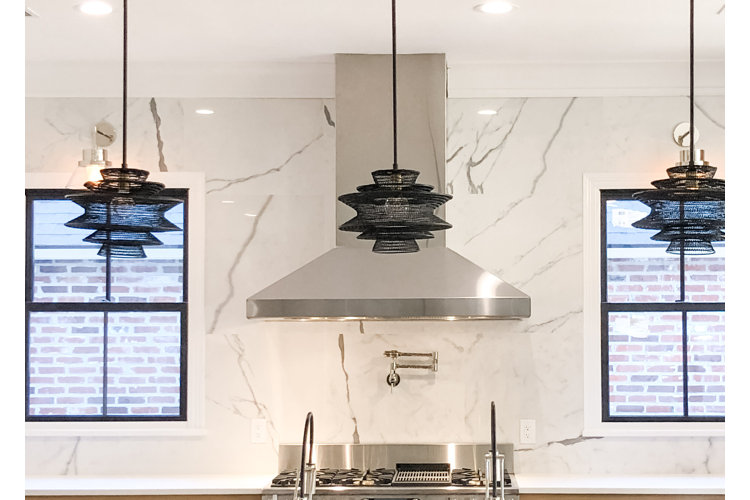
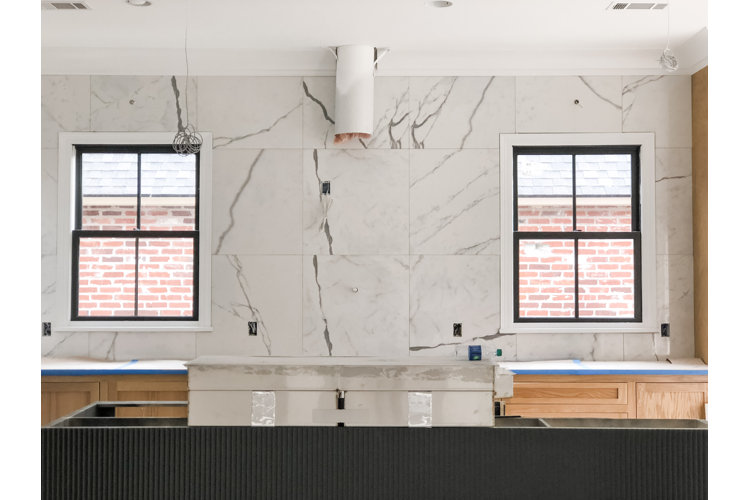
During the kitchen backsplash installation process, our sample homeowners decided not to use upper cabinets, which meant that more materials were needed than normal to cover a larger wall surface. Additionally, they wanted to take the backsplash from the countertop all the way up to the top of the wall to just where the crown molding ended.
When it came to installing the backsplash, they worked with a local tile distributor to find a large porcelain tile that had some of the same characteristics that would be found in a marble slab.
This was installed on the walls, and the tile pieces were placed as close as possible to each other. They chose a grout color that was very close to the off-white background color of the tile so that it looked like one seamless installation.
One of the disadvantages of using tile instead of a marble slab is that you don't get that clean, continuous book-matched effect where the veining of one slab ends and seamlessly starts on the next.
If you decide to go with the less traditional backsplash option of large-format tile, here are a few things to keep in mind:
1. Look for a tile material that is a larger format than you would typically see on a backsplash.
Most backsplash tile options are anywhere from 2ʺ x 4ʺ to 4ʺ x 6ʺ, and in some more contemporary spaces you might even have a 4ʺ x 12ʺ subway tile option. Our sample homeowners used a 30ʺ x 30ʺ tile that was installed end-to-end from the countertop up to the ceiling.
2. Make the grout lines of the tile disappear.
To do this, you really want to make sure that the grout color you choose matches the background color of the tile almost perfectly.
Install the pieces as close together as possible to make those grout lines disappear and really give the feeling of a seamless slab.
3. Try to make the veining transitions as seamless as possible.
To do this, you can choose your tiles and then work with your tile installer to lay them out and try to line up those vein lines as closely as possible. Then take painters tape and number each tile, and discuss with your tile installer that you want each tile placed in that order so that you can get as close to that realistic marble slab look as possible.
Award-winning, Baton Rouge-based interior designer and content creator Arianne Bellizaire has been named a High Point Market Authority Style Spotter (2015), Perlick Ambassador of Cool (2017), Villeroy & Boch Color Challenge Winner (2017), Modenus Blog Tour invitee (2016 & 2019), and Modenus DesignHound (Spain and London 2016, Surfaces 2018). She was also selected as an Ambassador for NYDC 2020 What's New What's Next. Her work and expertise have been featured in Forbes, Rue Daily, House Beautiful, Good Housekeeping, Business Of Home, and USA Today.
