DIY Knotted Jute Net Bottles
Add a nautical touch to any room with this knotted jute bottle DIY.
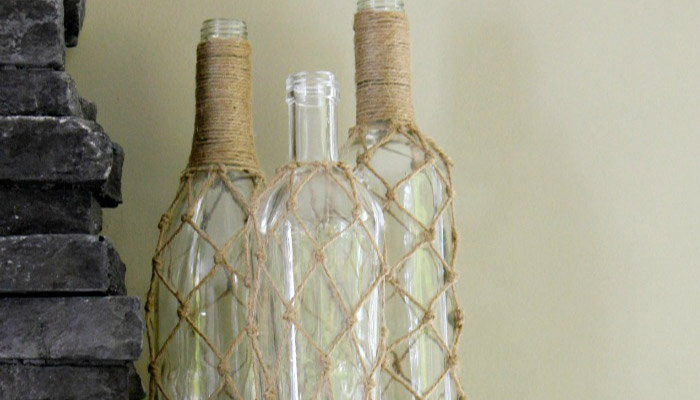
Photo: Kristi Mercer
I've been crushing on these jute net bottles for what seems like forever knowing all the while that I could totally make that look myself for so much less!
So, today I'm thrilled to be showing you a super easy way to wrap any old bottle with your own knotted jute net! I think the hardest part will be showing y'all how I created these nets, but I promise, once you get going, you won't believe how simple it was! I started with some plain glass bottles—wine, olive oil—you know, whatever I had lying around.
Follow the visual instructions below to make your own!
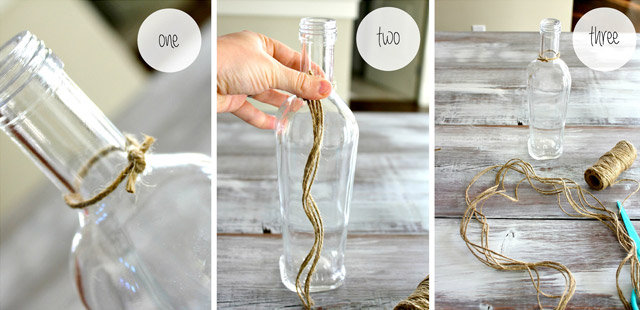
Photo: Kristi Mercer
Step 1: Tie a ring of jute around the top of the bottle. This will form the top of your net. I tied it with a double knot to make sure it was secure and cut off any extra.
Step 2: Measure a piece of jute four times the length of the bottle.
Step 3: Cut five more strips of this same length for six total.
Tip! It's much better to have too much than too little. I'll show you how you can use up any extra you may have at the end. After playing around with a few of these I learned that it's much easier to make a more tightly woven net by adding a few more strings or you can make something that's more open and sparse by using less. Most of my favourites were made with six strings, so that's what I'll demonstrate with today.
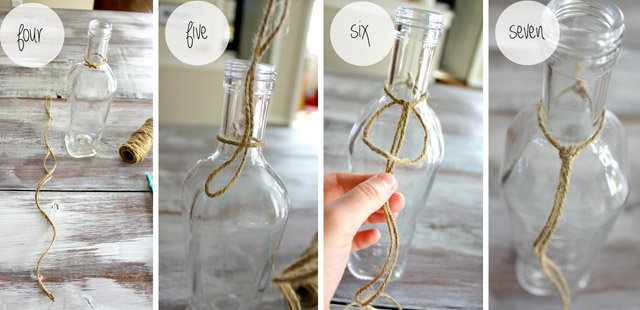
Photo: Kristi Mercer
Step 4: Fold one jute string in half.
Step 5: Fish that string through a ring you've made at the top of the bottle.
Step 6: Poke the ends of the string through the loop to create a knot.
Step 7: Create a knot with the loop. Do this five more times until you have six knots, making a total of 12 strings hanging down your bottle. Slide the knots along your top ring of string as needed, making sure they're evenly spaced.
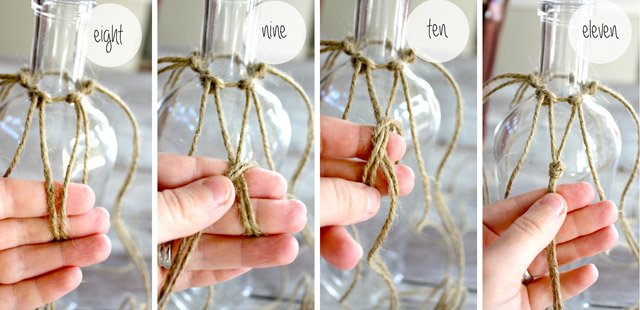
Photo: Kristi Mercer
Steps 8-11: Now you're ready to start making the net! Begin with the right string of one knot and the left string of the next. Loop the strings around your fingers, going over the strings, and through the loop to create a knot. Congratulations, you've made your first knot!
Photo: Kristi Mercer
Steps 12-14: Continue around the top selecting the right string from the previous knot and the left string from the next. Take care to make all of your knots at the same distance from your top ring so that your net looks nice and neat. Finish around that top row until each of your top strings has been used.
Step 15: Now it's time to move on to the next row. Continue in the same fashion as the first row, using one right string and one left to create a diamond shape. Work your way to the bottom of the bottle one row at a time being sure to keep all of your diamonds at the same height.
Photo: Kristi Mercer
Step 16: Try your best to make the bottom knots sit on the side of the bottle rather than underneath. This will help your bottle to sit evenly on a flat surface once finished. Adjust those bottom knots as needed to sit just on the side of that bottom edge.
Step 17: Finally, it's time to tie it all down. I used hot glue to avoid any knots on the bottom. Pull one set of strings tight, add a dab of hot glue to the bottom of the bottle, and hold the pair of strings on the for a few seconds until the glue dries. Do the same with the pair of strings directly opposite the pair you just glued down. Work across the bottom of my bottle until every pair of string is glued down.
Step 18: Cut off the extra ends.
There you have it; a quick and easy jute net bottle for just pennies!
Now, you could absolutely choose to stop right here, but I promised you we would find a way to use up all of that extra string. I simply wrapped it around the neck of my bottle. I started with a small dab of hot glue above one of my knots on the top ring of my net to secure the beginning of my string. I painted a layer of Mod Podge around the bottle neck and wound my string on top of it all the way up to the top. Each time I had to end with one string and move onto another, I simply added a small dab of hot glue to secure the ends.
I'm absolutely thrilled with how these pretty bottles turned out and I know they'll look fabulous in your home, too!
Photo : Kristi Mercer
