DIY Pelmet Box Window Treatment
Create a high-impact window treatment with some simple supplies!
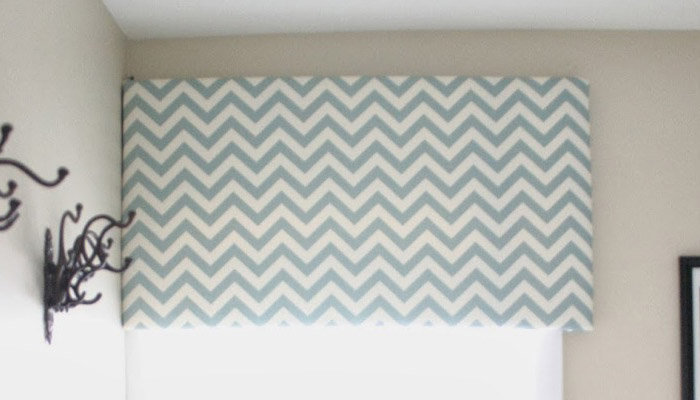
Photo: Christina Katos
Getting creative with your window treatments can be a challenge at times. In certain rooms and in certain instances typical drapes just don't work. Bathrooms are a great location for a pelmet box window treatment. You can add some colour and texture through fabric in your space while still keeping it all clean and off the floor! Follow the steps below to create a beautiful pelmet box out of just foam core, duct tape, batting and fabric, then mount it to your wall using adhesive strips.
Here's What You'll Need:
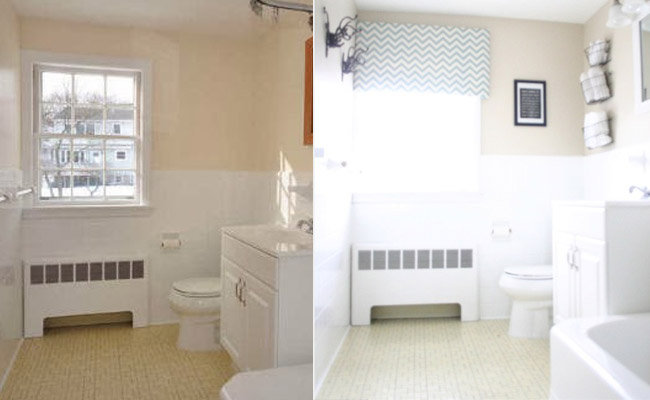
Photo: Christina Katos
- Fabric (1 yard for a 37 inch by 20 inch box was used in this example)
- Foam Core
- Batting (low loft batting)
- Duct Tape or Electrical Tape
- Upholstery Staple Gun
- Adhesive Strips
- Scissors
- Exacto Knife
- Measuring Tape
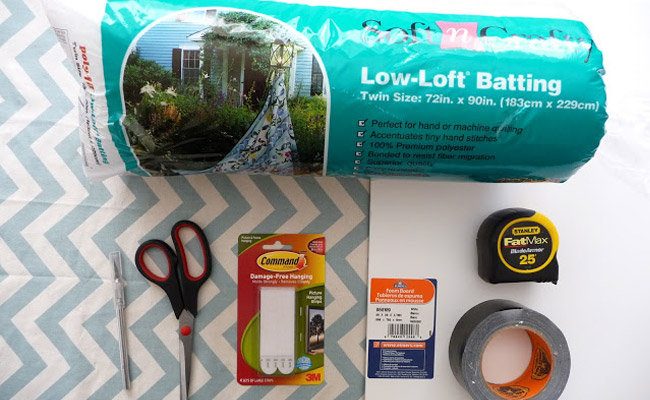
Photo: Christina Katos
1. Determine the width and height of your pelmet box. Measure your window from one edge of the window frame to the other, cutting your pelmet boxes so they sit just outside the window frame. Measure the two side pieces which will be the same depth as your window frame.
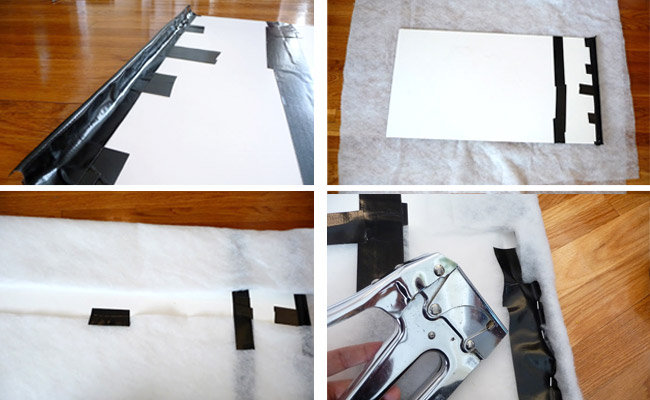
Photo: Christina Katos
2. Lay out the foam core. You may need to duct tape some pieces together to get the correct width. Don't worry about how it looks at this point. It will all be covered by the batting and fabric.
3. Cut out the side pieces and duct tape them to the larger piece at 90-degree angles.
4. Roll out the batting and lay your foam core piece on top of it. Cover the front and sides with batting. Use a layer of tape to attach it to the back. Staples tend to pop out of foam core unless you have a layer of tape first. You can alternate between the two. Take care to pull tight and keep the corners neat. These will be visible from the front and bottom.
Photo: Christina Katos
5. Once the batting is wrapped, do the same thing with the fabric, lining your pattern up correctly. Begin wrapping and taping. Again, this will be hung up on your wall and not visible. Add a layer of fabric to the back if your pelmet box hangs low over your window and is visible from outside.
Photo: Christina Katos
6. The next step is hanging it up. There are lots of different ways to do this. For heavier or larger pelmet boxes, use L brackets. In this case, as foam core is very light, adhesive strips will do the job! Line up the adhesive strips on the top of the window frame. Position your pelmet box in front, making sure it's straight, then attach by pushing it against the already attached adhesive strips.
Photo: Christina Katos
This project cost less than $30 to make from start to finish. A typical pelmet box of the same dimensions as the window in this tutorial cost approximately $350. Once you have the form created your can change the fabric as often as you want!
