How to Replace a Doorbell Transformer: A Step-By-Step Guide
Simple steps for a reliable ring.
A doorbell transformer is a device that takes the standard electrical voltage in your house (110–120 volts) and converts it to a lower voltage suitable for your doorbell. Need to replace yours, but unsure how? Read on to learn exactly how to replace a doorbell transformer.
How to Replace a Doorbell Transformer
Time Required: 1 hour or less
Skill Level: Beginner
What You Will Need:
- Flathead screwdriver
- Phillips head screwdriver
- Circuit tester, voltmeter, or multimeter
- Electrical tape
- Channel lock pliers (may be needed)
Step 1: Find the Doorbell Transformer
Before you can replace your doorbell transformer, you will need to locate it. Here are some typical doorbell transformer locations you can check:
- Garage: Your doorbell transformer may be located in your garage near other low-voltage outlets, such as TV lines and telephone cables.
- Near a Security Alarm System: Builders will sometimes integrate doorbell wiring with security system wiring. Your doorbell transformer may be located on the wall near your security system setup.
- Attic or Crawl Space: Doorbell transformers are sometimes located on an existing junction box in the attic, especially in ranch houses or houses with attached garages that are near the front door.
- Utility Room: A common location for doorbell transformer installation is in the utility room, along with your HVAC unit or furnace. It may be below the HVAC junction box or even on the ceiling.
Tip!
Looking for more information on doorbell wiring before replacing your transformer? Browse our Beginner's Guide to Doorbell Wiring.
Step 2: Determine Which Transformer You Need
Choose a transformer based on the voltage rating and requirements of your doorbell. Standard doorbell transformer ratings are between 10 and 24 volts, while smart doorbells range between 16 and 24. If you’re unsure which transformer your doorbell needs, confirm the correct voltage by checking your old transformer’s label or contact the doorbell manufacturer.
Tip!
Curious to learn more about Types of Doorbells before choosing a transformer? Browse our guide for everything you need to know.
Step 3: Turn the Power Off
Before you begin, it’s important to turn the power off at the fuse or circuit breaker leading to the transformer. Place tape over the circuit breaker so other people know someone is working on the circuit.
Step 4: Remove Your Current Transformer
Open the junction box: Typically silver, this is the box to which the transformer is connected. Some junction box covers snap off, while the screws of others must be loosened with a screwdriver. After opening your junction box, use a circuit tester to confirm the power is off before proceeding.
Disconnect the transformer from the house power: Untwist the plastic caps inside the junction box that connect the transformer wires and electric panel wires.
Disconnect the transformer from the doorbell: Use electric tape to hold together any doorbell wires connected to the screws. Then, loosen the screws on the transformer with a screwdriver and remove the wires.
Disconnect the transformer from the junction box: There will either be screws or a bolt inside the junction box that secure it to the transformer. If your junction box contains screws, use a screwdriver to loosen them. If the transformer is connected by a bolt, you will need a wrench. Turn the bolt counterclockwise with the wrench to loosen it. After removing the screws or bolt, take the transformer off and discard it.
Step 5: Install the New Transformer
- Verify that the power is still off: Only attempt to install the new transformer once you are sure the power is off.
- Attach the new transformer to the junction box: Use screws or a bolt to attach the new transformer to the inside of the junction box.
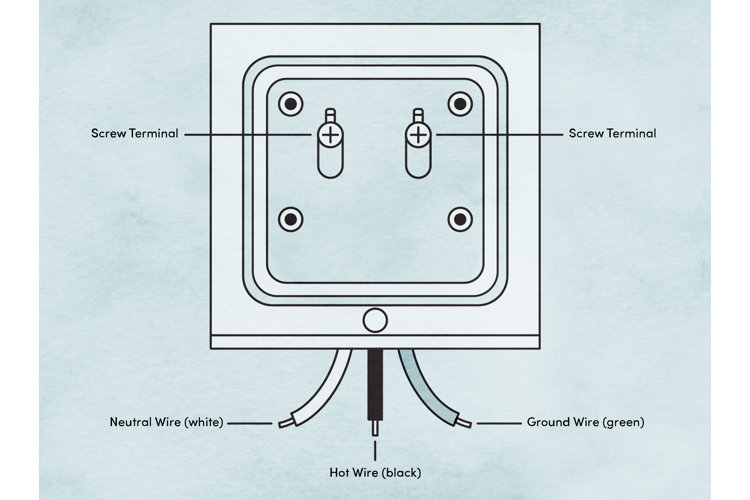
- Connect the wires inside the junction box: Connect the wires from the new transformer to the matching-colored wires inside the junction box. Pair black with black and white with white. The green wire from the transformer will connect to the panel’s green or bare copper wire, or to a grounding screw inside the junction box. Once matched up, twist the ends of the wires together, cover them with the wire caps, and twist the wire caps clockwise.
Step 6: Connect the Low Voltage Doorbell Wires to the New Transformer
- Remove the electrical tape: Take the electrical tape off your sets of low-voltage doorbell wires.
- Attach the wires to the terminals: Chances are you have two wire sets – one for each transformer. Wrap the ends of your wire sets around each transformer terminal, then tighten your screws to hold them in place.
Step 7: Turn the Power Back On
- Replace the junction box cover: Replace the cover by either snapping it on or securing it with the screws that were removed earlier.
- Turn the power on: Once all wires are connected and concealed, you can turn the power back on at the circuit breaker or fuse.
- Test the doorbell: When your power is back on, test your doorbell by pressing its button. If it properly rings, you’re all done! If not, check that the voltage adheres to your doorbell’s requirements and that the wire sets are properly screwed into place.
