How to Wire a Doorbell: Diagrams for Beginners
You can ding dong do it.
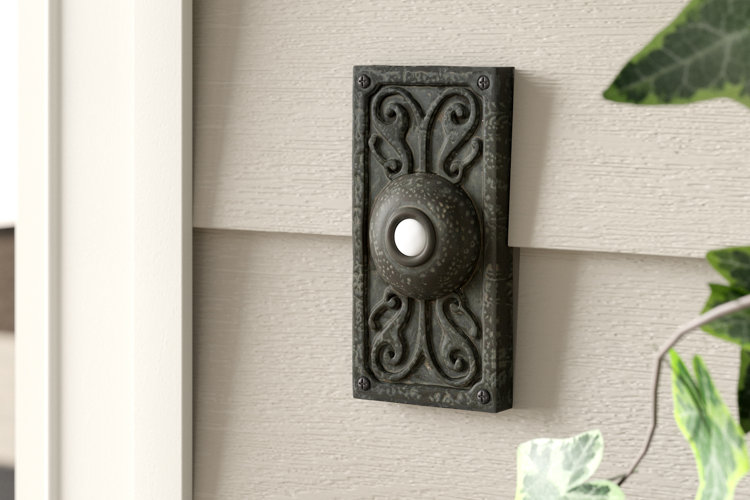
Though traditional doorbells might seem like simple, old-fashioned devices, they remain a crucial part of home convenience and security. The gentle chime of your doorbell is your first signal that a package has arrived or a guest is at your entryway. Whether you’re upgrading to a modern smart doorbell or replacing an out-of-date model with a fresh wired system, getting the wiring right will help your setup function reliably for years to come.
In This Guide:
- Doorbell Installation Types
- Wired Doorbell Components
- Doorbell Wiring Diagrams
- How to Remove a Doorbell
- How to Install a Wired Doorbell
- How to Install a Wireless Doorbell
- Frequently Asked Questions
How Doorbell Wiring Works (Quick Overview)
Doorbell wiring connects a low-voltage transformer, a push button, and an indoor chime into a continuous electrical circuit. When someone presses the button, the circuit closes, allowing low-voltage electricity to energize the chime’s solenoid. The solenoid drives a hammer to strike metallic resonators, producing the familiar doorbell chime. Most traditional doorbells operate on low voltage (typically 16V AC) transformed down from standard household power.
Safety Tip!
Always shut off electricity at the main breaker before handling any wires. Do not skip this step!
Wired vs. Wireless Doorbells
Choosing between a wired and wireless doorbell system comes down to your home’s existing electrical system, your preference for ongoing maintenance, and how quickly you want to complete the project. Compare wired and wireless doorbells to determine which type is best for your home.
Wired Doorbells
Wired doorbells are the traditional choice that reliably alerts you when a visitor is at your door. They connect directly to your home’s electrical system through a low-voltage transformer that brings down standard household voltage to a safe operating level.
- Power & Reliability: Wired doorbells draw continuous power directly from your home, so you don’t have to worry about replacing batteries or losing function when batteries die.
- Performance: They provide a stable connection to your indoor chime without signal interference or dropout.
- Maintenance: Hardwired systems require minimal long-term upkeep once installed.
- Installation: Setting up a wired system involves handling low-voltage wires, mounting a transformer, and routing connections between the push button, transformer, and chime.
Wireless Doorbells
Wireless doorbells are a modern, hassle-free alternative that does not need to be connected to internal house wiring.
- Ease of Installation: The push button unit mounts outside your door using screws or adhesive, while the indoor chime unit simply plugs into an outlet or runs on batteries.
- Functionality: When a visitor presses the exterior button, the device transmits a radio frequency or Wi-Fi signal to trigger the indoor receiver.
- Flexibility & Portability: Because there are no physical wires connecting the components, wireless models are ideal for renters, historic homes without existing doorbell wiring, or anyone looking for a quick DIY project.
- Maintenance: Wireless doorbells do require periodic battery replacements or recharging to maintain continuous operation.
Neighborly Tip!
This guide focuses on both the installation of wired doorbells into an existing doorbell system and the installation of wireless doorbells. If you are installing a doorbell system in a home that does not have an existing doorbell electrical setup, consult an electrician for assistance.
To learn more about the different types of doorbells, check out our guides:
Types of Doorbells Buying Guide
How Do Wireless Doorbells Work?
Wired Doorbell Components
Before you learn how to install or wire a doorbell, it helps to understand the main parts of a wired system. A standard setup consists of three core components: the push button, the chime, and the low-voltage transformer.
Push Button
Mounted on your home’s exterior beside an entry door, the push button acts as the switch that closes the electrical circuit when pressed. Pushing the button sends current to the indoor chime to create the sound. Push buttons come in a variety of weather-resistant finishes and designs to match your door hardware.
Chime
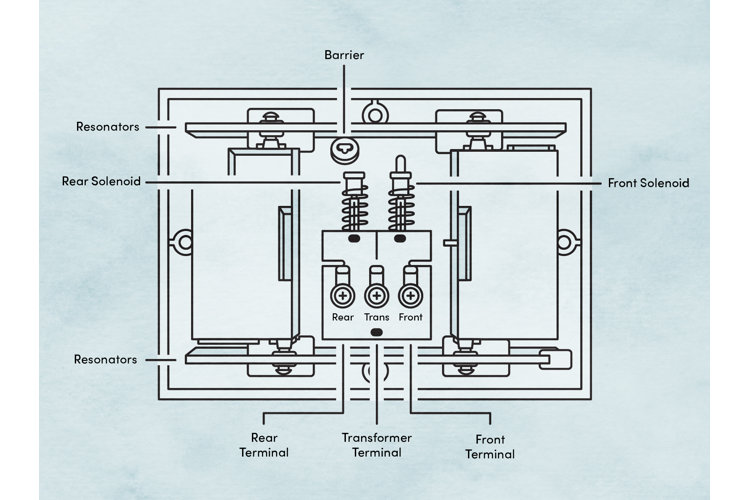
The indoor chime produces the audible ringing tone when activated by the push button. It consists of an internal hub with screw terminals, electromagnetic solenoids, and metallic tone bars (resonators).
- Terminals: The terminal block connects the low-voltage wires running from your push button and transformer. Most standard chimes feature three labeled terminals:
- Front: Connects to the primary push button at your front entryway.
- Rear: Connects to a secondary push button at a back or side door.
- Trans: The transformer (or common) terminal that connects directly to the power source.
- Resonators: Metallic bars tuned to specific musical notes that ring when struck.
- Solenoids: Electromagnetic coils that energize when the push button is pressed, driving a small hammer to strike the metallic resonators. Most chimes feature a two-note strike for the front door and a single-note strike for the rear door.
Doorbell Transformer
A doorbell transformer wires directly into your home’s electrical system and steps down standard power to safe, low-voltage electricity for the push button and chime. Standard household electrical outlets supply 120V of line voltage, but traditional doorbells require much lower voltage to operate safely (typically 16V AC). Transformers attach to an electrical junction box, usually located in a basement, attic, garage, or near your main breaker panel.
- Screw Terminals: Two low-voltage output terminals that connect to the chime unit and push button.
- Ground, Neutral, & Hot Wires: High-voltage input wires – typically Green (ground), White (neutral), and Black (hot) – that wire into your household electrical system.
Doorbell Wiring Diagrams (Common Setup)
Familiarize yourself with the four most common types of doorbell push button, chime, and transformer circuits by taking a look at the diagrams below. These doorbell wiring diagrams will also help you identify doorbell wires you'll be working with while wiring a doorbell.
Doorbell Wiring Diagram Setups Compared
| Setup | Buttons | Chimes | Best for |
|---|---|---|---|
| Single + single | 1 (front) | 1 | Most homes |
| Double + single | 2 (front/rear) | 1 | Two entry doors |
| Single + double | 1 | 2 | Hear chime upstairs/down |
| Double + double | 2 | 2 | Larger homes |
Single Doorbell Push Button With a Single Chime
This is the most basic doorbell setup option. You can see that the push button connects to one of the button terminals (in this case, the front) in the chime. The circuit is completed by the transformer, which is connected to both the doorbell chime and the doorbell push button.
Double Doorbell Push Buttons With a Single Chime
This doorbell setup is fairly standard if you'd like a doorbell at the front and rear of your home. Because both push buttons are attached to their corresponding terminal on the chime, a guest can ring the doorbell at either door and one chime will ring.
Single Doorbell Push Button With Double Chimes
In this diagram, you can see that the front doorbell push button is attached to the front terminal of both chimes and the transformer is attached to the trans terminal of both chimes. You would want this doorbell system setup if you want to be able to hear your front doorbell ring better in different areas of your home.
Double Doorbell Push Buttons With Double Chimes
In this diagram, you'll see that the front push button is connected to the front terminals on both chimes and the rear push button is connected to the rear terminals on both chimes. Both push buttons are connected to the transformer, which is connected to both chimes at their trans terminals. You would want this setup if you'd like doorbells at two doors of your home and if you'd like to be able to hear them ring clearly in different locations of your home.
How to Remove a Doorbell
Before you can install and wire a new doorbell system, you will have to remove your old one. There are a few steps to doorbell removal: removing the doorbell push button, removing the doorbell chime, and removing the doorbell transformer. Below, we cover all three.
If you've already done this, skip to the next section to learn how to install and wire a doorbell.
Before You Start
To avoid electrical injury, it's important to shut off the power to the doorbell transformer before you attempt to remove it or any other doorbell parts. Either locate and shut off the circuit breaker switch for the transformer or shut off your home's main electricity supply.
Important Note: Before touching any wires, use a voltage sensor to check that the power is actually off – the sensor will alert you if the wires are still live.
Tools & Materials Needed:
- Wrench
- Screwdriver
- Utility knife
- Tape
- Sharpie
How to Remove a Doorbell Push Button
Step 1: Remove the doorbell push button from your home's exterior.
Using a screwdriver, unscrew the two screws holding the doorbell push button to the wall. If the screws holding the button in place aren't exposed, you'll have to remove the plate covering them first. It can often be pried off with a utility knife or flathead screwdriver.
Step 2: Pull the doorbell push button gently from the wall.
Expose the wiring behind the button without damaging it.
Step 3: Disconnect the wires.
Using your screwdriver, unscrew the screws holding the wires in place in the back of the doorbell push button. Once the screws are loose enough, you can gently pull the wires away and free the doorbell push button.
Step 4: Tape the wires in place so you don't lose them.
Because you'll be installing your new doorbell push button using these same wires, it can be helpful to tape them down against the wall so they don't fall out of place.
How to Remove & Disconnect a Doorbell Chime
Step 1: Locate your doorbell chime.
It should be located in the general area of your entry door(s), often close to the ceiling.
Step 2: Remove the outer plate.
It can usually be easily lifted or pried out of place.
Step 3: Locate the terminal wires and mark them.
Your chime will have two or three wires connected to its central terminals. Wrap a small piece of tape around each wire and mark it according to the terminal to which it is connected so you don't have to worry about forgetting later on.
Step 4: Disconnect the wires.
Using your screwdriver, loosen the screws holding the terminal wires in place in the chime. You'll be able to gently release them once the screws are loose enough.
Step 5: Detach the chime from the wall and remove it.
With the wires loose, you are free to remove the chime from the wall. Use your screwdriver to unscrew the larger screws on either side of the chime. Keep your hand on the chime when you loosen the second screw so it doesn't fall to the floor. Make sure to hold the wires from the back as you gently pull the chime off of the wall so they don't fall into the wall upon release.
Step 6: Tape the wires in place.
Similar to removing your doorbell push button, tape all dangling wires in place on your wall so you don't lose track of them.
How to Remove a Doorbell Transformer
Step 1: Locate your doorbell transformer.
To find your doorbell transformer, check an exterior wall in your garage, basement, or attic. It will be in the general vicinity of your doorbell(s), typically close to the ceiling of that room. It will be attached to the side of a wall-mounted electrical junction box. It may be behind a plate or even behind the doorbell push button itself, though this is unlikely.
Step 2: Locate and disconnect the wires at the screw terminals.
Your transformer will likely have two screw terminals holding two wires in place. Unscrew those screws to release the two wires. Labeling these wires is not important unless you notice multiple wires connected to each terminal – this means your transformer is connected to multiple doorbell buttons. In this case, tape the groups of wires together according to the terminal to which they connect. It's a good idea to tape those wires in place along the wall so you don't lose them while working on the other parts of the transformer.
Step 3: Remove the cover on the electrical junction box.
To expose the wiring connecting your doorbell transformer to your home, you'll need to remove the electrical junction box cover. If it is held in place by screws, unscrew it using a screwdriver. If not, you can gently pry it off.
Step 4: Disconnect the thick power-supply wires.
You'll notice three wires – green, white, and black – connecting your transformer to your home's electrical system. There will be wire caps attaching the doorbell transformer's wires to your electrical system's corresponding wires. Detach the transformer from your home's power supply by untwisting those caps and then gently separating the wires from each other.
Step 5: Detach the transformer from the electrical junction box.
Your transformer will be held in place against the electrical junction box by a large bolt or set of screws. If you see a bolt, use a wrench to loosen it. If you see screws, use a screwdriver to loosen them. Once freed, gently pull the transformer out of place and thread its wires out of the junction box.
Step 6: Tape the power supply wires in place.
Even though they are located in an electrical junction box, the power supply wires may still fall out of place. Tape them down to ensure they don't move.
How to Install a Wired Doorbell
This section explains how to install a doorbell into an existing electrical system that has already been set up with the proper connections for a doorbell system. If you haven't yet prepared your home's electrical system for a doorbell, consult an electrician.
Again, before working with any wires, use a voltage sensor to make absolute sure that your power is off.
Before You Begin
Similar to removing an old doorbell, it is imperative to shut off the power supply to the doorbell system so you don't injure yourself while wiring a doorbell. Locate the circuit breaker that connects to the electrical junction box where your doorbell transformer will be and shut it off. If you can't locate yours, shut your home's entire power supply off before you begin.
If you become unsure that you're making the proper electrical connections at any stage of your doorbell installation, contact an electrician. It's always better to stay on the safe side when doing home installation projects, especially when dealing with electricity.
Tools & Materials Needed:
- Wrench
- Screwdriver
- Electrical Tape
- Power Drill
- Voltage Tester *
How to Install a Doorbell Transformer
Step 1: Attach the transformer to the electrical junction box.
If the electrical junction box cover is still on, remove it. Thread the power supply wires into the electrical junction box through the appropriate hole. Then, position the transformer in its opening in the side of the electrical junction box. Using a wrench (if a bolt is required) or a screwdriver (if screws are required), fasten the transformer in place.
Step 2: Connect the transformer's power supply wires to your home's power supply wires.
Match the wires by color – green with green or brown, white with white, and black with black – and twist them together. Then, twist wire caps onto the connections to hold them in place. You can wrap some electrical tape around the caps for a hold that is even more secure.
Step 3: Replace the electrical junction box cover.
Either snap the cover back in place or re-tighten its screws using a screwdriver.
Step 4: Attach the doorbell push button and chime wires to the screw terminals.
Your system's button and chime wires should be left taped in place from when you removed your old system. If this is the case, simply wrap the appropriate wires or wire groups around the corresponding screw terminals and use a screwdriver to tighten the screws in place.
How to Install a Doorbell Push Button
Step 1: Locate the exterior wires and attach them to the push button.
Find the two wires you taped to the exterior wall and replace them under the screws on the back of your new doorbell push button's plate. Using a screwdriver, tighten the screws until the wires are held in place.
Step 2: Place the push button in the wall and screw it in place.
Gently push the button into place on your exterior wall so that the wires are no longer exposed, then screw it into place using a screwdriver.
Step 3: If applicable, place the cover over the push-button plate.
If your doorbell push button came with a cover, place that over the push-button plate and attach it according to the manufacturer's instructions.
How to Install a Doorbell Chime
Step 1: Locate the doorbell chime wires and thread them through the back of the chime.
Untape the wires and gently thread them through the appropriate hole in the back of the chime without damaging the labels you made earlier. Once through, you can re-tape them temporarily in the chime if you still don't want to risk losing them.
Step 2: Screw the chime in place on your wall.
Position the chime on your wall. If it is the same size as your old chime, you can use the same screw holes. If not, you may need to use a power drill for this step. Place the left and right screws in their appropriate holes on the chime. Using a screwdriver or power drill, screw the chime into the wall.
Step 3: Attach the doorbell wires to their appropriate terminals in the chime.
Using the labels you made earlier, place each wire on its corresponding terminal and use a screwdriver to tighten it in place.
Step 4: Place the cover over the chime.
Position the cover that came with your chime and fasten it in place according to the manufacturer's instructions.
Step 5: Test Your Doorbell
Once all the components are in place and connected properly, it's time to test your doorbell! Turn the circuit breaker or power supply back on and test away. Press your doorbell's push button(s) and ensure that you can hear the chime loud and clear each time.
How to Install a Wireless Doorbell
This section walks you through the installation of a wireless doorbell. These battery-operated doorbells are a great option if your home doesn't have existing doorbell wiring or if you're looking for smart features. The installation process is fairly straightforward and doesn't require you to have any electrical experience. Plus, most wireless doorbells come in kits that include the doorbell, the receiver(s), and any mounting brackets needed for installation.
Tools & Materials Needed:
- Screwdriver
- Power Drill
- Batteries *
Step 1: Install the mounting bracket.
At your front door, install the mounting plate that was included in your wireless doorbell kit using a screwdriver and the included screws. Unlike wired doorbells, wireless doorbells come with a mounting plate that makes it easy to slide the doorbell off to recharge or change its batteries. If possible, try to use the same screw holes from your previous doorbell. Otherwise, you'll need to patch the old holes and drill new holes that align with your new mounting plate. If you don't have existing holes, we recommend placing the doorbell around 40" to 55" high – depending on what you want to have within the frame.
Step 2: Add batteries and attach to the mounting plate.
Place batteries inside the doorbell, then attach the doorbell to the mounting plate by sliding it into place.
Step 3: Find the right location for the receiver.
Since wireless doorbells operate on radio waves or Wi-Fi, you'll need to check the range for your specific doorbell to determine the maximum distance between the doorbell and the receiver. This receiver will be the chime unit, so place the receiver where you'd be likely to hear it.
Note: Some receivers plug into standard electric outlets, while others are battery-operated. Keep this in mind while choosing the right spot for your receiver(s).
Step 4: Test your wireless doorbell.
Test the doorbell to see if it's working properly and move any receivers closer if needed. If your wireless doorbell is a smart doorbell, this is also the time to download any apps, sync your doorbell to the Wi-Fi, and customize your settings to meet your household's needs.
Frequently Asked Questions
Which is better: a wired doorbell or a wireless doorbell?
When comparing wired and wireless doorbells, there are pros and cons to each. Wired doorbells are low maintenance and more reliable, while wireless doorbells are much easier to install and don't require access to existing wiring.
Do you need an electrician to install a doorbell?
Wireless doorbells and doorbells with existing wiring can be installed by yourself. If you don't have existing wiring or don't feel confident with electrical projects, it's best to hire a licensed electrician so that the installation is completed safely.
How much does a doorbell installation cost?
The cost of materials can range from $15 – $50 for a wired doorbell, $20 – $80 for a wireless doorbell, and $50 – $250 for a smart doorbell that is equipped with helpful features. Hiring an electrician for the installation can add an additional $100 – $250 for labor.
Are smart doorbells wired or wireless?
Smart doorbells are available in both wired and wireless options so that you can choose the installation method that works best for your home and your preferences.
Neighborly Tip!
Is replacing your door knob and/or door lock next on your renovation list? Check out our guides to find helpful tips:
The Best Types of Door Locks & Door Knobs for Your Home
Hardware 101: How to Remove a Door Knob
Hardware 101: How to Install a Door Knob
