Keyless Entry Installation for Beginners
A safer and smarter entry awaits.
A keyless entry system offers both convenience and safety, making it an efficient way to keep your home secure. Thinking about upgrading to an electronic lock but unsure how to install it? Our comprehensive guide walks you through every step of the process so you can enjoy a smart, stylish entryway.
What You'll Need
- Screwdriver
- Tape measure
- Batteries (if not included)
Step 1: Remove the Deadbolt
If your door currently has a deadbolt that you’re replacing, you’ll need to remove it before installing your new keyless lock. If you don’t have a deadbolt or are keeping the one you currently have, skip ahead to the next step.
1. Take Out the Deadbolt
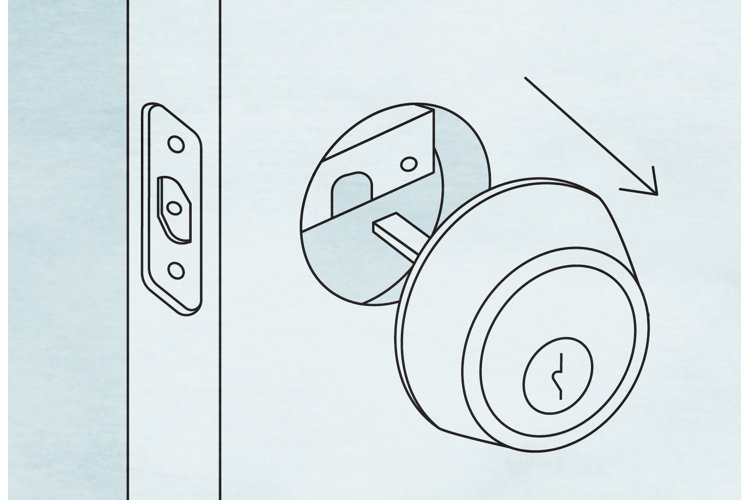
From the interior side of the door, insert your screwdriver into the deadbolt’s screws and turn counterclockwise to loosen them. Once removed, pull both sides of the deadbolt away from the door and set them aside.
2. Remove the Bolt Plate
Step 2: Remove the Old Lock
With the deadbolt removed, the next step is to take out the existing knob or lever so that your new keyless entry system can be properly installed.
1. Detatch the Handle
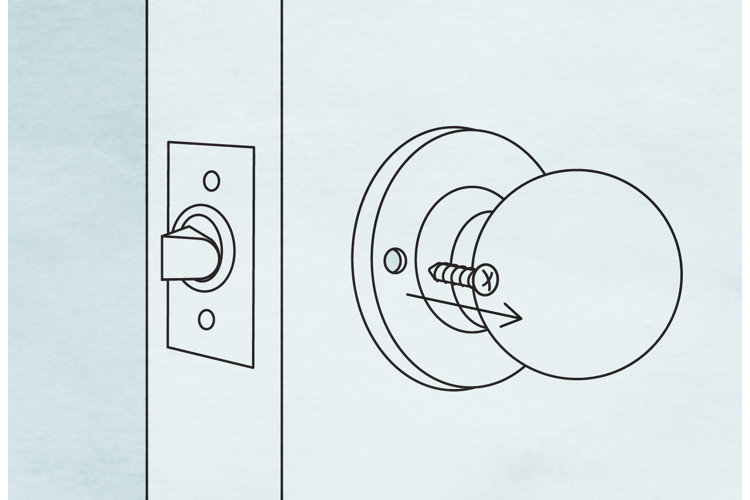
On the interior side of the door, locate the screws holding the doorknob or lever in place. Insert your screwdriver into each screw and turn counterclockwise until they come free. After the screws are removed, pull both sides of the handle straight out of the bore hole, keeping the handle pieces and screws together in case you want to reuse them later.
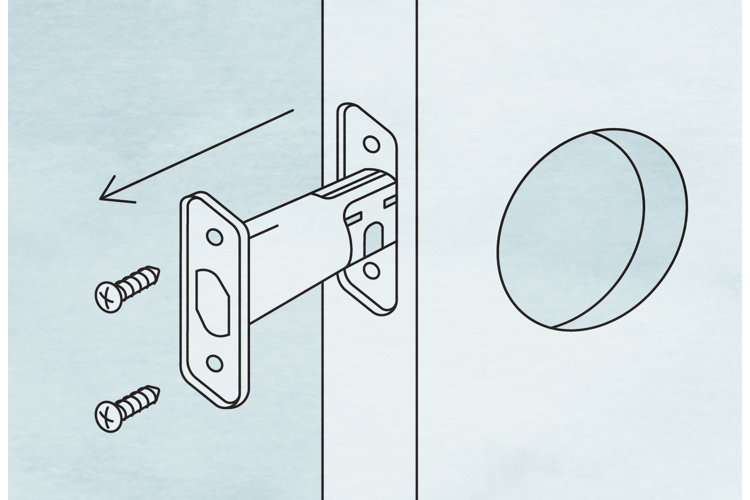
2. Remove the Latch Plate
On the edge of the door, find the latch plate that holds the latch mechanism in place. Use your screwdriver to remove the screws, then pull the latch mechanism straight out of the jamb hole. Set the latch and the plate aside.
3. Step 3: Measure for the Deadbolt
Before installing a new deadbolt, check the key dimensions of your door to make sure the lock will fit properly after installation. Use a tape measure for these four measurements, and take each twice to confirm accuracy.
1. Bore Hole Diameter
Locate the large circular hole on the face of the door where the deadbolt or knob was installed. Place your tape measure across the widest part of this opening, and record the diameter.
This measurement is important because your new lock must fit tightly inside this hole without extra gaps. Most modern doors have a 2⅛-inch bore hole, but older models may be a bit smaller.
2. Backset
The backset is the distance from the edge of the door to the center of the main bore hole. Measure it by pressing one end of your tape measure against the door’s edge and extending it to the middle of the bore hole.
Standard backsets are 2⅜ or 2¾ inches wide, and many electronic deadbolts are designed with an adjustable latch that can accommodate either size.
3. Door Thickness
Open your door and place your tape measure across the narrow edge that fits into the frame. Measure from the front face to the back face of the door to find its thickness.
Most doors are 1⅜ to 1¾ inches thick, with heavier doors extending up to 2 inches. Confirming this measurement ensures that your new lock’s spindle and mounting hardware are long enough to properly pass through the door.
4. Edge Bore Hole Diameter
Finally, use your tape measure to record the diameter of the small circular hole at the edge of the door where the latch mechanism slides in.
Standard edge bore holes are 1 inch in diameter. Widen your edge bore hole opening with a drill if yours is smaller, or choose a lock that matches your dimensions if yours is larger.
Step 4: Measure for the Handle
If your keyless system includes a knob, lever, or entry set, it’s important to measure the handle space. These measurements ensure your new hardware lines up with your existing holes to avoid any difficulties during installation. Grab your tape measure and follow the steps below depending on your door hardware.
For Door Knobs or Levers
If your new lock comes with a knob or lever separate from the deadbolt, simply confirm the three basic measurements you already took in Step 3: the bore hole diameter, the backset, and the door thickness.
If you’re installing an entry set, a two-piece system with a deadbolt above and a decorative handle below, you’ll need to take two additional measurements with your tape measure. These dimensions confirm that the spacing between the holes on your door matches the spacing required by the entry set.
- 1. Bore Hole Center-to-Center: Measure the distance between the center of the deadbolt hole (upper hole) and the center of the handle hole (lower hole) to ensure these components sit at the correct distance apart.
- 2. Handle Grip Center-to-Center: Measure the distance between the center of the handle’s main bore hole where the latch fits, and the center of the lower screw hole that secures the bottom of the handle grip to the door. This measurement ensures the overall length of the handle grip matches your door’s existing holes.
Compare these measurements with the manufacturer’s product dimensions to ensure a perfect fit.
Step 5: Install Your Electronic Deadbolt
Now that your door is prepped and your measurements are confirmed, it’s time to install the new deadbolt. Keep your screwdriver nearby to secure each component, and be mindful of the cable, as it powers the lock’s electronic features.
1. Install the Set Plate
Locate the new latch that came with your lock, and slide it into the hole on the edge of the door. Make sure the beveled (angled) side of the latch faces the door frame so that the bolt slides smoothly into the frame when you close the door. When the latch is correctly positioned, use your screwdriver to secure the latch plate with the provided screws.
2. Mount the Exterior Face
Take the exterior keypad or touch panel and line it up with the bore hole on the front of your door. Thread the cable attached to the exterior face through the bore hole to the inside of the door, ensuring it passes under the latch so that it doesn’t get pinched.
Align the long metal post with the opening in the latch mechanism. This post engages and operates the deadbolt. Hold the exterior face securely in place, keeping it level and flush with the door.
3. Anchor the Interior Mount
On the interior side of the door, grab the mounting plate, and feed the cable from the exterior face through the plate’s opening. Position the plate flat against the bore hole, aligning the screw holes with the holes on the exterior face. Use your screwdriver to insert and tighten the screws, fastening the exterior face and interior plate together through the door.
Next, connect the cable plug to the designated port on the mounting plate or lock body. Make sure it securely snaps into place. Finally, insert the batteries into the compartment if your model requires them at this stage.
4. Secure the Interior Face
Take the inside portion of the lock with the thumb turn, positioning it over the mounting plate and aligning the screw holes. Use your screwdriver to secure it with the included screws. Turn the thumb turn to extend and retract the bolt, making sure it smoothly operates.
Step 6: Install Your Electronic Knob or Lever
If your lock includes a separate knob or lever, install it after the deadbolt. Use your screwdriver to secure all the components.
1. Install the Side Latch
Slide the handle latch into the hole on the door edge, with the beveled (angled) side facing the door frame. Use your screwdriver to secure the latch plate with the provided screws.
2. Align the Exterior Face
Position the exterior knob or lever over the bore hole on the outside of the door. Thread the cable through to the interior side, keeping it flat and untangled as it passes through the opening. Follow the same care as you did when routing the deadbolt cable in Step 5, avoiding crimping or pinching the wire.
3. Install the Interior Mount
On the interior side, place the mounting plate against the door, feeding the cable through the plate’s opening. Line up the screw holes on the plate with those on the exterior face. Use your screwdriver to insert and tighten the screws, fastening the two sides of the handle together.
Next, connect the cable plug to the designated port, ensuring it snaps securely into place.
4. Attach the Interior Face
Take the interior portion of the knob or lever and position it over the mounting plate, aligning the screw holes. Use your screwdriver to secure it with the provided screws.
To complete the installation, make sure the strike plate, the metal plate on the door frame into which the bolt slides, is updated and properly aligned. A properly fitted strike plate ensures your deadbolt smoothly locks and unlocks without sticking.
1. Remove the Old Strike Plate
If your new lock includes a strike plate, use your screwdriver to remove the old one from the door frame.
2. Position & Attach the New Plate
Place the new strike plate over the same opening and fasten it with the provided screws.
3. Test the Bolt Alignment
Close the door and extend the deadbolt. It should cleanly slide into the strike opening without catching.
4. Adjust if Necessary
If the bolt doesn’t perfectly align, loosen the screws and slightly shift the strike plate up, down, or sideways. Retighten until the bolt smoothly operates.
Step 8: Program Your New Lock
Now that your hardware is installed, the final step is setting up your keyless entry system’s electronic features. Whether you’re using a keypad model or smartphone-enabled lock, proper programming ensures smooth daily use and reliable security.
For Keypad Models
Insert your batteries into the compartment if you haven’t already. Then, enter the preset code provided in your lock’s manual. Follow the prompts to create a custom code that you’ll use for entry, and test the keypad several times to confirm the new code works.
For Smartphone-Enabled Models
If your lock pairs with a smartphone, download the manufacturer’s app. Follow the in-app instructions to connect your lock via WiFi or bluetooth. Once connected, test virtual locking and unlocking through your phone.
Maintain Battery Power
If your lock runs on batteries, keeping them fresh is key to reliable performance. Check your manual for the expected battery life, typically 6 to 12 months depending on use. Be sure to set a calendar reminder for replacement, and always keep a spare set of batteries nearby.
