Your Guide to Measuring & Hanging Window Treatments
Window treatments simplified.
Ready to transform your windows from bare to beautifully dressed? This guide takes the guesswork out of hanging curtains and blinds, offering simple step-by-step instructions and expert tips to achieve a polished and professional look. Your journey to perfectly adorned windows starts here!
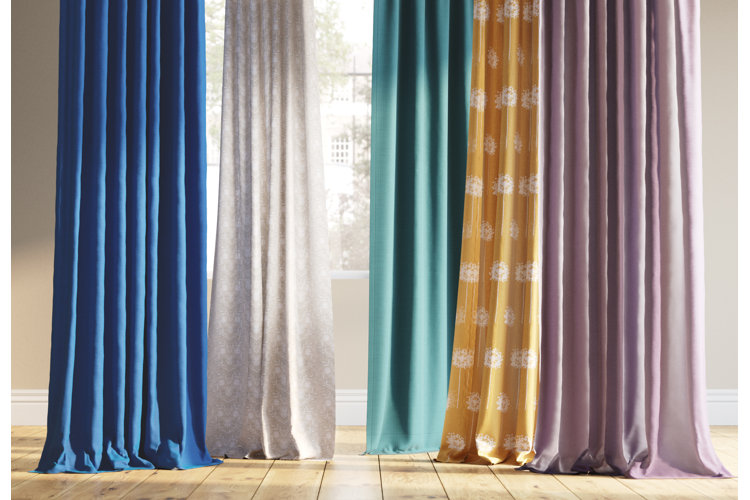
How to Measure for Curtains
How to Hang Curtains
How to Measure for Blinds
How to Install Blinds
How to Measure for Curtains
Finding the proper length and width of your curtain panels will ensure the visual appeal and function of the curtains in your home. The length of curtains not only determines how they fall, but can change the aesthetic and perceived height of the room. Follow the steps below to measure for the right size curtains.
1. Determine the Ideal Curtain Length
Depending on the style you want to achieve with your curtains, the length will vary. Here are some common curtain lengths to consider and how to measure for them so they will hang correctly.
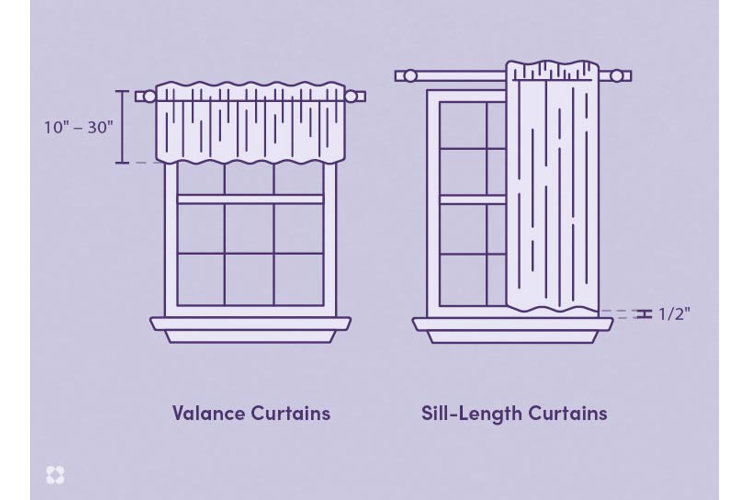
Valances: Window valances are most often used in kitchens and are designed to cover the top quarter or 10" – 30" of a window. Measure the distance from the window sill to the top of the window frame and divide that measurement by 4 to determine the ideal length of your window valance.
Sill-Length: Sill-length curtains provide an informal look and should fall about 1/2" above the windowsill. Measure from the top of your windowsill to the upper edge of the window frame and add 3 1/2" – 5 1/2" to that number to determine the ideal length of your short curtain. This will leave enough room to mount the curtain rod 4" – 6" above the window while leaving 1/2" above the sill.
Floor-Length: Floor-length curtains hang slightly above the floor but leave no more than 1/2" of space. To determine the right length for the floor-length look, measure from the floor to the top of your window frame and add 3 1/2" – 5 1/2" to account for curtain rod height.
Pooled: Pooled curtains collect on the floor and require an extra 6" – 12" of fabric to achieve the look. To calculate the length for pooled curtains, measure from your floor to the top of the window frame and add 10" – 18" of length to account for the pooling fabric and mounting height.
Rod Pocket: Most rod pocket curtains are mounted directly on the rod, so no length adjustment is needed in order to get the curtain to fall at the desired length.
Grommet/Eyelet: Curtains with grommet headers start slightly above the rod because of their hoops. Add 1" of length to the curtain panel or lower the rod by 1" to accommodate the difference.
Pinch Pleat: Pinch pleat curtain panels start just below the rod because of the clips. Subtract 1" from the panel length or move the rod up 1" to ensure it hangs at the desired length.
Tab Top: Tab top curtains typically hang lower from the rod than other curtain types. Depending on the length of the tabs, subtract 2" – 4" from the panel length or move the rod up 2" – 4" so it falls at the proper height.
3. Choose the Right Curtain Width
Proper curtain width is essential to ensuring the functionality of your curtains. They must be able to cover the window fully when closed to provide privacy and light filtration. It is recommended that curtains be between 1.5 and 3 times larger than the width of your window to provide full coverage when closed and even pleats when open.
To calculate the ideal width of your curtain panels, begin by measuring the total width of your window (including the casing and frame) from the left side to the outer right side. Add 12" to this measurement to account for the width of the mounting brackets that will allow your curtains to open fully. Then divide this measurement by the number of curtain panels you want to include.
For example, if your window measures 48" across, add 12" for a total width of 60". If you’re hanging one curtain, it should be no less than 60" wide, but 120" would be more ideal. For two curtain panels, each one should be at least 30" wide – or 60" for a fuller look – to ensure full coverage across the window.
4. Decide on the Curtain Rod Length
Depending on the width of your window, the curtain rod length will also vary. It’s important to choose the right size so you can pull your curtains all the way back without obstructing the window. The general rule of thumb is that curtain rods should be about 20% longer than the width of the window. Multiply the width of your window by 0.2 and add that number to the width of your window to determine the length of the curtain rod that you need.
For example, to calculate the curtain rod length for a 48" window, multiply the 48" by 0.2 to get 9.6". Then add that length to the width of the window for a total of 57.6" – rounded up to a 58" curtain rod.
Tip!
You may also opt for adjustable curtain rods that can be shortened or lengthened to their ideal size for an easily customizable installation.
How to Hang Curtains
Project Overview
- Time: 1–2 hours
- Skill Level: Beginner
- Number of People Recommended: 2
What You’ll Need:
- Stepladder
- Measuring tape
- Pencil
- Level
- Stud finder (optional)
- Power drill & drill bits
- Drywall anchors (if needed)
- Curtain rod & brackets
- Curtains
1. Measure & Mark the Bracket Positions
Using a measuring tape, determine where to place your mounting brackets to achieve your desired curtain rod position. Mark these spots with a pencil. Here are some recommended measurements to keep in mind:
Height: Curtain rods are typically mounted between 4" – 6" above the top of your window frame. To create the illusion of taller windows, the rods can be mounted up to 12" above the window depending on the height of your ceilings.
Width: Curtain rods should extend between 6" – 12" beyond the window on each side, with the brackets placed 4" – 10" wider than the window frame for optimal support. If you have extra-wide windows, it is generally recommended to place brackets every 36" for additional support.
2. Install the Mounting Brackets
As an optional step, you can use a stud finder to identify where to mount your brackets. Mounting your curtain rod to studs will make it extra secure, but will require you to drill a pilot hole before installing the brackets. You can also use drywall anchors if you prefer not to mount to studs. Position your brackets over your designated pencil marks and use your power drill and screws to secure them.
3. Attach the Curtains & Rod
Before hanging the curtain rod on the brackets, attach the curtains. This process may vary based on the header type of your curtains. You may wish to iron your curtains before attaching them to the rod. Then set your curtain rod into the brackets on the wall and secure with a setting screw if needed. Once your curtains are hung, ensure they are level and fall at the desired length. Use a steamer to remove any remaining wrinkles in the fabric.
How to Measure for Blinds
Blinds are a more fitted window treatment than curtains so they require precise measurements of your window. They can provide privacy and light filtration but are most effective when they are properly fitted to the window. Follow the steps below to find the right size blinds for your windows.
1. Decide on Mount Type
The style of blinds you choose will directly affect the function and aesthetics of your window treatments, as well as how you need to measure your windows when purchasing blinds. There are two common styles to choose from.
Inside-Mount: These blinds are installed on the interior of the window casing and sit flush to the window pane. They may not provide as much light control as outside-mount blinds, but these blinds are useful when wall space is tight. You can also pair them with curtains for added style.
Outside-Mount: These blinds are installed outside of the window frame, either on the casing itself or on the wall above your window. Outside-mount blinds offer more light control but they will cover the frame of your window and are more difficult to pair with curtains.
Depending on the blinds style that you chose, you’ll want to take different measurements of your window to ensure the proper fit. Keep in mind that blind measurements are always written as width first, length second. Record your measurements in this order so you don’t confuse them when purchasing.
Inside-Mount: To measure for inside-mount blinds, take all of your measurements inside the window casing or frame. To find the width, measure from the left inside edge of the casing to the right and subtract 1/4" to allow your blinds to move easily within the frame. Then measure from the inside top edge to the window sill to determine the length. Don’t forget to measure the depth of your window to ensure your blinds will sit flush in the frame. Aim for a depth of 1" – 4" for horizontal blinds or 3" – 4" for vertical blinds.
Outside-Mount: Measuring for outside-mount blinds will include the width of the window frame in all of your measurements. Measure from the outside left edge to the outside right edge of your window frame to find the ideal width for your blinds, or add 2" – 3" to this number to allow for overhang. Then measure from the top edge of the casing to the outside edge of the windowsill for length, adding 2" to this measurement to account for mounting space. Because outside-mount blinds sit in front of your window, there’s no need to measure for depth.
How to Install Blinds
Project Overview
- Time: 1 hour
- Skill Level: Beginner
- Number of People Recommended: 2
What You’ll Need:
- Stepladder
- Measuring tape
- Pencil
- Level
- Power drill & drill bits
- Drywall anchors (outside-mount only)
- Screws (usually included with blinds)
- Blinds & brackets
1. Mark the Bracket Positions
Your blinds will come with the mounting hardware required to install them. Depending on if you have inside- or outside-mount blinds, hold up the brackets to the desired position. For inside-mounted blinds, the brackets should be flush with the inside top edge of the window casing. For outside-mounted blinds, position the headrail 2" – 3" above the window frame. Mark the position of the headrail brackets with a pencil and use a level to ensure your placement marks are even.
2. Drill Holes & Install Brackets
Using your power drill and small drill bits, drill pilot holes where you’ve marked the bracket placement with a pencil. If you’re installing outside-mount blinds, insert drywall anchors into the wall at this time to provide extra support. Now attach the brackets with the provided screws.
3. Attach the Headrail & Blinds
Depending on the type of blinds or the manufacturer you’ve purchased them from, the headrail may be mounted to the brackets in different ways. Slide or snap the headrail into the brackets and secure them per the manufacturer’s instructions – whether that be snap-shut or screw-secured. Once the blinds are attached securely, open and close them to ensure they are functioning properly.
Now that you know how to measure for and install curtains and blinds, you can transform your windows in functional and stylish accents. For more information to help you purchase the perfect window treatments for your home, check out Your Ultimate Guide to Window Treatments.
