How to Build a Chicken Run: Step-By-Step Instructions
Give your chickens a safe space.
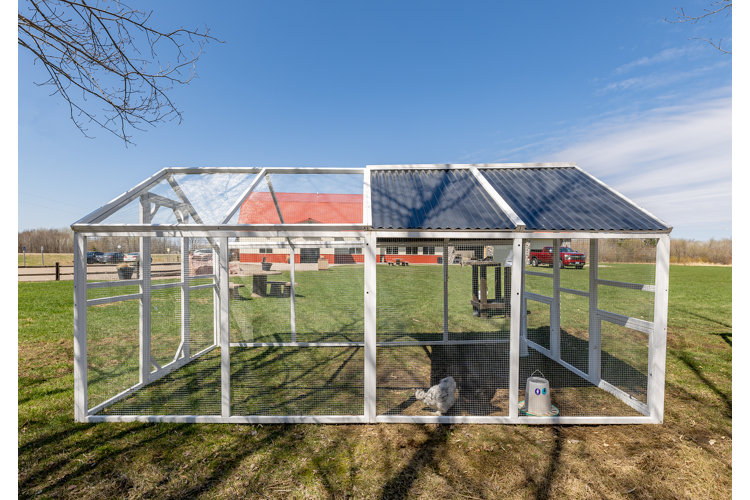
A chicken run is just as important as a coop when it comes to keeping your flock happy and healthy. Your chickens deserve to live their best lives – give them the outdoor life they deserve, without having to worry about predators or harsh weather. Purchasing a chicken run is a great option, but it’s not impossible to build one on your own. Read on to learn how to build a chicken run if you’re thinking of taking this project on.
How to Build a Chicken Run
Wondering how to build a chicken run? We’ve got you – follow these instructions to build a wooden walk-in chicken run with a partial or full cover.
Difficulty: Intermediate
People Needed: 2
What You Will Need:
- 8 landscape timbers
- 16- 2″ x 4″ lumber
- Table saw
- Level
- Metal fencing
- Chicken fencing
- Tarp
- Staple gun
- Nail gun
- Electric drill
- Wire
- Wire cutter
- Post hole digger
- Sand
- Landscaping rocks or bricks
- Ladder
- Screen door and hardware
1. Draw Up Your Chicken Run Plans
Before you begin building, you will need to draw up chicken run plans. Consider what size run you will need to build and where in your yard you will build it.
- Choose a spot: Find a level space in your yard where you would like to put your chicken run. This will ideally have grass or dirt, since chickens love to scratch the ground, take dust baths, and forage for bugs and plants. If you do place it on your lawn, don’t expect the grass to last long because chickens love to snack on that as well.
- Decide on the size of your run: You will need to decide what size run you would want to build. Consider the size of your chickens and the number of chickens you have. The general rule is to provide a run that has 8 –10 sq. ft. per chicken. If you have smaller breed chickens, you can get away with 8 sq. ft. per chicken, but if you have a large breed go with 10 sq. ft.
- Place stakes to mark your measurements: Once you’ve calculated how much space you will need for your chickens, measure it out on the ground where you will build. Place a wooden stake where each corner of the chicken run will be. You will be placing a landscape timber at each corner, as well as one directly in between each corner timber. Measure the equal distance in between each corner timber and place a stake there to mark where you will need to dig your post holes. If your corner posts are more than 24′ away from each other, place two vertical timbers equal lengths apart between the corner posts for added support.
- Determine where to place your center post: You will also be placing a vertical post in the center of the run for added support. Find the center point, which should be lined up with the middle posts on each side and place a stake there so you know where to place the post later.
Tip!
When choosing your chicken run placement, consider potential water and electricity sources. You may choose to hang a heating lamp during the winter, use a heated water bowl, or you may want to reduce the distance you will need to walk with a bucket of fresh water.
2. Measure & Cut Your Materials
Once you have your chicken run plans ironed out, gather your building materials and cut them to size.
- Measure & cut your 2″ x 4″ s to length: Measure the distance between the corner post and middle post. You want the 2″ x 4″ to end at the outside edge of the corner landscaping post and in the center of the middle post, where it will meet with the 2″ x 4″ for the other half of each side. Once you know how long each 2″ x 4″ needs to be, cut them down to size using a table saw. You will also need a space for a door, so keep this in mind when measuring your 2″ x 4″s. Measure the width of the door you will be using and cut a space where you want to put your door.
- Make sure your landscaping timbers are the correct length: To make a walk-in chicken run, you will need it to be at least 6′ tall. Most landscaping timbers come in 8′ length. The posts will go 2′ into the ground, so make sure they are at least 8′ long. If you purchase ones that are longer than 8 feet, you can keep the added height or cut them down to your preferred height.
3. Dig Post Holes & Place Your Timbers
Now it’s time to dig the holes for your posts. If you have soft enough soil you can use a manual post hole digger. If you’re having trouble, you may need to rent an auger to help dig the post holes more easily.
- Dig a hole at each stake: Dig a 2′ post hole where you have placed each stake. Make the hole just wide enough to fit the landscaping timber. Try to be as exact as possible with the depth of each hole. Once you put the posts in the holes you will need to measure them to make sure they are the same height. If any are off you can correct the hole by filling in dirt, or digging a bit more.
- Secure your vertical timbers: Once you have your holes dug you will place a landscaping timber in each one. Once you are sure the hole is the correct depth and all posts are the same height you can fill the rest of the hole around the timber with sand. Since we will be securing the timbers with horizontal 2″ x 4″s, sand will be enough to secure them for our purpose.
4. Secure The Metal Fencing on the Side of the Run
Once your posts are secure, it’s time to wrap them with metal fencing. Choose a roll of metal fencing that is pliable enough for easy installation, but sturdy enough to keep predators out.
- Wrap metal fencing around the perimeter of your run: Wrap the fencing around the vertical posts. You will secure the fencing to each post with a staple gun as you go. Put a staple over the wire fencing in between each horizontal wire to ensure it is properly secured to the post. Depending on the height of your fencing, you will likely need to do a second level of fencing to reach the top of the posts. Make sure the top and bottom fencing overlaps a bit so it can be secured with wire to keep it closed.
- Cut any extra fencing: If excess fencing goes above the top of the posts, cut it down so it is level with the tops of the posts.
- Use chicken wire for extra protection: Now go around the bottom perimeter of the run with chicken wire (at least 2′–high) and secure it to the posts like you did with the metal fencing. The chicken wire has smaller holes that will prevent the chickens from sticking their heads out, keeping them protected from predators.
5. Affix Your Horizontal 2″ x 4″s to the Landscaping Posts
You will use a nail gun to secure the 2″ x 4″s to the posts. Use pressure-treated 2″ x 4″s or a non-toxic finish or paint on them to prevent rot. Remember to leave a space for your door frame and door.
- Attach 2″ x 4″s along the base of the run: Line a 2″ x 4″ up at the base of the timbers – each 2″ x 4″ should go from a corner timber to the center of a middle timber. At the center timber, two 2″ x 4″s will meet. Use your nail gun to secure the horizontal 2″ x 4″s to the vertical timbers. Do this for each side of the run.
- Attach 2″ x 4″s along the top of the run: You will now repeat the last step at the top of the run where the timbers end. Do the same to attach the top of the timber that is in the center of the run to the middle timbers on the front and back side of the run – this is to prevent the fencing that will go over the top from sagging. Once you are done, you will have a border at the base and top of the timbers.
- Install a frame for your door: Using 2″ x 4″s and a nail gun, build a frame that you can attach your door to in the space that you left open for your door. Simply use wire cutters to cut a space in the fencing where the door will go and use a staple gun to attach the fencing to the edges of the frame once it is installed. Be sure that the inside of the fame is the correct measurement to fit your door.
6. Install metal fencing over the top of the run
You will need to include metal fencing over the top of your run for it to be predator-proof. Most chickens can fly enough to get over fencing, and birds of prey like hawks can also swoop down and carry unsuspecting chickens away.
- Cover the top of the run with fencing: Using the same metal fencing that you used for the sides, you will run the metal fencing across the top of the run – repeat this side by side with a slight overlap until the entire run is covered.
- Secure the metal fencing: Use a staple gun to secure the fencing to the top border of 2″ x 4″s. Many predators and pests can climb the fencing and get in through small openings, so use wire to secure the overlapping fencing together so there are no breaks where chickens could get out or predators could get in.
5. Install Your Door
You can build a simple screen door on your own using wood and extra fencing, or you can purchase a premade screen door. If you use a premade screen door, reinforce the screen by attaching metal fencing or chicken wire over the opening with a staple gun, since regular screen material is not strong enough to keep predators out.
- Attach your door to the frame: Use an electric drill and screws to attach the door to the door frame with door hinges. If you’ve made your own door, make sure to attach a simple handle to the door so you can pull it open.
- Install a door bolt: Install at least one door bolt on the outside of the door so you can lock it from the outside. This is important for keeping chickens in and preventing predators from opening the door.
8. Attach Tarp Covering
Covering part of your run gives your chickens a safe space to huddle if it starts to rain or if they feel threatened by airborne predators. It also provides them with shade on days where the sun is particularly strong and allows them to enjoy the outdoors regardless of snow or rain. Tarp is an inexpensive and durable material that can be changed out for a new one if it becomes damaged or wears down over time.
- Place your tarp: Place a tarp over the top of your chicken run. You can cover half of the top or the entire length of the run.
- Secure the tarp: Pull the tarp tight over the top and secure it either to the wood 2″ x 4″s with a staple gun or to the fencing using chords or zip ties.
Tip!
Tarps are convenient because they are inexpensive and easy to replace when needed. If you want a covering that is more durable, you can create a flat roof by nailing some corrugated metal siding to the top border of your run.
9. Add Enrichment Items
Now that your run is complete, you can decide what to place in it. Switch items out and create variety to keep your chickens occupied and happy. If you have a large run, you can even place your chicken coop inside to allow the chickens to safely come and go from their coop as they please.
- Roosting Frame: Place a roosting frame inside your run so your chickens can roost when the ground is chilly or they want to take an outdoor nap.
- Feeders & Waterers: A chicken run is an ideal place to feed your chickens because it encourages them to spend time outside, and keeping their food out of the coop makes it less likely that pests and rodents will hang out there.
- Disco Balls: Chickens actually love disco balls since they are attracted to the light reflections they produce. Hang a disco ball (or two) from the top of your run so your chickens can party.
- Nesting Boxes: If your chickens don’t have access to their coop while in their run, place extra nesting boxes in the run for hens to lay their eggs.
