How to Install Tile Backsplash: A Step-By-Step Guide
We’ll walk you through it.
The kitchen is the heart of the home – it’s a space where memories are made, meals are shared, and recipes are passed down. It’s also a high-traffic area where messes are made. A tile backsplash is a stylish solution that makes cleaning up easy, so you can spend more time enjoying your kitchen and less time stressing about water damage and food stains. Tile backsplashes are also common in bathrooms and can play a hand in transforming a dull bathroom into the ultimate spa-like space. Read on to learn how to install tile backsplash in your home.
What is a Tile Backsplash?
A tile backsplash is an area of tile that covers the wall space behind or around countertops. You’re most likely to find tile backsplash in a kitchen or bathroom. Backsplash is designed to be easy to clean and protects the walls from splashes of water and cooking messes. While wall tiles are made of many different materials, ceramic and porcelain tiles are most popular for backsplash tiles due to their durability and moisture-resistance. Check out our Choosing the Best Backsplash Tile guide for a rundown on backsplash tile materials.
Benefits of a Tile Backsplash
From elevating your kitchen’s style to enhanced durability, there are many benefits that come with tile backsplashes:
- Enhanced functionality: A backsplash made of durable tiles can be both beautiful and easy to clean. Since backsplash tiles are made out of water-resistant materials like ceramic, natural stone, and glass, they tend to be durable and easy to clean.
- Aesthetic appeal: Backsplash tiles come in so many colors and patterns. A tile backsplash gives you the most flexibility when it comes to customization and design, making it easy to elevate the style of your kitchen or bathroom.
- Cost-effective: While some tiles can cost more based on material and design, installing a DIY backsplash is typically more cost-effective than other backsplash materials, such as granite. Tile backsplashes are also easier to install yourself and easier to repair. For example, a cracked tile can be replaced without having to replace the entire backsplash.
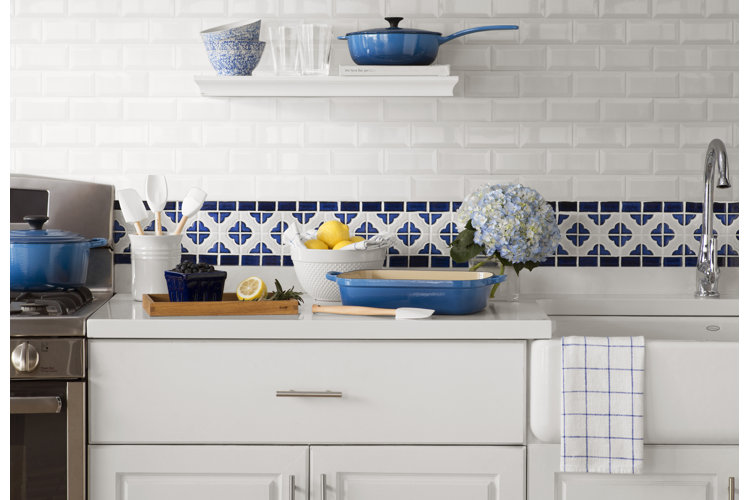
( Shop this image: blue cast-iron cookware set, blue mosaic backsplash tile ,and white subway tiles.)
How to Install Tile Backsplash
In this guide, you will learn how to install a tile backsplash, which will require the use of mortar and grout. If you are looking to install a peel & stick tile backsplash, don't worry, we have a guide for that too! Installing backsplash tiles can be daunting, but we’re here to make sure you have everything you need to get the job done right. Read on for all the details and to decide if this DIY backsplash project is right for you.
Time Required: 2+ days
Skill Level: Intermediate
What You Will Need:
- Tape measure
- Drop cloth, paper or plastic (for protecting counters & cabinets)
- Painters tape
- Backer board (optional)
- Silicone caulk
- Caulk gun
- Putty knife
- Pencil
- Manual tile cutter
- Tile nipper
- Wet saw (optional)
- Mixing bucket
- Trowel
- Grout float
- Sponge
- Tiles
- Tile spacers
- Grout
- Haze remover (optional)
- Grout sealer
Step 1: Prep for Your Project
- Measure the wall space where you plan to install your tile backsplash: Multiply the width x height to get the square footage you will need to cover. Add 10% to that for a safety margin to make sure you have enough material or in case you damage a tile.
- Make sure you have enough supplies: Based on your square footage, make sure you have enough mortar, grout, and caulk to complete your job. It should be listed on the packaging how much square footage the mixture will cover. Once mixed, you will only have a certain amount of time to work with mortar and grout, so running out for more once you start may not be an option.
- Decide whether you will install a backer board or apply the tiles to the existing wall: While tiles can be applied to clean smooth drywall or plaster walls, backer board is recommended for superior results. On top of guaranteeing a smooth, flat surface to affix your tiles, the backer board is made of cement, sand, and fiberglass mesh, which makes it ideal for high-moisture areas like kitchens and bathrooms. With a backer board, if there is a leak in your tile backsplash, it won’t cause water damage like it would on your regular wall. However, installing a backer board does require cutting out the area of your existing wall and replacing it with the backer board.
Tip!
When deciding on an area to cover with tile backsplash, try to choose natural-looking end points. Stopping at the end of the counter, or up to the bottom of cabinets is popular in many kitchens. If you’re feeling ambitious, you can opt for a backsplash that goes all the way up to the ceiling!
Step 2: Protect Your Counters & Cabinets
- Clear your counters: Remove all appliances, cookware, and decor from your counters.
- Cover counters and cabinets: Using a covering like paper, plastic, or drop cloth, cover your counters and cabinets. Use painter’s tape to secure your covering. Apply painter’s tape to the countertop starting a tile’s thickness away from the wall so the tape is not stuck under the tile once the tiles are installed.
Tip!
As a safety precaution, before you start cutting into walls or removing outlet covers, make sure to turn off the power to the area you will be working on.
Step 3: Prep Your Wall
- Remove existing tile: If there is existing tile, you will need to remove it using a chisel and masonry hammer. Wear eye protection for your safety.
- Install backer board (optional): If you decide to replace the wall with backer board, you will need to remove the existing wall where you plan to install your backsplash and install the tile backer board in its place.
- Clean Up: It’s important to start with a clean and smooth surface when installing tiles. Make sure the wall is clean of any residue, debris, and dust before starting.
Step 4: Cut & Pre-Lay Your Tiles
- Design Your Layout: Lay out your tiles on the wall and solidify your desired design before mixing or placing any mortar. It’s important to have it down and well thought-out before installing them on the wall.
- Cut Your Tiles: Once you have your design set, mark and cut any tiles needed to fit your backsplash space. For ceramic and porcelain tiles, you can use a tile cutter to cut straight lines and a tile nipper to cut circular incisions. You can use a wet saw to cut ceramic and porcelain tiles and to prevent chipping or breakage when cutting natural stone.
- Pre-Lay Your Tiles: Lay your tiles out against the wall once more after cutting them. Use a pencil to mark where they will start and end. Lay them out on your counter or another surface closeby where they will go up on the wall, so you can easily grab them and apply them to the wall once you start applying your mortar.
Tip!
There’s no need to go out and buy a wet saw. If you plan to finish your tile backsplash project within a day or two, rent a tile saw to save some time and money.
Step 5: Mix Your Mortar
- Mix your mortar: Follow manufacturer instructions to mix your powdered thin-set mortar. Carefully follow any instructions and read labels to make sure you are using the correct mortar for your specific project and tile. Mix the mortar in your mixing bucket.
- Get your trowel: Use a notched trowel to apply the mortar. Typically a notched towel that is ¼” x ¼” will work well with natural stone tile. Your mortar should have recommendations for trowel size depending on your project and tile, so be sure to read those before selecting a trowel.
Step 6: Apply Your Mortar & Tiles
- Spread a thin layer: Begin applying the mortar in 2’ sections. Apply a thin layer with the flat side of the trowel, pressing at a 45° angle.
- Make notches: Using the notched edge, apply a small amount of mortar and go over the area to comb even ridges in one direction.
- Start placing tiles: Once you’ve combed ridges into your mortar, begin to place your tiles on the wall following the lines made during your layout. Place tile spacers in between tiles as you go to keep them lined up the way you want them.
- Clean along the way: Continue this until the tile is covering your desired backsplash area. As you go, use a damp sponge to remove any excess mortar from the face of the tile.
- Wait: Allow the mortar to dry completely. It should take 24 hours for your mortar to be completely dry and for you to move on to the next step. Exact drying time depends on manufacturer and temperature in your home, so be sure to read manufacturer instructions thoroughly.
Step 7: Mix & Apply Your Grout
- Choose your grout: Use a poly-blend sanded grout for joints (spaces in-between tiles) that are larger than ⅛”. Use a poly-blend unsanded grout for joints that are ⅛” or less.
- Mix: Following manufacturer instructions, mix your grout in a clean mixing bucket and allow it to set per the instructions. This process typically takes 5-10 minutes.
- Apply: Once the grout is ready, apply it to the joints using a grout float at a 45° angle. Then go over the tile with the grout float at a 90° angle to remove excess grout as you go.
- Clean and shape joints: Use a wet sponge in a circular motion to gently remove grout from the face of the tiles. Rinse the sponge frequently to avoid spreading more grout on the tiles. Use a gloved finger or a popsicle stick to shape the joints. Repeat this process one or two more times. Clean up needs to be done before the grout has fully set to avoid it hardening and sticking to the face of the tiles. Be careful and use limited water on your sponge to avoid washing out your joints.
- Give it a final cleaning: Allow the grout about 3 hours to dry before using a dampened cloth or sponge to remove the final haze of the grout from the face of the tiles.
Tip!
Consider using premixed materials. Both mortar and grout come in premixed versions and can save you time and labor. This also allows you to take a break between applying mortar and grout since the pre-mixed versions live in resealable containers. Read manufacturer labels to make sure each product is compatible with your project.
Step 8: Seal Your Tiles
- Wait: Allow the grout 24 hours to a few days to fully dry. The dry time depends on the manufacturer of the grout and should be listed on the packaging.
- Caulk open spaces: Apply a small amount of latex caulk between the tile and your countertop to prevent liquid from leaking into the wall or backer board. Latex caulk takes 1-2 hours to be dry to the touch but several days to fully cure, so be careful when working around it once dry.
- Seal your grout: Apply a grout sealer and allow it to dry fully (24-48 hours). Grout sealer will prevent future staining.
Step 9: Enjoy Your New Backsplash
- Replace countertop items: Once fully dried and cleaned, place your countertop appliances back in their normal spots.
- Maintain your backsplash: Spot-clean any food or toothpaste splashes as needed. Give your backsplash a routine cleaning with tile or glass cleaner to prevent staining and keep your backsplash looking fresh!
