How to Replace a Ceiling Light Fixture
Step-by-step help.
If you want to change up your ceiling light fixtures, we’ve got you covered. This guide goes over how to remove them and install new fixtures in no time.
Tip!
Unsure what ceiling light you want to replace your old fixture with? Read our guide on Types of Ceiling Lights: How to Choose the Right One. Also, you don't have to choose the same type of light fixture as your current one, so long as it fits the electrical box hole. If it's smaller, you can just add a decorative ceiling medallion to cover the gaps!
Skill Level: Intermediate
Time Requirements: 90 minutes to 2 hours
Number of People: 2
What You’ll Need
- Screwdriver
- Circuit tester
- Step stool or ladder
- New ceiling light fixture
- Wire connectors (wire nuts)
- Electrical tape (if needed for old or damaged wires)
- Lightbulbs (unless they come with the new fixture)
How to Replace a Ceiling Light Fixture
Step 1: Turn Off the Power
It's essential to turn off the power before doing anything to ensure your safety and prevent electric shock. To do this, locate the circuit breaker box (typically located in the basement or a utility closet) and turn off the power to the room where you plan to remove and install the ceiling light.
Tip!
If your breaker is not labeled, you can always shut the power off to the entire house to be safe.
Step 2: Remove the Shade or Globe
Some ceiling lights have what is called a shade or glass globe that sits over the lightbulbs and will have to be removed first. The most common light fixtures will either require loosening screws that hold the shade or globe in place, unhooking mounting clips, or unscrewing the shade itself.
- Be sure to hold on to the light fixture (especially glass fixtures) to keep it steady when you are unscrewing it.
- Once the fixture shade or globe is off, you will see bulbs and the light fixture’s base.
- Unscrew the lightbulbs and set them aside if you plan on using them for your new light fixture.
Tip!
If using a ladder or step stool, be sure to have a friend with you to hold the ladder still.
Step 3: Unscrew the Fixture
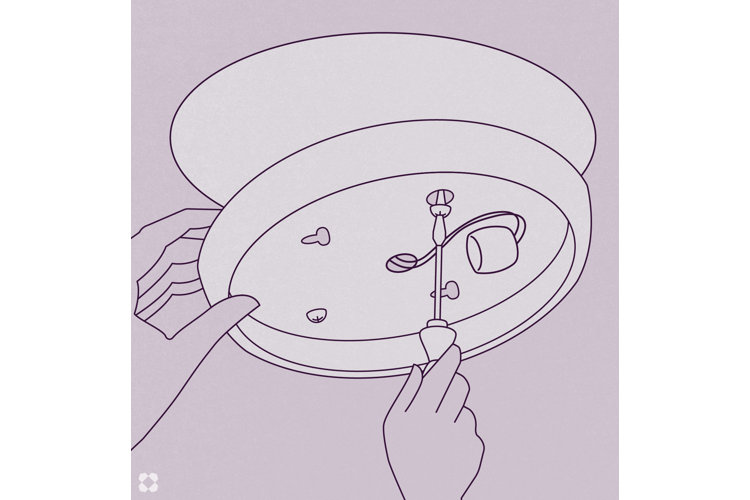
Under the shade or globe, you will see the main part of the light fixture. This will have to be removed before installing the new fixture. Most light fixtures are screwed in; use a screwdriver to loosen the screws that hold the light fixture to the mounting base. Once the screws are removed, your fixture should be separated from the base.
Step 4: Disconnect the Wires
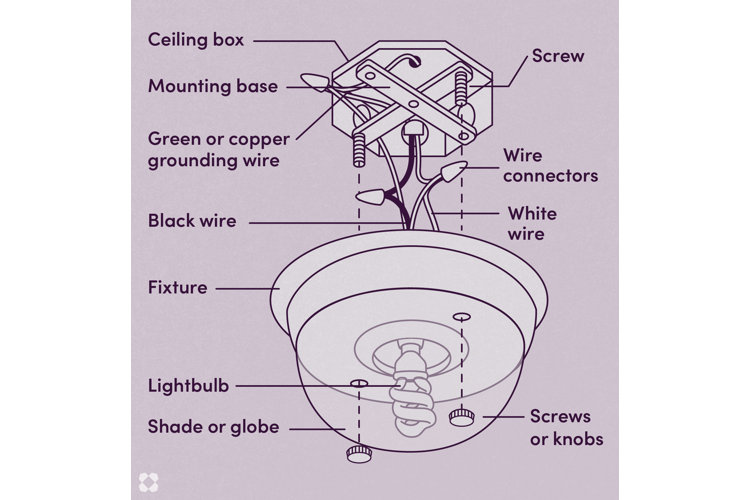
After you unscrew the fixture, you’ll notice that there are wires hanging from the ceiling electric box that attach to wires in the light fixture. Use a circuit tester to test the power and ensure that there is no electricity in the wires. Most fixtures have three lead wires; black, white, and green (or copper).
- Black wire is known as hot wire
- White wire is known as neutral wire
- Green or copper wire is the grounding wire.
Once you’ve confirmed that the power is off, it’s time to disconnect each wire. Unscrew the wire connectors (or wire nuts) to disconnect the fixture’s wires from the wires on the electrical box. Some fixtures have a copper wire attached to the mounting base that is used to prevent electrical shocks or fires. Be sure to disconnect this as well and set it aside in case your new fixture does not have one included. Once wires are removed, your old ceiling light’s fixture will be able to be fully removed from your ceiling.
Step 5: Disconnect the Mounting Base
Once you've disconnected the wires, you can turn your attention to the mounting base of the light fixture. This is typically a strap or bar that helps connect the electrical box to the fixture. Most mounting bases attach to the electrical box with screws, so you'll need to use a screwdriver to unscrew and remove it before continuing. The new ceiling light usually comes with its own mounting base.
Step 6: Unbox the New Ceiling Fixture
Once you've safely removed all the components of your old fixture, you can start prepping for the new one. Remember that you can always keep your old light fixture in case you want to reuse it later. When you’re ready, unbox your new ceiling light.
- Remove all of the plastic and take the fixture’s base out of the box.
- Find the plastic bag that is full of the hardware you will need, and set it aside.
- Examine the wires that are attached to your new fixture, and reference the instruction manual to identify the hot, neutral, and ground wire components.
Step 7: Install the Mounting Base
Depending on the style of your light, you will either screw your base directly into your existing mounting base (if you did not remove it) or attach a new mounting base to the ceiling electrical box. If attaching a mounting base, your fixture will then be screwed into the base. Be sure to read the manufacturer’s instructions for your new light fixture before installing. The installation requirements can vary depending on the size and weight of the light.
Step 8: Connect the Circuit Wires
For most light fixtures, the wires you disconnected (coming out of the electrical box) will be able to attach to your new light fixture. You should see one white wire, one black wire, and either a bare copper or green wire coming out of the electrical box. Have another person hold up the new light fixture while you connect its wires to those in the electrical box.
- First, connect the ground wire on the fixture to the ground wire in the ceiling using a wire connector.
- Next, connect the white wire to the other white wire using a connector.
- Lastly, connect the fixture’s black wire to the ceiling’s black wire.
Tip!
If the wiring in the electrical box is old and cracked, you may need to wrap the wires with electrical tape to help reinforce them. The tape should cover the wire up to the exposed end of the wire.
Step 9: Mount the Fixture
After the wires are connected, you will need to attach the fixture to the mounting base. This will vary depending on what style of light you chose. Most fixture bases will use two long screws that need to be threaded into two holes on the mounting base, but some require you to slip the fixture over the mounting base and use a knob that screws on. Be sure that your screws are in place and tightly screwed down before moving on to the next step.
Tip!
Depending on the size of the fixture, you might want another person to help hold it in place while you attach it to the mounting base. To make the process safe and easy, you'll each need your own ladders.
Screw the lightbulbs into your fixture’s base. Be sure to check your light manufacturer’s instructions for specific wattage. To test, turn the power on your breaker back on and turn on your light switch.
Step 11: Install the Shade or Globe
Once your light is working properly, the last step (if applicable to your specific light fixture) is to install the shade or glass globe. Some can be screwed in with screws, while others call for the shade to be turned clockwise to screw on. Be sure to check the manufacturer’s instructions when installing.
Tip!
Check out these guides for guidance on installing specific types of light fixtures like recessed lights or chandeliers:
How to Install Recessed Lighting
Chandelier Installation 101: How to Install a Chandelier
How to Install a Ceiling Light
