How to Install Bifold Doors
A beginner-friendly approach.
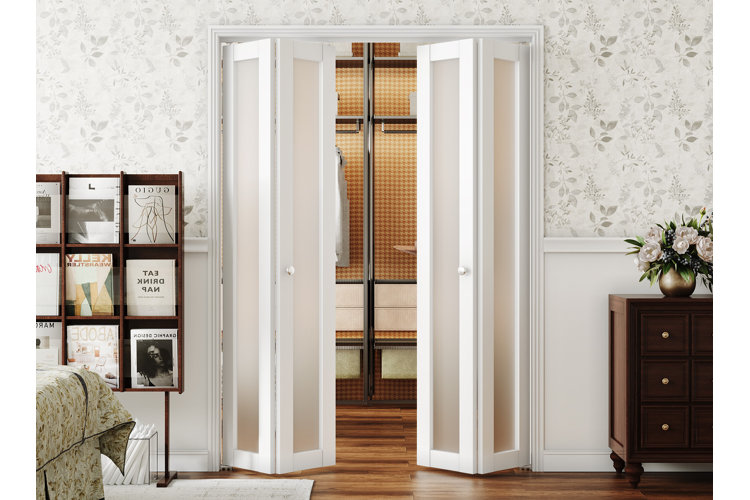
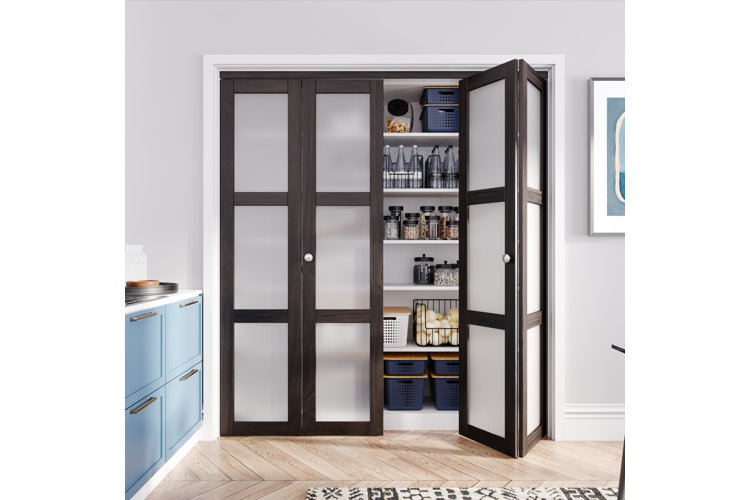
Bifold doors help separate rooms and hide the clutter of laundry or pantry closets, all while remaining space-friendly. For this reason, it's no wonder they're a popular choice for interior doors! Considering installing a bifold door by yourself? We've got you covered! Keep reading to learn how to install bifold doors like a pro.
Bifold Door Installation Overview
How to Install Bifold Doors
Bifold Door Installation Overview
Use this section to get prepared for your bifold door project so you can ensure you have everything you need.
Time Required: 2–4 Hours
Skill Level: Beginner to Intermediate
Number of People: 2
What You Will Need:
- Single or double panel bifold door with hardware included. This should include a door track kit and additional hardware.
- Level (to make sure the door track rests plumb on the door frame)
- Pencil (to record measurements and mark door track screw holes along the top of the door frame)
- Power drill & tool kit (for securing the track to the top of the door frame and securing the lower pivot bracket)
- Wood drill bits & screwdriver drill bits (for drilling pilot holes into the door frame/floor and attaching brackets)
- Hammer (for securing pivot pins in the door frame)
- Hacksaw (only if you need to trim the door track to fit the width of the door frame)
- Ladder (depending on the height of the door frame)
- Tape measure (for centering the track and the lower pivot bracket)
How to Install Bifold Doors
This section walks you through the process of installing bifold doors to show you just how doable it is – even for beginners.
1. Measure the Door Frame
Before you pick out a bifold door, you want to make sure it will fit the door frame properly. This is especially important if you plan to install a bifold door on a closet or pantry door frame that might not be the standard 30" W x 80" H door frame size. Measure and record the height and width of the door frame so you can choose the right bifold door size, and determine whether you just need a single-panel or double-panel configuration to cover the width of the door.
2. Organize & Assess the Door Hardware Components
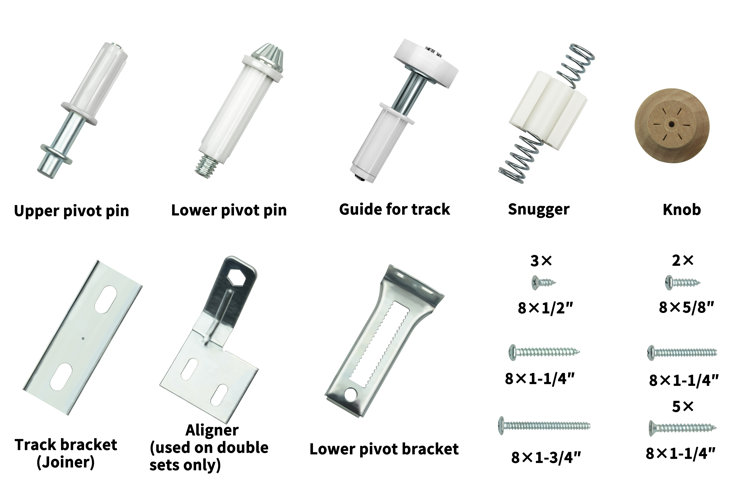
Here is a list of the typical hardware that comes with bifold doors for installation. Take a moment to review each piece of hardware before learning how to install bifold doors. This list may vary depending on the manufacturer.
- The door track itself (not pictured above): Most bifold doors come with a compatible metal track that you install along the top of the door frame. The door attaches to the track using pivot pins to hold the door securely in the frame.
- Bifold door hinges (not pictured above): Your bifold door will also come with door hinges specifically designed to accommodate the folding/unfolding movement of the door panels. Depending on the manufacturer, these may already come attached to the door panels, or you may have to add them yourself.
- Upper pivot pin: The upper pivot pin goes in the upper corner of the bifold door panel that isn't located on the opening side of the door. This is usually marked with a pre-drilled hole. Once in the door, the pivot pin gets attached to the track bracket on the guide for track.
- Lower pivot pin: The lower pivot pin fits into the bottom edge of the bifold door on the side of the door that doesn't open. It then attaches to the lower pivot bracket. Its overall purpose is to secure the bottom edge of the bifold door.
- Guide for track (also called a roller pin): This is what makes the magic happen! It attaches to the upper corner of the opening side of the bifold door and fits along the door track. The top portion is designed like a wheel, and it rotates as you fold or unfold the door, allowing the bifold door panels to slide seamlessly along the track.
- Snugger: A snugger is a spring-loaded component that attaches to the center of the door track for double sets of bifold doors or on the opening side for single sets of bifold doors to help keep them closed/prevent them from rolling backwards or folding up. This is an optional component for single sets of bifold doors.
- Door knob: Every set of bifold doors comes with a door knob to make folding and unfolding the door a breeze. It may come pre-installed or detached so you can determine the best placement.
- Track bracket (joiner): A bifold door usually comes with one track bracket that's usually already attached to the door track. This is what the upper pivot pin fits into. The track bracket is typically located on the side of the bifold door that doesn't open. If you have two sets of bifold doors for a large closet or pantry, you'll likely need two track brackets, one for one set of panels and one for the other.
- Aligner (only for double sets): If you plan to install bifold closet doors to cover a larger door opening, you'll need a pair of aligners to help keep the sets of doors closed or fully unfolded. This is an alternative to a snugger. Attach two aligners (one for each set of doors) on the interior of the doors on the opening side. When lined up properly, they should lock into place and hold the sets of doors together. Then they unlock as soon as you unfold the doors.
- Lower pivot bracket: The lower pivot bracket attaches to the bottom corner of the door frame and the floor on the non-opening side of the door. It acts as an anchor point for the lower pivot pin.
- Bracket screws: Bifold door hardware kits also typically come with compatible bracket screws to make installation a breeze! Review the instruction manual for your bifold door to determine where certain screws go.
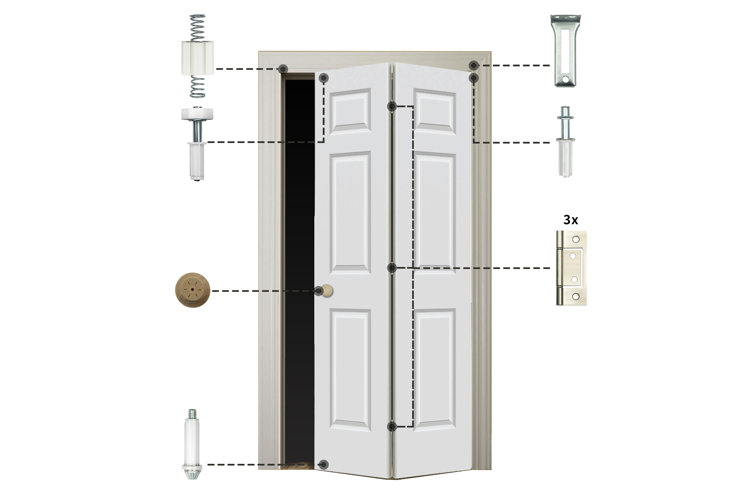
Here is a diagram of where these components go to help you visualize the installation process:
3. Start by Installing the Door Track
Now that you've organized and accounted for the hardware that your bifold door came with, it's time to install the track.
- Measure the depth of the door header (the top of the door frame) and mark the center point with a pencil. This center point will be where you line up your door track.
- Have a friend hold the track along the bottom of the header (the top of the door frame).
- Line up a level with the door track and see if the bubbles center properly. If they aren't centered, your door track may not be in a straight line.
- Readjust the door track until the bubbles line up in the center of the level.
- With your friend still holding the track in place, take your pencil and mark each pre-drilled hole along the track.
- Remove the track from the header (just for a moment).
- Using your power drill and a wood drill bit, drill a pilot hole at each place marker.
- Realign the door track with the newly drilled holes on the door frame header.
- Grab your power drill and a screwdriver drill bit and locate the mounting screws that came with the door track.
- Have your friend hold the track in place as you drill the mounting screws into each hole along the door track.
4. Install the Lower Pivot Bracket
Once you have your door track on the door frame header, you can focus your attention onto the lower pivot bracket. This is the bracket that will hold the bottom of the bifold door in place on the side that doesn't open. Depending on the manufacturer, this bracket is usually in the shape of a right angle and is designed to mount to the bottom of one of the side door jambs and the floor. For context, the door jamb refers to the frame of the doorway and includes two side jambs and one header jamb. The orientation of the bifold door will determine whether you mount the lower pivot bracket to the bottom of the right side jamb or the bottom of the left side jamb.
- Start by taking a tape measure to measure the depth of the side door jamb and mark the halfway point. This is where you'll attach the lower pivot bracket.
- It's important that the lower pivot bracket lines up and is parallel with the door track you just installed because this will ensure that your bifold doors will rest straight up and down and can open/close properly.
- Place the bracket up against the corner where the side door jamb meets the floor and line it up to be centered on the pencil mark you made on the side door jamb.
- Take your pencil and mark each pre-drilled hole on the bracket (you may need to use duct tape in order to mark the floor drill holes if you can’t see the pencil markings).
- Remove the bracket.
- Using your power drill and a wood drill bit, drill pilot holes at each marker on the floor and on the door jamb.
- Reposition the bracket to line up with the newly drilled pilot holes.
- Fit your power drill with a screwdriver drill bit and use the mounting screws designated for the lower pivot bracket to secure the bracket in place.
5. Check for Levelness
Rechecking levelness is the next essential step for how to install bifold closet doors. Now that you've attached the door track and the lower pivot bracket, you need to check for levelness one more time. Line up your level along the door track and then along the floor-mounted portion of the lower pivot bracket to ensure they're both level. This will ultimately save you more time later and ensure the door will fit properly.
6. Hammer the Upper Pivot Pin Into the Top of the Door
Now to assemble the door hardware! Start by locating the pre-drilled hole in the upper corner of your bifold door. If your set of bifold doors has a door knob already on one panel, make sure to attach the upper pivot pin to the hole on the panel without the door knob. This is because the upper pivot pin is meant to anchor the set of doors on the non-opening side. Once you've verified that it's the right installation hole, use a hammer to hammer the pivot pin into the hole.
Please note that the above image shows two bifold door panels stacked on top of each other: one is the hole for the upper pivot pin, and the other is the hole for the guide for track.
7. Repeat the Process for the Guide for Track & the Lower Pivot Pin
Next hammer the guide for track (also called a roller pin) into the pre-drilled hole on the panel that has the door knob on it. This should be on the opening side of the door frame and on the opposite side where you put the upper pivot pin. Then do the same with the lower pivot pin. This pin should be hammered into a pre-drilled hole located on the bottom of the same door panel that has the upper pivot pin.
8. Hold the Door in Place as You Lock the Upper & Lower Pivot Pins Into the Corresponding Brackets
When it comes to determining how to hang a bifold door, it's actually pretty easy! Simply have a friend help you hold the door panels as you slide the upper pivot pin into the track bracket, as seen in the image above.
With the upper pivot pin in place, you can slide the lower pivot pin into the lower pivot bracket, as shown in the image above.
9. Line Up the Guide for Track With the Door Track
With the non-opening side of your bifold doors secure, you can now attach the guide for track on the side that opens. All you have to do is insert the roller portion of the guide for track into the track itself, and it's good to go!
10. Test It Out
Now that your bifold door installation is complete, admire your hard work. Test opening and closing your bifold door and make adjustments as needed.
Tip!
Since you now know how to install bifold doors, try your hand at these DIY projects:
How to Install Barn Doors for Beginners
How to Install a Screen Door Step by Step
