How to Install Laminate Flooring
Your beginner-friendly guide.

In this guide, we go over how to install laminate flooring, including how to choose an underlayment and helpful tips for staggering and installing laminate floor panels. Keep reading for an overview of what you need or jump ahead to get started.
Laminate Flooring Installation Overview
How to Install Laminate Flooring
Laminate Flooring Installation Overview:

Before you learn how to install laminate flooring, let's go over what to expect, including skill level, time requirements, number of people required, and a recommended supply list.
Skill Level: Beginner to Intermediate
Time Requirements: 4–8 Hours (Depending on room size)
Number of People: 1–2
What You'll Need:
- Tape measure (to measure room square footage and measure laminate flooring prior to cutting)
- Pencil & notepad (to record square footage and mark flooring panels for cutting)
- Floor scraper (for removing old flooring or leveling out subfloors)
- Pry bar (only necessary if removing old baseboards)
- Hammer (to help remove or level nails on the subfloor)
- Floor cutter or circular saw (if you need to cut flooring panels to fit the space)
- Undercut jamb saw (to cut beneath door jambs so flooring can fit snugly underneath)
- Safety glasses (when cutting materials)
- Laminate flooring underlayment and underlayment tape (only if the underlayment doesn't come with pre-attached tape)
- Utility knife (to cut/remove excess underlayment to fit the space)
- Knee pads or a cushioned mat (to reduce pressure on your knees as you work)
- Laminate flooring. Check out our guide on How to Choose the Best Laminate Flooring for help choosing what’s right for your space.
- Duct tape (to mark floor panels for cutting)
- Spacers (to place between the first set of floor panels and the wall to leave room for natural expansion and contraction)
- Tapping block (to place against laminate flooring and protect it when using the rubber mallet)
- Rubber mallet (to tap against a tapping block that's aligned with laminate flooring to help close gaps between floor panels)
- Pull bar (to help tighten/minimize gaps between floor panels)
- Baseboards (or quarter rounds if you don't want to remove previous baseboards)
- Transition pieces (like overlap reducers or flush reducers to lay across doorways if the adjacent room rests at a different height or has another type of flooring)
- Nail gun (to attach baseboards or quarter rounds and transition pieces to walls and floors)
How to Install Laminate Flooring
With your supplies at-the-ready, let's dive into this beginner-friendly DIY project! Keep reading for step-by-step instructions or jump to a specific section.
1. Measure the Room's Square Footage
2. Prep the Subfloor
3. Choose & Install the Underlayment
4. Practice Laying Laminate Floors
5. Install Laminate Flooring
6. Cut Laminate Flooring to Size As You Go (If Needed)
7. Add Baseboards or Quarter Rounds & Transition Pieces
1. Measure the Room's Square Footage
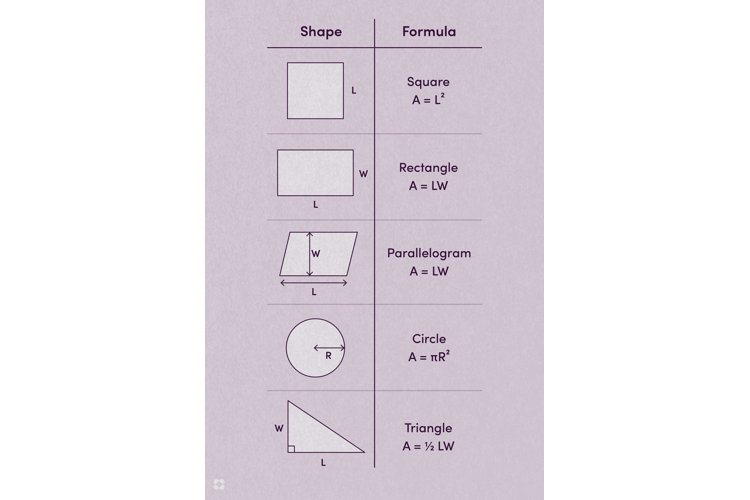
Before you learn how to install laminate flooring, you need to make sure you have the right amount! Knowing how to calculate the square footage of a room for flooring can save you time and money in the long run. To do so, measure the length and width of the room. Then, multiply (L x W) or reference the diagram above to calculate the square footage of a unique-shaped room. The resulting number is your square footage. Review How to Find the Square Footage of a Room: Flooring & Walls and How to Calculate Square Footage for Rooms for more tips.
Once you've determined the total square footage of the room where you plan to install laminate flooring, go to the laminate flooring section on Wayfair's website and click on the flooring product you want. On the product page, there should be a square footage calculator that allows you to enter your room's square footage and tells you how many boxes of flooring you need to purchase!
Tip!
Be sure to check out How to Choose the Best Laminate Flooring to learn more about the best types of laminate flooring for different rooms in your home.
2. Prep the Subfloor
Before adding laminate flooring, you first need to prep the subfloor. This includes leveling out the ground by removing or leveling floor nails and removing old flooring. This will ensure the best foundation for laminate floor boards. Here are the best practices for preparing your subfloor for laminate flooring:
- Use a floor scraper to help remove old flooring, bumps, or protrusions of concrete or other subfloor materials.
- Use the claw portion of a hammer to remove old nail heads protruding from the floor (if left behind from carpeted floors), or use the hammer portion to make them level with the floor (if the subfloor is made of a material like plywood or fiberboard).
- If the room has baseboards along the edges of the wall, you'll need to remove them using a pry bar. You can technically leave these on, but you'll need quarter rounds to help cover the spot where the edges of laminate floor boards come in contact with the baseboard – so we recommend removing the baseboard for a more put-together look. Review How to Remove a Baseboard in One Piece if you want to reuse your old baseboards.
- Installing laminate flooring around door jambs? You'll likely need to trim the bottom edges using an undercut door jamb saw. This allows you to slide the edges of laminate flooring under the door jamb for a seamless look.
The next step in how to install laminate wood flooring is to choose a suitable underlayment and install it on top of the subfloor. This is an extremely important step as the underlayment can reduce strain on your floors, add cushioning, reduce noise transfer, and prevent moisture damage to floorboards. Review our guide on What is Underlayment?: How This Extra Layer Of Material Protects Your Floors to learn more about its importance and your underlayment options.
Choosing a Laminate Flooring Underlayment
Select the underlayment option that matches your subfloor type for the best results.
For Plywood Subfloors:
For plywood, you can take your pick of underlayment options! Most underlayments for plywood subfloors are made of foam, cork, a plastic moisture barrier, or a combination of materials to add comfort and noise-dampening properties.
For Concrete Subfloors:
If installing laminate flooring on concrete or in a room that's moisture-prone like a bathroom or basement, you'll need a vapor/moisture barrier underlayment designed to protect laminate flooring from water and humidity. Underlayment for concrete floors also employs foam or cork materials to prevent floors from getting too cold while also adding cushioned comfort and noise-dampening properties.
For Heated Subfloors:
If you have floors with built-in heating components, opt for underlayment specifically designed to come in contact with heating components and to help transfer heat up through the floorboards. For the best results, we recommend pairing under floor heating–suitable underlayment with radiant heat–approved laminate flooring!
Installing Laminate Flooring Underlayment
Follow these steps to install the underlayment layer on top of the subfloor. You'll likely only need one layer of underlayment, but for moisture-prone spots, it can be beneficial to start with a vapor barrier layer (usually made of plastic) before adding a foam layer on top (for cushioning, thermal insulation, and noise reduction).
1. Purchase enough of an underlayment that's suitable for your floor type. Underlayment products come in rolls that are measured in square feet, so this is also where knowing the square-footage of your room will come in handy. For example, if your room is 250 sq. ft. and the underlayment you want comes in 100 sq. ft. rolls, you'll need to purchase three rolls and you'll just have extra left over.
2. Roll out the first portion of underlayment. Unroll the underlayment until it's touching both walls on opposite sides of the room. Use your utility knife to cut along the edge of the underlayment to detach it from the roll. Secure the edges of the underlayment that are next to the walls with underlayment tape or duct tape to ensure they don't move around during the installation process or after flooring has been installed. This way, you also don't have to worry about the underlayment moving/exposing a portion of the subfloor to potential moisture or debris that gets beneath the floor panels.
3. Roll out the next portion of underlayment to slightly overlap the first. Overlap the first row of underlayment with the second row by a few inches to prevent gaps in the underlayment layer. Use your utility knife to detach the underlayment from the roll.
4. Peel off the tape liner on the overlapping piece and press down. Peel off the tape liner on the overlapping piece of underlayment and use your hands to press down along the length of the overlapping piece to ensure both pieces of underlayment are taped together. If your underlayment doesn't come with pre-attached tape, just use underlayment-suitable tape to tape the overlapping layer to the first layer.
5. Repeat the process until the entire floor is covered. Repeat steps 2 and 3 until the entire floor is covered in one layer of underlayment.
6. Use a utility knife to remove excess underlayment. Take this time to cut any excess underlayment that you don't need.
Tip!
You can also streamline the process of installing underlayment by selecting laminate flooring that comes with it pre-attached to the bottom of the floor panels! Just check to make sure the attached underlayment is suitable for your subfloor type. For concrete floors or moisture-prone spots, it's best to combine laminate flooring that has a pre-attached underlayment with a vapor/moisture-barrier underlayment.
When it comes to laying laminate flooring, there are so many different designs you can try. A popular choice is to stagger laminate floor panels, as this creates an aesthetically-pleasing and organic display of faux wood grain patterns. Wondering how to stagger laminate flooring? There are a few different methods to try! It's all about staggering the placement of the side and end joints of each floor panel to create an effortless look. Start by laying down a full-length panel. The next panel that goes beside it should either be shorter or longer than the first panel – it's all up to preference. The next panel should be the opposite in size to the second panel, followed by another full-length panel.
Here are a couple examples of how to lay laminate floor panels horizontally:
Example 1: (Full length, followed by ⅓ length, followed by ⅔ length, followed by a combo of ⅓ length and ⅔ length, followed by full length)
Example 2: (⅓ length, followed by full length, followed by ⅔ length, followed by ½ length)
Similarly, you want each row of panels to have different lengths. Here are some examples of how to style single vertical rows of floor panels:
Example 1: (⅓ length, followed by full length, followed by ⅔ length, followed by ½ length)
Example 2: (Full length, followed by ⅔ length, followed by full length, followed by ⅓ length)
Feel free to play around with the layout and don't be afraid to cut laminate flooring to size! More on cutting laminate flooring in step six. After you’ve decided on how you’d like to lay out the flooring, take a picture of the proposed layout so you can easily recreate it when you're ready to install.
After installing the underlayment and deciding on the proper layout, you can get to installing! Follow these steps for success:
- First, position spacers along the bottom edges of the walls. These are designed to keep a ¼" gap between laminate flooring and the wall, which will prevent the floor panels from warping or breaking when exposed to natural temperature changes.
- Most spacers are designed to be freestanding or to clip onto the outer edge of the floor panels that rest beside the wall. However, you can ensure a snug fit and prevent spacers from falling/moving by pressing the floor panel against the wall and lightly tapping a spacer or a wooden shim into place with a mallet. You need to remove all spacers once the entire floor has been installed to allow the floor panels to breathe.
- Lay down the first laminate floor panel beside the spacers.
- Then, add the second panel by inserting the lengthwise edge of the second panel into the grooves of the first panel.
- Once you hear a click, press the new panel down onto the floor to help lock the panels together.
- Then, line your tapping block up with the outer lengthwise edge of the panel you just installed – making sure that the block fits into the panel's click-lock grooves.
- Use a rubber mallet to lightly tap on the side of the tapping block until the gap closes between the two floor panels.
- Repeat the process of laying down individual laminate panels until you cover the entire floor – making sure to insert the lengthwise edge of the new panel into the grooved edge of the previous panel. Depending on the amount of space left, you may need to cut the last row of panels to be narrower so they can fit snugly between the second-to-last row and the wall. Remember, you want ¼" of space between the floor panels and the wall to allow the panels to swell or contract without buckling.
- Laminate panels also have click-lock grooves on both ends of the panel to make it easy to add panels above or below to achieve the desired look.
- To ensure a snug fit, use the tapping block and rubber mallet for each piece of laminate flooring that you add.
Tip!
If using a combination of a tapping block and a rubber mallet can't close the gap between laminate flooring, you can always add a pull bar to the mix. This tool is designed to lock onto the edge/underside of a floor panel. Repeat the tapping process but this time use a second rubber mallet to tap the pull bar at the same time. This should help the floor panels fit tightly together.
6. Cut Laminate Flooring to Size As You Go (If Needed)
Once you've had a chance to practice the layout of your flooring and have begun installation, you may need to cut certain panels to adequately fit beneath/around door jambs or to accommodate unique angles.
- First, take your tape measure and determine the length of the spot where you need to fit a custom panel. Be sure to account for ¼" of space that needs to be left between the edge of the flooring and the wall (to allow for natural expansion and contraction of the floor panels).
- Use duct tape to transfer the measurement onto the floor panel you plan to cut. This will help ensure the accuracy of the cut and will be easier to see compared to a marker.
- There are a few different methods for how to cut laminate flooring. You can use a specialty wood floor cutter (pictured above), a table saw with a circular saw blade, or a handheld electric saw with a circular blade. For the most precision control, a floor cutter or table saw works best.
- When in doubt, always start by cutting off less than necessary. This way, you can always make adjustments without worrying about cutting off too much of the floor panel.
- Repeat the process for additional floor panels.
Once you've installed laminate flooring, you can add the finishing touches. You'll need a nail gun to secure baseboards, quarter rounds, and transition pieces (overlap reducers or flush reducers) along the bottom of the wall and in doorways.
- Install new baseboards or reinstall old baseboards (if undamaged) along the edges where the wall and floor meet to help hide the ¼" gap between the laminate flooring panels and the wall. Check out our guide on How to Install Baseboard in 10 Steps for installation help.
- If you already had baseboards and chose not to remove them prior to installing laminate floors, you'll need to install quarter rounds along the baseboards to cover the gaps between the baseboards and the edges of the laminate flooring panels.
- If you aren't continuing the laminate flooring into the adjacent room(s) you'll need to install an overlap reducer transition piece where the laminate flooring meets the flooring of the next room. You will need to measure the width of the doorway and the size of the gap to determine the best size for an overlap reducer.
- If adjacent rooms are slightly higher or lower than the room where you just installed laminate flooring, you'll need a flush reducer transition piece, instead. This will help level the gap between the rooms.
Tip!
Learn more about flooring types in our Flooring Options & Materials Guide and our guide on Hardwood vs. Laminate vs. Vinyl Flooring: How to Choose Flooring That Exceeds Your Expectations.
