How to Install Shutters
You can do it. Trust us.

Shutters are an easy and quick way to add architectural interest to your home. It's also an easy DIY project! Read our guide to learn how to install shutters.
Before You Begin
Choose the Right Shutters
There are many different styles and designs of shutters. Read our "Types of Exterior Shutters: How to Choose the Right Ones" guide to make the process easier. After you choose the right style, it is important to measure your windows and choose the right size. Read our "How to Measure for Shutters" guide.
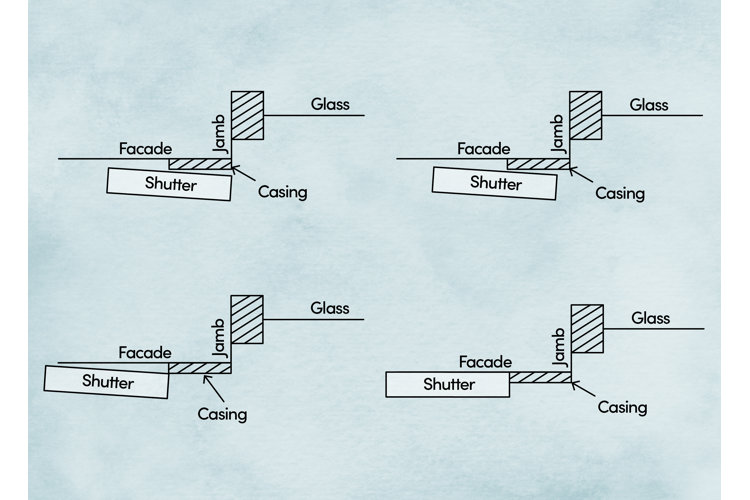
Understand Parts of a Window
Before installing your shutters, take a look at the illustration below to ensure you understand specific parts of a window that are involved in installing shutters.

Choose Your Mounting Aesthetic
For architectural interest, we recommend angling shutters instead of having them flat against the house. However, if you’re going for a modern look, placing them flat against the house is a popular way to install them.
How to Install Decorative Shutters
What You Will Need
Shears
Saw
Electric drill
Level
¼ inch drill bit
Shutter fasteners
Pencil
Ladder
Another person to help hold the shutter
Step 1: Remove Existing Shutters
Do not pry them or pull them off as it may damage the siding. Use shears or a saw to cut the fasteners behind the shutter itself.
Step 2: Mark Shutter Locations
Hold your shutters up against the siding where you would like them to be. You may need a friend to help hold it. We recommend lining up the top of your shutter with the top of your window trim. Use a level to ensure the shutter is straight up and down. Push a pencil through the premade holes in the shutter to mark the location for the screw holes. If your shutters do not come with premade holes, use a ¼" drill bit to make your own holes 5" from the top of the shutter and 5" from the bottom of the shutter.
When installing vinyl shutters on a window with a sill, leave a gap of ¼ inch to allow it to contract with the seasons.
Step 3: Drill Pilot Holes
At the pencil marks, use a ¼" drill bit to make pilot holes in the siding of your home.
Step 4: Align Shutters and Attach Them
Place your shutter against your house, making sure to align the holes in the shutter and the pilot holes, and screw the shutters into place. We recommend using shutter fasteners that are at least 2" – 3" long to ensure they get properly attached to your home.
How to Install Operable Shutters
What You Will Need
Shears
Shims
Electric drill
Level
¼ inch drill bit
Shutter fasteners
Pencil
Ladder
Another person to help hold the shutter
Step 1: Remove Existing Shutters
Do not pry them or pull them off as it may damage the siding. Use shears or a saw to cut the fasteners behind the shutter itself.
Step 2: Place Your New Shutters In Window

Place your shutters in your window. They should fit nicely into the casing. Place shims around all sides of the shutters so there is at least a ¼" gap on all sides. We recommend installing louvered shutters with the louvers angled toward the house. When you close the shutters, the louvers will push rain away from the house and block the sun's rays.
According to manufacturer instructions, assemble the pintles and hinges together. You will likely need four hinges and four pintles – one for the top and bottom of each shutter panel.
Step 4: Mark Pintle and Hinge Locations
Center the strap hinge on the top and bottom of the shutter's rail. Place the pintles on the window casing and use a level to ensure that the top and bottom pintles are plumb. You will need a friend to hold the pintles in place while you mark the location of the pintles' screw holes on the casing and the strap hinge's screw holes on the shutter.
Step 5: Mount Shutters
Remove the pintle, hinge, and shutter, then drill pilot holes into the window casing. Place your shutter on a level surface, and using a drill, screw the strap hinges into place. Put the shutter back into the window, line up the pintle's screw holes with the pilot holes and screw the pintle into place.
Step 6: Place Shutter Tie-Backs
Consider installing a shutter tie-back to ensure it doesn't swing shut. These are usually easy to install and only require aligning the tie-backs to where you want them and drilling them into place.
