How to Replace a Tub Drain: Your Step-by-Step Guide
Learn how to replace and install each type of tub drain.
The best bathtub drains provide a watertight seal and limit the need to refill the tub as you relax – also helping to conserve water. In this guide, we go over how to replace and install bathtub drains so you can reap the benefits for years to come. Without further ado, here's how to replace a tub drain, step-by-step.
Before You Begin
Here's everything you need to know about bathtub drain replacement, including time requirements, skill level, number of people needed for the project, and recommended supplies for completion.
Time: 1–2 Hours
Skill Level: Beginner
Number of People Recommended: 1
What You'll Need:
(Shop this image: silver drain stoppers and baskets, rubber gaskets, drain thread adapters, and chrome overflow faceplates.)
- Locking pliers, a wrench, or a specialty drain removal tool (to remove the drain basket)
- Cleaning rag, sponge, and bathroom cleaning solution
- Drain stopper of your choice (options discussed in step one)
- Drain basket/flange (that the stopper fits into)
- Compatible rubber gasket (to help seal the drain basket)
- Drain thread adapter (this is an optional attachment for the end of a drain basket if the diameter is too small for the drain hole)
- Screwdriver (to remove the old overflow faceplate and install the new one)
- Overflow faceplate (a round cover that goes over the overflow drain hole on the wall of a bathtub. It's only necessary if your new drain stopper doesn't have the same finish as the current faceplate)
- Faceplate screws and mounting components (typically come with an overflow faceplate)
- Tape measure (to measure the drain hole or old drain stopper for a new drain stopper)
- Pencil (to record measurements)
- Plumber's putty (to help install the new drain)
- Putty knife (optional for removing extra putty)
- Painter's tape (to monitor/test the tub's water level)
(Shop this image: gold lift-and-turn drain stoppers, silver push-pull drain stoppers, gold pop-up drain stoppers, and gold toe-touch drain stoppers.)
Before you learn how to replace a tub drain, it's important to figure out which type of drain stopper you currently have – this will impact how to properly remove the drain and can help you find a similar drain stopper replacement.
Lift-and-Turn: Lift-and-turn drain stoppers consist of a knob that you lift and turn in one direction until it locks in place (opening the drain). To close the drain, simply turn the knob in the opposite direction until you feel it unlock and lower over the drain hole.
Push-Pull: Push-pull drain stoppers look very similar to lift-and-turn models. The key difference is that instead of lifting and turning the knob at the top, you simply push down on the knob to close the drain and pull upwards when you want to open the drain.
Pop-Up: Pop-up bathtub drain stoppers "pop" up or down via a lever located on the overflow faceplate. The overflow drain and the drain stopper are connected by a rod through the tub's pipework. More on how to properly remove and replace a pop-up drain stopper and faceplate in step two.
Toe-Touch: Toe-touch drain stoppers, sometimes called "tip-toe stoppers" are convenient and easy to use. All you have to do is press down on the top of the stopper to close or open the drain. This process is possible because it has an interior spring mechanism.
(Shop this image: silver trip-lever drain stoppers, silver drain stoppers, and chain-and-plug drain stoppers.)
Trip-Lever: Like pop-up drain stoppers, trip-lever stoppers are opened or closed via a lever located on the overflow faceplate. The lever on the faceplate is connected to a rod with a plunger at the bottom. This portion rests inside the tub's pipework. When the lever is flipped up, the plunger lifts up, allowing water from the tub drain to flow through. When flipped down, the plunger blocks the pipework leading to the tub drain, allowing the tub to fill and stay full of water, despite the trip-lever drain's exposed grate holes. This design also rests level with the tub floor, so you don't have to worry about hitting it with your feet.
Flip-It: Flip-it drain stoppers come in two different configurations. They either come with a small flip lever located on the top of the drain stopper that you flip to one side to open the drain and to the other side to close the drain (the traditional flip-it method), or they have a flat cap that flips up or down to open/close the drain (the press-flo method as pictured above).
Chain-and-Plug: The classic chain-and-plug drain stopper is usually paired with traditional clawfoot bathtubs. This tub drain stopper consists of a chain, usually attachable or pre-attached to the overflow plate, and a plug that fits inside the drain hole of the tub. You simply plug or unplug the stopper to fill or drain the bath water.
Tip!
Check out How to Choose the Correct Type of Drain for tips on selecting a replacement drain stopper.
2. Then, Remove the Drain Stopper
Now that you've identified the type of drain stopper your bathtub currently has, follow the recommended instructions for how to remove a tub drain stopper:
For Lift-and-Turn, Push-Pull, or Toe-Touch
- Start by putting the drain stopper in its opening position.
- (Skip this step and the next step for how to remove a push-pull drain stopper) Then, unscrew the knob (for lift-and-turn) or the cap (for toe-touch).
- If there's a screw inside (if not skip to the next step), take your screwdriver or a pair of pliers and remove the interior screw that connects the stopper to the rest of the drain components.
- Turn the stopper (usually counterclockwise) until it comes loose from the drain.
- Lift the remaining portion of the stopper out of the drain and set it aside.
For Flip-It
- To remove traditional flip-it drain stoppers, start by opening the drain using the flip lever.
- Then, use the flip lever as a guide to help turn the drain stopper counterclockwise until it comes free from the drain.
- For press-flo models, you may need to use a suction cup to help remove the flat drain stopper from the drain. However, you can also place the drain in its open position (so that it's vertical with open space on both sides) and use a pair of pliers to help twist/remove the stopper.
For Trip-Lever
- Use a screwdriver to loosen and remove the mounting screw from the trip-lever stopper – This is usually a single screw located in the center of the grid drain.
- Once removed, you should be able to lift and turn the grid drain until it comes out of the drain. However, you may need pliers to ensure speedy removal.
- Then turn your attention to the overflow faceplate on the wall of the tub (only if you plan to replace it to match the new drain stopper).
- Unscrew the overflow faceplate and any mounting hardware that's attached to the frame of the overflow drain hole.
- You should see that the inside of the overflow faceplate is attached to a rod that runs through the hole.
- Gently pull on the rod until everything comes out including the plunger (a cylinder-shaped) piece of hardware.
For Pop-Up
- Put the pop-up drain stopper in its opening position.
- These types of drain stoppers can usually be pulled out, but you may need to twist or turn it to remove it completely from the drain.
- As you remove the stopper, you'll notice that it's attached to a long piece of metal (usually called a rocker arm).
- Gently pull upwards until the entire rocker arm is out of the drain.
- Then turn your attention to the overflow faceplate.
- Unscrew the faceplate to reveal the open drain hole.
- The inside of the faceplate is attached to a metal rod that goes into the drain hole.
- Like with trip-lever drain stoppers, you'll want to gently pull on the rod until the entire rod is out – the end of the rod should have a coiled spring.
For Chain-and-Plug
- Remove the stopper plug from the drain with a simple pulling motion.
- Then, unscrew and remove the overflow faceplate (to detach the chain).
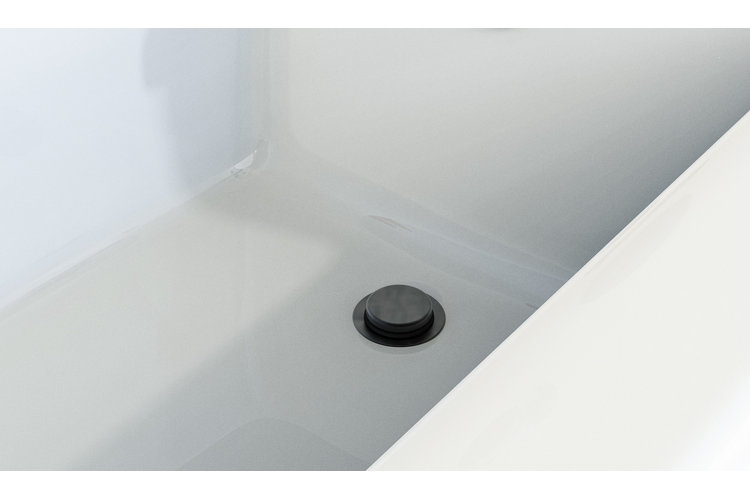
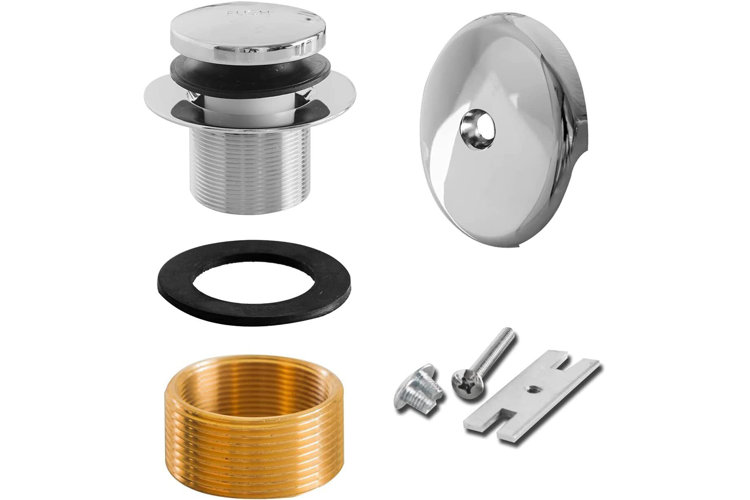
3. Take Out the Drain Basket (Also Called the Flange)
(Shop this image: silver pop-up drain stoppers and baskets)
The next step for how to replace a tub drain is to remove the stopper's drain basket. This image shows the difference between a drain stopper (pictured left) and a drain basket/flange (pictured right), and how the drain basket should look once you've removed the stopper completely. The top ring should be what's visible and the coiled base is what sits inside the drain hole itself.
To remove the drain basket, you'll either need a pair of pliers or a specialty tub drain removal tool. You can use pliers to slowly lift and turn/loosen the drain basket until it comes loose from the drain hole. Tub drain removal tools are simply designed to speed up the removal process and limit damage to the drain basket (which is helpful if you're just removing the drain basket to clean the space or to make an adjustment).
4. Do a Quick Clean of the Drain Opening
Once you've removed the drain basket, it's a good idea to clean the area around the tub drain. This ensures that the new drain achieves a proper seal when installed and prevents future corrosion.
- If the rubber gasket didn't come loose with the drain basket, it's likely still fitted around the drain hole.
- Remove the old rubber gasket and clean around the edges and the inside portion of the drain with a sponge and a bathroom-suitable cleaning solution.
- Dry the area with a rag so it's prepped and ready for the new drain.
5. Measure for the New Tub Drain
The diameter of standard bathtub drains is 1.5" – 2", and most drain baskets are designed to fit inside. However, measuring the diameter of your bathtub drain hole can ensure you choose the right drain basket size. Some drain holes can accommodate basket sizes of 3" or more. When in doubt, measure the diameter of your old drain basket for a perfect fit. If the new drain basket/stopper you choose is too small for the drain hole, that's when you can use a thread adapter! (More on this in the next step.)
(Shop this image: silver lift-and-turn drains and drain stoppers)
Once you know how to remove a bathtub drain, installing a new drain is a breeze! Follow these steps for success.
- (Skip this step for trip-lever stoppers) First, remove the drain stopper portion from the drain basket so you can see inside the drain basket. This is important because you'll need to put pliers or a drain removal tool inside the drain basket to help as you turn/seal it in place.
- Test how the drain basket fits into the drain hole. If it fits snugly in the hole, you don't need a drain thread adapter. If it's loose and doesn't tighten when twisted, then you'll need to attach a drain thread adapter to the end of the drain basket. This will ultimately ensure that your drain is watertight.
- Place a rubber gasket on the inside of the drain hole opening. Make sure that it fits snugly and covers all the edges around the drain hole opening. This will help prevent leakage from the tub.
- (For pop-up drain stoppers only) Screw the rocker arm into the bottom of the drain basket.
- For other drain stoppers, make sure that the drain thread adapter is screwed onto the drain basket (if needed).
- Take out the plumber's putty and roll it in your hands until it gets long enough to wrap around the drain basket.
- Wrap it around the drain basket just below the upper edge (before the coils start).
- (For pop-up drain stoppers only) Carefully feed the rocker arm (attached to the drain basket) into the drain hole.
- For all other types, simply place the drain basket into the drain hole and twist/press down until it's flush with the bathtub – don't worry if the plumber's putty starts to squeeze out from under the lip of the drain basket.
- Place a drain removal tool into the drain basket, so that the grooves match up with the holes at the bottom of the basket. Use a wrench to help twist the tool inside the drain basket until you feel it completely tighten.
- Remove the tool and use your hands or a putty knife to remove any excess putty from around the edges of the drain basket.
- Reattach the drain stopper to the top of the drain basket.
(Shop this image: black overflow faceplates and black wall-mounted tub faucets.)
After replacing a tub drain, it's time to focus on the overflow faceplate. This is a round cover located on the wall of the bathtub, and it's designed to keep the tub from overfilling with water. Depending on the new drain you installed, you may or may not need to replace the overflow faceplate. Trip-lever and pop-up drain stoppers require a new overflow plate with a lever because of their stopper mechanisms. For other types of drain stoppers, a new overflow faceplate may only be needed to match the finish of the new stopper.
Unscrew the Old Overflow Faceplate: Using a screwdriver, remove the screw(s) on the exterior of the tub's overflow faceplate. For pop-up or trip-lever drains, there should also be a rod attached to the faceplate that also needs to be removed.
Assess the Overflow Drain Hole Opening: For most overflow drain holes, the inside of the drain hole behind the faceplate has two locations to install screws. If your faceplate has a single central screw, you'll find an interior bracket mounted across the hole with one screw attached to either side of the frame, and a central screwhole to secure the faceplate in place.
Remove Old Mounting Hardware: Use your screwdriver to remove each screw on either side of the mounting bracket and remove the bracket and screws from the opening of the overflow drain hole. Clean it and keep it nearby in case your new faceplate doesn't come with a mounting bracket.
Clean the Opening: Take this opportunity to clean around the edges of the overflow drain hole before you refit it with a new faceplate. This will help prevent instances of rust or corrosion over time.
Measure: Just like tub drains, most overflow plates are designed to fit over the overflow drain opening on most bathtubs. However, it's always important to measure just to be sure. Measure and record the diameter of the overflow drain opening to ensure any overflow faceplate you choose can fully cover the hole. You can also use the dimensions of your old overflow faceplate as a guide.
Attach the Mounting Bracket to the Hole: (This step isn't necessary if the faceplate you chose already has two screws). Use a screwdriver to secure the mounting bracket to the pre-drilled holes on the outer frame of the drain hole with mounting screws.
Fit the New Faceplate to the Overflow Drain: For pop-up and trip-lever drains, you first need to attach the rod to the inside of the faceplate (unless pre-attached) and carefully feed it down the drain hole. Make sure that the open lip of the overflow faceplate points downwards (towards the tub drain) to catch and drain water if it reaches a certain level. Then, hold the faceplate in place and attach it to the drain hole with the included mounting screws.
(Shop this image: freestanding bathtubs, chrome floor-mounted bathtub faucets, and marble bathroom floor tiles.)
Close the drain with the new drain stopper and fill the tub with water (no need to fill it all the way up, just a quarter of the way). Then, place painter's tape on the tub wall along the water line. Check back in one hour to determine if the drain leaked water. You'll be able to tell if the water level has lowered beneath the line of the painter's tape. You may need to reseal the drain or check the drain stopper portion to make sure it's watertight.
Tip!
With a better understanding of how to replace a tub drain, check out these guides for shower-specific drain types and replacement options:
Types of Shower Drains & How They Work
How to Fix a Shower Drain
