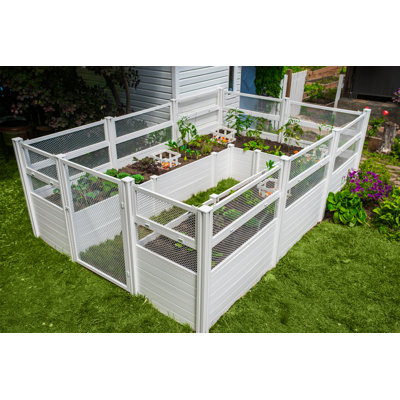
Inspired by the African keyhole gardening technique, the Classic 6x6 Keyhole Composting Garden lets you compost household waste and grow vegetables in the same garden. A central compost basket is used in the Keyhole Garden to conveniently place your daily kitchen scraps. This household waste is then organically transformed into nutrient-rich soil that nourishes your vegetables. Compost-fed soil better holds moisture and nutrients, while using up to 70% less water.
Crafted from a durable food grade BPA/phthalate-free vinyl that ensures healthy, safe food production and a long product lifespan. Boards slide into posts easily and conveniently, with no need for tools or screws. Our innovative posts make for perfectly modular garden beds, allowing you to design and configure your own unique layout and size.
It’s smart, sustainable, and beautifully designed.
Tools required: Power drill or screwdriver (Philip's #2), level
This product has no bottom floor
Inspired to Give Back
We stumbled upon the Keyhole Garden concept while researching organic gardening methods. This inspired us to create our own series of garden beds using this African gardening technique. This idea was gifted to us by the African people and so we felt compelled to give back.
Thrive is a charity determined to end malnutrition in our lifetime. They empower communities with the training and simple tools needed to sustainably grow an abundance of healthy, organic, disease-fighting foods for life. Vita partners with Thrive by financially supporting programs in Africa and around the world.
Learn more about how Vita gives back: www.wearevita.com/pages/giving-back
Learn more about Thrive: www.thriveforgood.org
Just what I wanted! The hardest part was clearing and leveling the ground; after that, it was smooth sailing. The only issue we encountered was not paying close enough attention to step 2A. It is extremely important to follow the magnified boxed image that shows the correct direction of the tongue and groove on the very first fence post, as this sets up the entire garden perimeter. We only realized we had installed it incorrectly after completing the perimeter and attempting to install the gate. Unfortunately, we hadn’t started with the correct direction of the tongue and groove, which meant the gate couldn't attach properly, and we had to disassemble everything and start over. Thankfully, disassembly and reassembly are easy, and no tools are required! Also, this thing takes a LOT of soil to fill, even when filling the bottom with biodegradable materials!. Anonymous. Mon May 26 2025