How to Create Your Own DIY Faux Fireplace
Elevate your living room with this easy DIY.
Whether you're looking for a rental-friendly DIY or simply want to create a stylish focal point, a DIY faux fireplace is sure to add plenty of inviting appeal. Making your own faux fireplace can be surprisingly simple too. We've put together a guide outlining the steps for building a faux fireplace to inspire your next home project.
Before You Begin
How to Create Your Own DIY Faux Fireplace
Before You Begin
There are a few things to consider before building your own DIY faux fireplace.
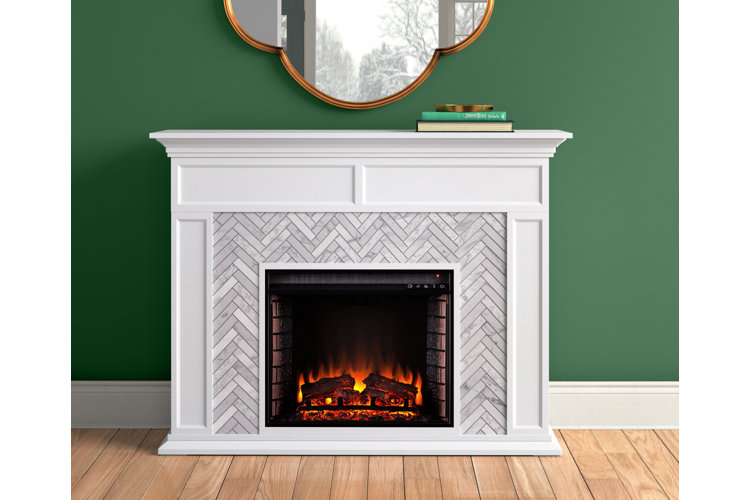
Get to Know the Parts of a Fireplace

Most fireplaces have a few key components. Knowing the parts of the fireplace can help you visualize this DIY project.
Mantel: The mantel is the shelf-like piece atop a fireplace that is used for decorative purposes. These can come with a fireplace surround or be purchased individually to switch up the style of your fireplace.
Surround: The fireplace surround is the exterior structure of the fireplace, including the mantel, two side supports, and sometimes a base that connects the two supports at the bottom. Surrounds are often made from wood or stone and come in a wide range of styles to suit your home.
Firebox: The firebox is the box-shaped spot where the fire is contained. Many fireboxes feature protective metal screens or glass doors for added safety.
Hearth: The hearth is a fireproof piece of material (like brick or stone) that is installed below the base of the fireplace and extends a foot or so past the firebox. A fireplace hearth is traditionally used to protect the floor from the high heat and stray embers of a wood-burning fireplace.
Think About the Location
Though this project is easy to put together, a faux fireplace can be a heavy piece of furniture. You'll want to anchor the fireplace into the wall to avoid any tipping, so it's important that you scope out a spot that's near a wall stud. You can use a stud finder tool to quickly identify wall studs, or you can usually find a stud 16" away from a nearby outlet or light switch, since studs are most often placed 16" apart as per building codes.
Gather the Materials You'll Need
Before you start building a faux fireplace, you'll need to gather all of the materials. We've outlined the materials required for this project.
Fireplace Surround: Using a fireplace surround is an easy way to create your own faux fireplace. As mentioned above, the fireplace surround is made up of two vertical posts that support the mantel and surround the firebox (the rectangular space that holds the fire). These fireplace surrounds can come as freestanding structures that you can use to update an existing fireplace, but for this project, they're an easy way to construct a faux fireplace.
Plywood: Unless you plan on placing an electric fireplace insert into your faux fireplace, you'll need a sheet of wood to act as the faux firebox. This sheet of wood will be placed behind the fireplace surround to cover up the wall behind the fireplace surround and provide a tiled backdrop for your faux logs. We recommend using an inexpensive piece like plywood or MDF since you'll be painting it or covering it with peel-and-stick tile to mimic a firebox.
Circular Saw: You'll need this for cutting the sheet of wood to the correct size. Other types of saws, such as table saws or hand saws, can also work for this project since there aren't any complicated cuts.
Sawhorse: Proper support is essential for cutting any piece of wood. A sawhorse supports both sides of the wood so that you can cut evenly and safely.
Peel-and-Stick Tile: Peel-and-stick tile isn't just for backsplashes, it's also an easy way to elevate your DIY faux fireplace. These thin sheets of "tile" are made from vinyl or PVC and have a strong sticker-like adhesive on the back side that make them easy to install. Simply cut the sheets to fit the size of your fireplace surround to add detailed tilework to your fireplace without the hassle of grout.
Scissors: Depending on the design you choose for the peel-and-stick tile, you might need a pair of scissors to snip excess tiles.
Large Format Tile: Create a faux fireplace hearth with large format tile. Though your faux fireplace may not need a hearth for safety, it can add style and dimension to your DIY. Large format tiles placed below your fireplace can give the faux design a more realistic feel (especially if the fireplace surround you've chosen doesn't have a base).
Anti-Tip Anchoring Kit: Because the faux fireplace can be heavy, it's important to use an anchoring kit to anchor it to the wall to avoid any tipping.
Electric Drill: You'll also need an electric drill to install the anti-tip anchoring hardware.
Faux Logs: To finish your faux fireplace, you'll need a stack of faux logs. Often made of ceramic or real wood, these decorative logs will give your DIY a realistic touch.
How to Create Your Own DIY Faux Fireplace
A faux fireplace is a cozy addition to any room – from your living room to your bedroom. Follow our step-by-step instructions to make your own DIY faux fireplace.
Step 1: Assemble the Fireplace Surround
Most fireplace surrounds arrive unassembled, so the first step is to assemble the surround according to the manufacturer's instructions.
Step 2: Measure the Surround
Once you've assembled the fireplace surround, place it where you plan on installing the faux fireplace. This spot should be in front of a wall stud since you'll be anchoring the surround to the wall to prevent it from tipping.
Measure the interior space below the surround (where the firebox would be) to figure out the dimensions you'll need to cut the wood. The piece of wood will sit between the back of the surround and the wall, so you'll want to add two or three inches to the measurement so that there is a bit of overlap.
Then, measure the width and depth of the surround so you can determine how much tile you'll need for the hearth. Add an inch or two to the surround’s width and a foot to its depth to create a realistic hearth.
Step 3: Cut the Wood to Size
Prop your piece of plywood or MDF on a sawhorse and use a pencil to draw a line where you plan to cut. Using the measurements from the surround, use a circular saw to cut the piece of wood to size. The finished piece should have a rectangular shape that is slightly larger than the interior of the surround so that it can act as a faux firebox.
Step 4: Apply Peel-and-Stick Tile
Gather the sheets of peel-and-stick tile and arrange them on top of the piece of wood without removing the protective layer from the adhesive backing. This allows you to configure the tile how you want before you start applying them to the wood. After you've decided on the right design, apply the sheets by working your way from one side to the other so that you can take your time lining up the edges of one sheet with another.
Step 5: Place the Faux Hearth
Use the width of the surround to determine what size tile you'll need. A single large format tile (or a few) will give the appearance of a hearth below the fireplace surround. Place the tile or tiles on the floor where you plan on installing the faux fireplace.
Step 6: Add the Fireplace Surround
Move the fireplace surround so that it sits atop the makeshift hearth. Slide the tiled piece of wood behind the fireplace surround so that it looks like there is a firebox. The faux firebox will fit securely behind the fireplace surround and stand on top of the faux hearth. You won't need to attach the piece of wood because it will be sandwiched between the surround and the wall after you've anchored the surround in the next step.
Step 7: Secure the Fireplace Surround
Because the fireplace surround is likely to be heavy, it's important that you anchor it to the wall for safety purposes. Some fireplace surrounds may include a mounting system, while others require you to purchase your own anti-tip anchoring kit, so make sure you check the details of your fireplace surround to see what you may need.
Since you've already identified where the wall studs are in Step 1, drill pilot holes for the screws. Then use screws to secure the furniture brackets over the holes.
Line the fireplace surround up with the brackets and determine the best place to drill pilot holes in the surround. Attach the other set of brackets to the new pilot holes with screws.
Attach the wall brackets to the fireplace surround brackets using the straps or cables included in the kit. Tighten the straps or cables to hold the two together and prevent tipping.
Step 8: Add Faux Logs
Tuck a stack of faux logs into the firebox of your faux fireplace. You can even place them on top of a fireplace grate for added realism.
Step 9: Style the Mantel
As your final step, it's time to decorate the mantel. The fireplace mantel provides a great opportunity to display your favorite pieces of decor and show off your personal style. From oversized wall mirrors to sculptural candlesticks to vases full of fresh florals, there are endless ways to decorate your mantel. Check out our guide 19 Fireplace Mantel Ideas to Inspire Your Decor for more ideas.
