11 Steps for Replacing a Vanity Top
DIY with ease.

Is your bathroom in need of a makeover? Replacing a vanity top is one of the many ways you can give this space a stylish upgrade. We’ll teach you how to replace a vanity top step by step along with all the tools you'll need to complete this project with ease.
Tip!
Find envious looks in your bathroom with your new vanity with ideas from our guide: Bathroom Vanity Ideas Sure to Make a Statement
Tools You Will Need
Here are all of the tools you will need for replacing a vanity top.
- Tape measure
- Vanity top
- Bathroom sink (if your new vanity top does not come with one)
- Bathroom faucet
- Razor knife
- Caulk & caulking gun
- Screwdriver
- Bucket
- Towel
1. Measure Your Current Vanity Top
Before you begin removing your vanity top, it’s important to gather your measurements. Measuring the size of the current bathroom vanity top will help you determine how big the new one needs to be and the precise dimensions to look for.
Use your tape measure to calculate the length and width of your vanity top as well as the sink. Write down the dimensions you’ve recorded to refer back to when you begin shopping.
Tip!
Don’t forget to measure your area for the perfect vanity with help from our guide: Vanity Dimensions: How to Find the Right Size For You
2. Select Your New Vanity Top
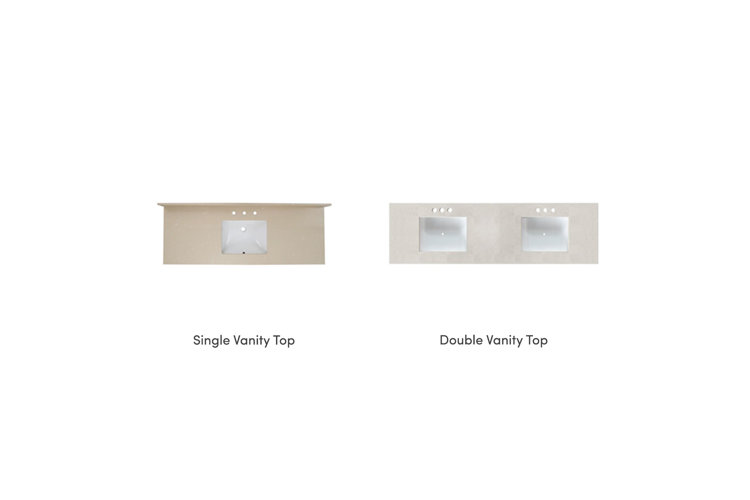
After you’ve gathered your measurements, the hunt for your new bathroom vanity top begins. There are two main types of vanity tops that refer to the number of sinks they include: single and double. Knowing which style you prefer (and need) will help you garner vanity ideas you would like to implement in your bathroom remodel.
- Single: As the name suggests, these vanity tops only include one sink. They are perfect for individual use or those who want to have extra counter space.
- Double: These vanity tops feature two sinks. These tops are great for two people that want to have their own sink, especially if the bathroom is being shared.
Don’t forget – while shopping for your new bathroom vanity top, be sure to follow your recorded dimensions so the overall length and width is precise to what your space allows. For small bathrooms, 30 and 36 inches are the standard dimensions since they are smaller and fit in compact spaces. Medium bathrooms typically use 42 and 48 inch vanity tops, while larger bathrooms can typically accommodate 60 and 72 inches.
While you’re updating your bathroom vanity top, this is a great opportunity to upgrade your sink as well! Some vanity tops will include their own sink, but some are customizable and able to accommodate one of the three sink types.
- Undermount: The undermount style has a sink that is placed underneath the vanity top. Since this sink is installed underneath the countertop, it creates an elegant aesthetic that is not interrupted by your sink extending over the edge. If your vanity already includes a sink, it’s likely the undermount design as these are the default options for vanity and sink combinations.
- Drop-In: Drop-in sinks have a rim, or edge, that sits on top of your vanity. This style does not have the seamless flow that an undermount sink does.
- Vessel: A vessel sink is similar to a drop in, but instead of the edge sitting on top of the counter, the whole sink sits on top. These sinks come in the shape of an oval, bowl, or square.
Tip!
Don’t forget to pair your new vanity top and sink with a stunning new faucet!
4. Disconnect Your Water & Plumbing
Now it’s time to start removing the old bathroom vanity top. Begin by disconnecting your water and plumbing. Use your screwdriver to disconnect the water supply shutoff valves that are underneath the sink. Once this is done, open the faucet to relieve any leftover pressure.
Next you should note the P-trap, which is the curved drainpipe that’s oftentimes plastic. Take your bucket and place it directly underneath the P-trap to collect any water that may come out once you start to unscrew and remove the trap.
5. Cut the Wall Caulk
Using your knife, run the blade along the seam of the caulk that connects the wall and the edge of your current vanity top (but carefully to ensure you do not further damage your drywall). This will help loosen the vanity top from the wall.
6. Lift Up Existing Countertop
After you’ve cut through your caulking, the current top should be able to lift off easily. Remove your existing vanity top and set it to the side. Check the wall for any repairs that need to be made. If there’s any damage, you may need to use a putty knife and putty to patch up the wall.
7. Lay Down New Countertop
It's time for the most exciting part in replacing a vanity top! Lay down your new countertop (not including your sink), so you can line it up to the wall. Your new vanity top should fit perfectly where your existing top once sat unless you are replacing it with a larger or smaller bathroom vanity.
8. Caulk the Edges
After you’ve laid the new vanity top in place, caulk the edge to seal it to the wall. Go slow with caulking so you can get straight lines. A pro tip for caulking your new vanity top is to put painter’s tape on the wall right above the area you need to caulk to achieve straight lines. Keep in mind that caulk takes about 30 to 60 minutes to dry, so you should wait at least an hour before completing the next step, or once your caulk is dry to the touch.
9. Install the New Sink
If your vanity top includes a sink, then go ahead and skip to the next step. If your new bathroom vanity does not include a sink and you’re installing a new one, follow this step.
Once your new vanity top is sealed and the caulk is dry, it’s time to install the sink.
Drop In Sink Installation
1. Lower In Your Sink
Since your vanity will already have a cutout, take your new sink and lower it into the spot. The bowl of the sink should drop entirely through the cutout until the rim is sitting on top of the counter.
2. Remove the Sink for Caulking
Remove your sink from the cutout and flip it over gently to run a seam of caulk around the bottom of the rim. Then, place your sink back in the cutout, and gently and firmly press down until the rim meets the countertop to seal the caulk. Following the instructions of your chosen sink, use the clips your sink should come with to continue sealing it in place. Wait 30 to 60 minutes for the caulk to dry before moving forward to step 10.
Vessel Sink Installation
1. Position Your Sink
Since vessel sinks sit on top of the counter, you will be aligning the sink over the drain opening that is cut out on your vanity top. To know exactly where your sink will need to sit, line up the line over the drain opening cutout.
2. Caulk the Underneath
After lining up your vessel sink, flip it over to expose the underside. Line the edge of the bottom of the sink with caulk. Then, flip it back over and line it back up before pressing down on the counter to seal and dry.
10. Install the New Faucet
After adding the new sink, it’s time to pair it with your new faucet.
1. Assemble Your Faucet
Every faucet is different, so be sure to follow your chosen faucet’s instructions to assemble before installing. Once you’ve put together your new faucet, line it over the holes of your sink before removing and caulking.
2. Caulk Your Faucet
Using your caulking gun, draw a line of caulk over the edge of your facet or the faucet holes. Then, place the faucet over the holes and press down to seal it to the counter.
3. Install the Basin Nuts
With your faucet in the sink, place one of the basin nuts in your faucet’s kit through tailpieces and secure them in place. Securing the basin nuts may require a screwdriver if you cannot tighten them by hand.
11. Reconnect Water & Plumbing
Each sink type connects the same way to your water source. This is the final step where you will reconnect your water valves and P-trap. Using your screwdriver, reconnect the valves and then the P-trap. You will also need to reconnect your water lines to your faucet. After you've done this, turn on the faucet and check for any leaks.
Your brand new bathroom vanity top is good to go!
Tip!
To complete your bathroom renovations, check out this guide: How to Install a Bathroom Vanity
