How to Hang Pegboard: Your Step-By-Step Guide
How to install a pegboard with ease.

Whether you use one in your garage, kitchen, or craft room, a pegboard can help you utilize vertical space to organize your tools and utensils and can help bring order to chaos. Here's how to hang a pegboard so you can keep your supplies within easy reach.
How to Hang Pegboard
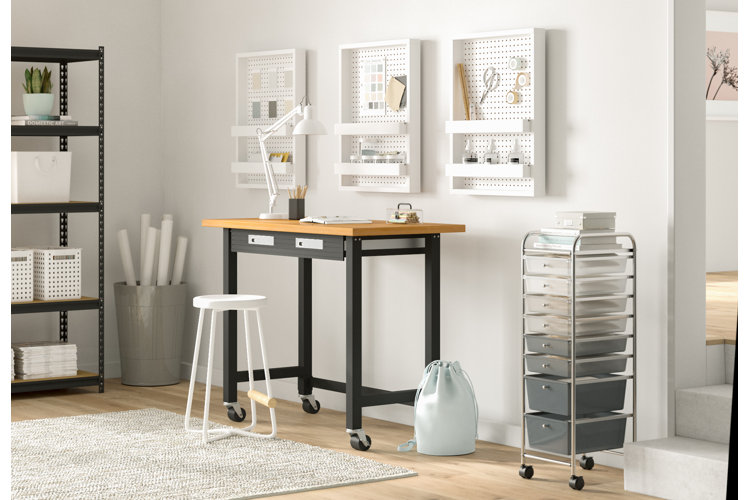
(Shop this image: storage drawers, craft/sewing tables with casters, backless bar and counter stools, white desk lamps, and storage racks and shelving units)
Pegboards are fun and creative options that turn unused wall space into storage. These large sheets are typically made from wood fibers or compressed paper, but they can also be made from metal or plastic. Their most identifiable feature is the grid pattern of pre-drilled holes that are evenly spaced over the pegboard surface. This design can easily accommodate hooks and baskets, which is why many people use pegboards for tools, utensils, and other supplies. If you are interested in DIY installation, mounting a pegboard is a fairly straightforward task that you can accomplish in a few hours.
Tools
- Tape measure
- Pegboard
- Jigsaw or circular saw
- Stud finder
- Pencil
- Marker (if needed)
- Level
- Picture frame molding or 1" x 2" board for framing (if needed)
- Stain or paint (if needed)
- Varnish or polyurethane (if needed)
- Furring strips (1" x 2" wood pieces) or spacers
- Drill or screwdriver
- Wood screws (3/4") or drywall screws (2 1/2")
- 2" washer screws
- Drywall anchors (if needed)
- Pegboard hanging accessories
Step 1: Measure Your Space
Use a tape measure to get the horizontal and vertical measurements of the wall space where you plan to hang your pegboard. Most people choose to place their pegboard over a workbench or a craft table where it will be easily accessible. The amount of space you have available will determine the pegboard size you should buy.
Step 2: Select Your Pegboard
Pegboards can be 2' x 2', 2' x 4', 4' x 8', or larger – so it's up to you to pick the best one for your space. You can also select from different materials including wood (which is easiest to cut), plastic (which is the lightest option), or metal (which is more heavy duty).
If you can't find a wooden pegboard to match your exact measurements, you can always cut a larger one down to size using a jigsaw or a circular saw. Alternatively, you can mount two pegboards side by side for a better fit. Choose a pegboard with a minimum thickness of 1/4" for the best durability.
Step 3: Mark the Wall
Once you have chosen a pegboard that will fit, make note of its dimensions. Use a stud finder to locate and mark the wall studs. Then use the pegboard's dimensions to draw an outline on the wall, making sure the lines run through the wall stud marks.
Use a level to ensure that all lines are straight. It's best to install your pegboard over drywall, and it is even easier to do over exposed or unfinished studs in a location such as a garage because you can attach the pegboard directly to them.
Step 4: Size Your Pegboard
If you need to cut your wooden pegboard to size, make sure to do so with the face down to keep the edges looking clean. And if there are any light switches or outlets that will fall beneath your pegboard, this is the time to mark the obstructions on the pegboard and cut holes to accommodate them.
Step 5: Finish Your Pegboard
If you want to frame your pegboard, you can use picture frame molding or 1" x 2" boards to do so. Cut them to the width and height of the pegboard and attach them using screws. Most standard wooden pegboards are unfinished, so you can paint, stain, or decorate yours the way you prefer.
If you choose not to paint a wood pegboard, it is still a good idea to at least seal the edges and the insides of the holes with a varnish or polyurethane. This is because the wood tends to swell and fall apart when it gets wet or absorbs moisture.
Step 6: Create a Gap Behind the Pegboard
If you are hanging your pegboard onto drywall, you will need to create at least a 1/2" gap between the wall and the back of the board so that hooks and other hanging accessories can easily slot into the pegboard holes. To create this gap, use furring strips, which are 1" x 2" pieces of wood that mount onto the back of the board and the wall studs. Measure out enough furring strips to fit on every wall stud that the pegboard falls over – or at a minimum, ensure there is one every 16".
The larger the pegboard, the more strips you will need so make sure your furring strips match the length of the pegboard. For maximum support, mount the furring strips vertically to the studs using your drill or screwdriver. Secure the top and bottom of each furring strip with 3/4" wood screws or 2 1/2" drywall screws. If you are using more than one pegboard, make sure to cut them in such a way that the seams fall directly over the center of a furring strip.
Note: If your pegboard comes with pegboard spacers, you can use these instead. And if you are installing a pegboard directly onto the exposed wall studs, the gaps between the studs will give you the room needed for the hooks, so you don't need to worry about furring strips.
Step 7: Hang the Pegboard
Now you are ready to mount the pegboard. Hold the pegboard in place (you may need assistance here) and use a level to ensure it is straight and aligned with all four sides of your outline. Use 2" washer head screws to drill holes through the pegboard and into the furring strips at all four corners, starting with the top corners. If you are not using the wall studs, make sure to use drywall anchors for a solid mount. Once you install it, pull gently on the corners to test that it is secure and tighten if needed.
Step 8: Attach the Hooks
Once you've installed your pegboard, you can attach and hang your pegboard hooks and accessories as you wish. There are many different options to choose from, so you can pick what works best for you. The beauty of a pegboard is how easy it is to reconfigure your layout using the various holes. Although, if you use your pegboard for tools, you may choose to hang them in specific locations and use a marker to draw their outlines so you know exactly where they go.
Make sure to use shorter hooks for smaller and more lightweight items and longer, more heavy-duty hooks for heavier items. If you are hanging tools on the pegboard, remember that some require specialized hooks – so take that into account if necessary.
Tip!
Looking for some clever ways to use your pegboard? Read our guide 27 Functional & Stylish Pegboard Ideas to Try at Home for inspiration.
