How to Install a Wall Sconce
Update your lighting.

Wall sconces brighten up hallways, bedsides, and bathroom vanities while adding a stylish touch to any wall. Below is a step-by-step guide to help you easily install one or several in your home.
Important Safety Note:
If you don't have experience working with electrical systems, we highly recommend hiring a licensed electrician to complete the installation. This will ensure your safety and make the process stress-free.
How to Install a Wall Sconce
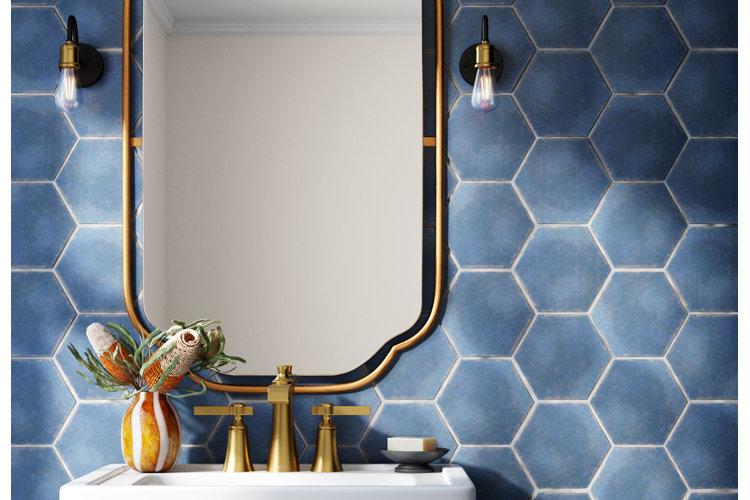
(Shop this image: blue bathroom wall tile, armed wall sconces, gold bathroom sink faucets, gold wall mirrors, and orange table vases)
Skill Level: Intermediate
Time Required: 1–3 Hours
What You'll Need:
Tools
- Voltage tester
- Stud finder
- Pencil/utility knife
- Tape measure
- Drywall saw
- Fish tape
- Wire cutter/stripper
- Long-nose pliers
- Drill and bits
- Screwdriver
- Level
Materials
- Wall sconce
- Painter's tape
- Wire nuts
- Mounting screws
- Anchor screws (only if installing on a spot without wall studs)
Step 1: Choose the Right Location
Since they are mounted on the wall and not the ceiling, wall sconces need to be installed at the height that will maximize their functionality – something that changes per room and intended usage. For example, installing a wall sconce in the hallway will require a higher measurement than that of installing a wall sconce next to the bed. You will also need to take into consideration the product you choose, the size, and the lighting direction. Below are some suggested wall sconce heights as measured from the floor upward (you should adjust as needed).
Kitchen (Counter): These are usually installed between 55" and 60" above floor level, and they are often placed above the sink or counter. These sconces are typically installed in pairs with the barn light and spotlight style being the most popular choices for providing task lighting above prep spaces.
Bedroom (Bedside): Bedroom wall sconces should be installed between 48" and 60" off the ground or around shoulder height when you are seated in bed to offer the best reading light. Swing-arm and spotlight wall sconces are ideal since they provide more directional illumination.
Bathroom (Vanity): Vanity wall sconces should be installed between 60" and 65" above the floor or approximately at eye level. Corner and spotlight sconces are typically placed on either side of a mirror or vanity to reduce shadows.
Living Room (Accent): You ideally want to install living room wall sconces between 60" and 72" off the ground. They should be spaced around 5' to 7' apart for the most balanced distribution of light and to avoid dark spots. Corner wall sconces are popular for a focal point on either side of a bookcase or fireplace, while recessed sconces offer a less visible option.
Entryway: For entryway wall sconces, we recommend installing them between 66" and 72" above floor level. These sconces offer the first welcome into your home, so you want them to be bright and attractive. This is also a good place to use decorative armed wall sconces.
Stairs & Hallways: For the best results, install these wall sconces between 60" and 72" off the ground and about 8' to 10' apart. This helps to illuminate the path and provide consistent lighting throughout the area. Flush mount wall sconces are popular when you need to install several fixtures, while candle-style wall sconces create a dramatic effect.
Exterior: For outdoor wall sconces, we recommend installing them between 66" and 72" above the ground, typically at eye level. These sconces provide illumination in the dark, add charm to your home, and provide extra security. Barn wall lights are a common choice for exterior wall sconces as they provide downward directional light.
Tip!
Read Types of Wall Sconces and our Wall Sconces Buying Guide for more information about these lights before you make your decision.
Step 2: Turn Off the Electricity
Before you do anything else, shut off the power via the circuit breaker to cut off electricity to the room. This prevents you from getting electrocuted as you work. Also make sure to test the light switches and use a voltage tester to ensure the electricity is off before you begin.
Step 3: Understand Which Type of Wall Sconce You’re Installing
Wall sconces connect to your home’s electrical circuit in two main ways: either by plugging into a standard household outlet, or by being wired to a nearby light switch. Plug-in wall sconces have built-in electrical cords and require you to install them on the wall above an electrical outlet so you can plug them in to power them. This is a much more beginner-friendly installation method as you just have to mount the sconce to the wall. Hardwired wall sconces require you to run/connect wires between the sconce and a nearby light switch. This method requires more expertise and time, but yields seamless, built-in results. Jump to the appropriate installation section, below:
How to Install a Plug-In Wall Sconce
How to Hardwire a Wall Sconce to a Light Switch
How to Install a Plug-In Wall Sconce
Installing a wall sconce that plugs right into a standard electrical outlet? Follow these steps.
1. Measure & Mark the Installation Spot
After choosing a location with an electrical outlet and turning off the power, you can start mapping out your wall sconce placement. Start by measuring the length of the wall sconce's electrical cord. This will help you determine the maximum height where you can install the wall sconce and still reach the plug. Then, use your tape measure to measure upwards starting from the electrical outlet. Make sure not to exceed the length of the fixture's cord. Mark the desired installation spot on the wall with a pencil.
2. Find the Wall Studs
Next, take a stud finder and place it on the wall where you want to install your plug-in wall sconce. It will indicate where the wall studs (support beams behind the drywall) are located. If your proposed installation spot has studs, then you know you have a secure, weight-bearing structure to support the weight of the wall sconce. Skip to step four if this is the case.
If your installation spot doesn't have wall studs, then go to step three.
3. Drill Pilot Holes & Insert Anchor Screws if the Spot Doesn't Have Wall Studs
If the exact spot where you want to install the sconce doesn't have wall studs, don't worry! There's a simple fix to ensure the sconce mounts securely to the wall. Line up the mounting bracket on the installation spot and mark the screw holes. Then, using your drill, drill pilot holes on each spot. Insert a drywall anchor screw in each hole. These screws are designed to provide support and evenly distribute the weight of the fixture to limit stress on the drywall. Now continue on to the next step.
4. Install the Mounting Bracket & the Faceplate With the Wall Sconce
- For spots without wall studs, line up the mounting bracket with the pre-drilled holes that already have anchor screws inside. Then, drill the mounting screws into the openings of each anchor screw.
- For spots with wall studs, you just drill the mounting screws through the holes of the mounting bracket and right into the drywall.
- Attach the faceplate of the wall sconce to the mounting bracket. This usually includes securing the faceplate to the mounting bracket using provided screws.
- Place a level on the wall directly above the mounting bracket/faceplate to ensure it's vertically straight. You want each of the level's air bubbles to be in the center.
5. Add the Lightbulb & Light Shade (Unless Already Installed)
If the faceplate comes with the wall sconce light shade and lightbulb, you can skip this step. Otherwise add the lightbulb and shade cover at this time.
6. Turn the Power Back On
Turn the electricity back on via the circuit breaker.
7. Plug in & Test the Wall Sconce
Plug the wall sconce into the electrical outlet and turn it on using a wall-mounted light switch or a switch located on the wall sconce. Now admire your hard work!
Tip!
Want the ease of installation of a plug-in wall sconce, minus the cord? Opt for battery-operated wall sconces. They don't even need to be located near an outlet. Some even adhere to the wall, meaning there's no need for drilling or finding wall studs. This is a perfect renter-friendly lighting option.
After deciding on an installation spot and cutting the power, here's how to install a wall sconce by wiring it to a light switch.
1. Prep the Spot for Installation
Unless you or an electrician have already wired power to a spot on the wall (this should be an electrical box recessed in the wall with wires sticking out), then you'll need to place your sconce above an existing outlet. This will allow you to use that outlet's electrical supply to power your light switch and the light itself.
- Once you determine where you want to mount the sconce, use your stud finder to locate the two vertical studs between which you will place the light (studs are typically 14.5" to 16" apart).
- Make sure the outlet resides between these same studs and mark the studs with painter’s tape.
- Use the tape to mark the intended location of the wall switch (typically 48" high). The electrical box will need to be attached to the stud, so the intended location will need to be against one of these studs.
2. Cut Holes for the Light & Switch Boxes
For the light switch and sconce boxes, you can use a pencil or utility knife to trace the outlines on the wall and use a drywall saw to cut the holes. Remove the drywall cutouts once done. Some round electrical boxes come with paper templates to use as a guide to outline the hole on the drywall.
3. Prepare the Existing Outlet
- Remove the faceplate from the outlet.
- Use your voltage detector to again ensure there is no power running to the outlet.
- Once sure, remove the screws holding the outlet to the outlet box, but take care to not disconnect the wires.
- Using a screwdriver, remove the outlet box from its place inside the wall.
- Measure out enough 14/2 wire to reach from the switch box hole to the hole left by the existing outlet box with an extra 8" to 10" protruding from each end.
- Run the wire between these points. Insert the 14/2 wire into the light box.
4. Connect Light Box & Switch Box Wires
Manually fish 14/2 wire from the light box hole to the switch box hole. Use the pliers to cut the wire leaving about 8" to 10" of wire extending from each hole. It may not be necessary to use the fish tape on this short run of wire but it can help make the task easier. Pull the wire through and connect the switch and light box.
5. Mount the Light Box
Insert the 14/2 switch-to-light wire into the light box and place the box in the hole. Tighten the screws into the stud to secure the box in place.
6. Attach the Mounting Hardware
Use the wire cutter to strip the outer casing from the ends of the 14/2 wires. Attach the metal ring or mounting hardware to the light box, making sure to thread the wires through as you do so.
7. Connect the Sconce to the Wires
Twist the exposed ends of the 14/2 wires together to the sconce's wires to connect them. Use wire nuts to connect wires to cap them off. Make sure to match the colors – white to white, black to black, bare copper (ground) to bare copper.
8. Mount the Wall Sconce
Place the wall sconce over the light box and start securing the sconce onto the mounting hardware with the included fasteners. Take a step back to ensure the base is straight and make any adjustments if needed. Once level, completely tighten all the fasteners. Install a lightbulb of the correct wattage.
9. Mount the Switch Box
Insert the two 14/2 wires into the back of the switch box and place it in the wall opening. Tighten the screws to securely attach it to the stud.
10. Connect Light Switch to the Wires
Black wires: Attach (by twisting) the black wire (power source from the outlet) to one screw (or slot) of the light switch and the load black wire (heading toward the sconce) to the other screw (or slot).
White wires: Attach white wire to white wire and cap them off with a wire nut. This bypasses the switch and completes the circuit.
Copper (ground) wires: Attach the two bare copper wires and add a third copper wire (about 5" to 6" long). Twist the three wires and cap them off with a wire nut and attach the loose end to twist the wire around the green screw on the light switch.
After connecting each wire to the light switch, screw the switch to the box and attach the faceplate.
11. Tap Into the Outlet
Begin by again stripping the ends of the 14/2 wire coming from the light switch. Similarly to how you connected the light switch, attach the black wire to the brass screw (or the wire hole near the brass screw) and attach the white wire to the silver screw (or wire hold near the silver screw.
Again, secure the bare wire to the green screw. Return the outlet box to its position inside the wall and screw the outlet into the box. Reattach the faceplate.
12. Switch On the Light
Turn the power back on and test the sconce by flipping the switch. If the light turns on, you have installed your wall sconce correctly.
