How to Install a Kitchen Sink
Upgrade your kitchen with ease.

Whether you're replacing a kitchen sink or building your dream kitchen from scratch, this is one upgrade you can do on your own. Follow our step-by-step guide to learn how to install a kitchen sink with ease.
Before You Install
Here are some things to consider before taking on this DIY kitchen project.
Understand Kitchen Sink Installation Types

Since each type of sink is installed differently, it's important to know what type of kitchen sink you will have. Learn more about sink types with our helpful guide on How to Choose a Kitchen Sink.
Check Measurements
Measuring for your sink may be the most important part. Make sure you have space for your new sink before buying. To avoid measurement mishaps, consult our guides on How to Measure a Kitchen Sink and Buying a Kitchen Faucet? Here’s Exactly What to Measure.
Know the Parts of a Sink
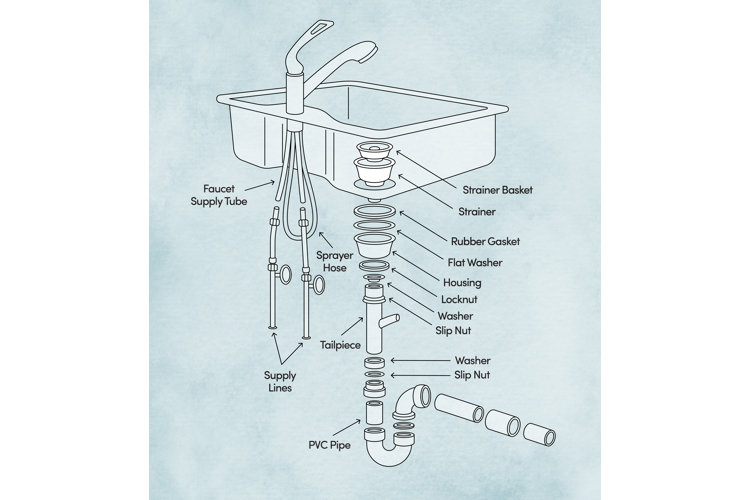
Use this illustration to understand specific terms that are mentioned in our instructions below. If parts of your plumbing, such as P-Traps or supply lines, are old or broken you will need to replace them. Use the illustration as a guide to ensure you connect everything correctly.
Install Faucets and Accessories
Before installing your sink, we recommend installing the faucet, faucet handles, soap dispenser, sprayer, and any other accessories. Once the sink is in place, you won't have as much room to work and these will be harder to install. However, please note that if you are putting in a new drop-in sink, the faucet lines will need to be threaded through the sink's holes as well as the faucet holes in the countertop as you are putting the sink into place.
Installing an undermount sink can feel daunting, be sure to consult the manufacturer instructions that pertain to your specific model. Follow these step-by-step instructions to install an undermount sink.
What You'll Need
- Damp cloth
- Silicone caulk
- Utility knife
- Putty knife
- Bucket
- Adjustable wrench
- Pliers
- Screwdriver
- Wood clamp
- 2 pieces of wood
- New sink
- Manufacturer's instructions
- A friend to help lift the sink
Step 1: Check Your Plumbing
Before you begin the installation process, check the quality of your supply pipes and drainpipes. If they are rusted, you will need new ones.
Step 2: Turn Off & Disconnect Water Supply
Cut your water supply using the shutoff valves underneath the sink. To bleed water pressure off the lines, open your sink faucet and let the water run until it turns to a slow drip. Use an adjustable wrench to disconnect the water supply tubes under the sink, keeping a bucket on hand to catch any excess water. If you have a garbage disposal, unplug it, and then locate the circuit breaker and turn off the power.
Step 3: Remove the P-Trap & Any Other Connections
Use pliers to loosen the nut attaching the P-Trap (the U-shaped part of the drainpipe) to your sink. Pull the P-Trap off, again using a bucket to catch any excess water. If you have a dishwasher, disconnect the drain line using your pliers. If you have a garbage disposal, consult the manufacturer's instructions for removal.
Step 4: Remove the Sink
Use a utility knife to remove the sealant or caulk where your sink meets your countertop. Unscrew the clips under the countertop that are holding your sink in place. Have a friend help hold the sink in place while you do this, so it doesn't fall on you. Carefully remove your sink from the countertop and cut away any remaining caulk.
Step 5: Install New Sink
Attach the mounting clips to your new sink according to the manufacturer's instructions. Apply a bead of silicone caulk along the rim of the new sink. Move your new sink into the cabinet and raise it into place. Wipe away any excess silicone with a damp cloth.
To keep your sink stable while the caulk dries and while you install the mounting clips, we recommend using either a wood clamp or wood wedge to keep the sink in place. If you are using a wood clamp, lay a piece of wood horizontally across your sink. To avoid scratching your countertops, lay a towel under the wood. Then, place one end of a wood clamp through the drain hole. Place another piece of wood between the bottom of the sink and the clamp. Tighten the clamp.
Once the clamp or wedge is in place, attach the mounting brackets and clips to the underside of your sink. This may require caulk or a drill.
Tip!
If you don’t have a wood clamp, you can also use a piece of wood (make sure it is the right length!) that can be wedged between the bottom of the sink and the floor of the vanity to act as a brace. Keep the wood clamp or wedge in place for 24 hours while it dries.
Step 6: Install Drain and Accessories
Once the wood clamp or wood wedge has been in place for 24 hours, you can remove it and attach the drain. Apply a bead of caulk to the underside of the drain to create a watertight seal. Underneath the sink, tighten the gasket and flange. Remove any excess caulk. If you will be using a garbage disposal, install the mounting bracket under the sink.
Step 7: Connect the Plumbing
Reattach the P-Trap and connect water supply lines to the faucet lines. Reinstall the dishwasher drain if you have one, and if you have a garbage disposal, follow the manufacturer's instructions for installation.
Step 8: Test It Out
Turn on the water supply and run the water. Check for any signs of leaks and adjust accordingly. Then turn on the power at the circuit breaker for the garbage disposal.
How to Install a Drop-In Sink
Drop-in sinks are generally the easiest to install since the counter itself provides more support. Follow these instructions to install this type of sink.
What You'll Need
- Damp cloth
- Caulk
- Utility knife
- Putty knife
- Adjustable wrench
- Pliers
- Screwdriver
- Tile cutter
- New sink
- Manufacturer's instructions
- Bucket
- A friend to help lift the sink *
Step 1: Check Your Plumbing
Check the quality of your supply pipes and drainpipes before beginning the installation. If they are leaking or rusted, you’ll need new ones.
Step 2: Turn Off & Disconnect Water Supply
Shut off the valves underneath the sink to cut the water supply. Open your sink faucet and let the water run into your bucket until it turns to a slow drip to bleed water pressure off the lines. Use an adjustable wrench to disconnect the water supply tubes under the sink, keeping a bucket on hand to catch any excess water. If you have a garbage disposal, unplug it, and then locate the circuit breaker and turn off the power.
Step 3: Remove the P-Trap & Any Other Connections
Use pliers to loosen the nut attaching the P-Trap (the U-shaped part of the drainpipe) to your sink. Pull the P-Trap off, again using a bucket to catch any excess water. If you have a dishwasher, disconnect the drain line using your pliers. If you have a garbage disposal, consult the manufacturer's instructions for removal.
Step 4: Remove Sink Supports
Check for any clips or bolts fastening your sink to the countertop and remove them with a screwdriver.
Step 5: Remove the Sink
Use a utility knife to remove the sealant or caulk around the rim of your sink, then carefully remove your sink from your countertop. Clear any remaining screws or nails, and cut away any remaining caulk.
Step 6: Double-Check That It Fits
Lower your new sink into the hole in your countertop to ensure it will fit. If the hole is too small, flip the sink upside down and place it over the hole. Trace the edges of the sink. Subtract 1/2" from all four sides of the tracing and mark it with a pencil. This is the new countertop cutout size that should be used as it will ensure there is a lip for the drop-in sink to rest on. Use a tile cutter to make any necessary modifications.
Step 7: Install Sink Hardware
Place the clips onto the sink and turn them inward, toward the sink bowl. Feed your faucet and faucet supply lines through the openings in your new sink. Attach the drain. Apply a bead of caulk to the underside of the drain to create a watertight seal. Underneath the sink, tighten the gasket. Remove any excess caulk. If you will be using a garbage disposal, install the mounting bracket under the sink.
Step 8: Secure the Sink
Apply a small bead of caulk to the underside of the sink's lip. Lower the sink into place, taking care to align the drain and pipes. Press the sink down firmly and wipe away excess caulk from the countertop. Rotate and tighten any clips or bolts, fastening your sink to the countertop.
Step 9: Connect the Plumbing
Reattach the P-Trap and connect water supply lines to the faucet lines. Reinstall the dishwasher drain if you have one, and if you have a garbage disposal, follow the manufacturer's instructions for installation.
Step 10: Test It Out
Turn on the water supply and run the water. Check for any signs of leaks and adjust accordingly. Turn on the power at the circuit breaker for the garbage disposal.
How to Install a Farmhouse Sink
Since farmhouse sinks require cabinet support and a more intricate installation process, we recommend working with a professional to install this type of sink. However, depending on the style, you may feel comfortable following the manufacturer's instructions to install the sink yourself. Reference the manufacturer’s instructions before making a decision to DIY or hire a professional.
